
How to Recover Overwritten Files


Did you replace a file with one of the same name, save changes over an older document version, or delete a file before its storage space was reused? These situations may look similar, but they are not technically identical.
In Windows 11, replaced files do not always overwrite the same physical sectors. Some applications create a new file and replace the old entry, so the previous data may still exist elsewhere. If the actual sectors were overwritten, however, recovery software cannot restore those bytes.
Can You Recover an Overwritten File?
Yes, an overwritten file may sometimes be recoverable, but only if some form of the old data still exists. The main complication is that “overwritten” can describe several different situations. A file that Windows shows as replaced is not necessarily physically overwritten on the drive.
Your chances are much better if Windows, your application, OneDrive, or a backup contains an older version. Recovery software can also help if the previous file data still exists on the storage device. However, once new data physically replaces the sectors or blocks that held the old data, ordinary recovery software cannot restore those bytes.
Here’s how the most common scenarios compare:
| What Happened | What May Have Happened to the Old Data | Best Recovery Option | Recovery Chances |
| You edited a document and saved the changes | The application may have updated the file or created a replacement | Application Version History, OneDrive, File History | High if a previous version exists |
| You copied a new file over one with the same name | The old file entry may have been replaced without use of exactly the same sectors | Previous Versions, backup, recovery software | Medium to High if old data still exists |
| A deleted file’s clusters were later reused | Some or all of the original data may have been physically overwritten | Recovery software for surviving data | Low to Medium |
| Only part of the old file was physically overwritten | Some data may remain, but the file can be incomplete or corrupted | Recovery software | Low to Medium |
| All sectors that held the old file were physically overwritten | New data has replaced the previous bytes | Backup or version history | Effectively impossible with ordinary recovery software |
| The file was stored in OneDrive | Older cloud versions may exist independently of the local copy | OneDrive Version History | High if a retained version exists |
| A Word, Excel, or PowerPoint file has an earlier version | Office or OneDrive may have retained a previous copy | Office Version History or AutoRecover | High if a version exists |
| A file was replaced on an SSD | The result depends on how the application replaced it and what happened to the old blocks | Version history or backup first | Variable |
What Does “Overwritten” Actually Mean?
What “overwritten” means can vary depending on what happened to the original file, and that directly affects whether recovery is possible:
- A file-level replacement occurs when you save a new version or copy a file over another file with the same name. Windows may show only the new file afterward, but that does not prove that its contents occupy the exact sectors that held the old file. An application can instead create a new file, write the new data to another location, and remove the previous file entry.
- A physical overwrite is different. It occurs when new data is actually written to sectors or blocks that contained the old file. Once those bytes have been replaced, normal data recovery software cannot retrieve their previous contents.
- A partial overwrite means that only some of the old file’s clusters were reused. Recovery software may retrieve the portions that remain, but the resulting file can be incomplete or corrupted. The outcome depends on the file format and which parts survived.
- A deleted file that was later overwritten is a deleted-file recovery case followed by reuse of its freed storage. Recovery may still be possible if some of the original data remains, but any portions physically overwritten by new data cannot be recovered. *
How Does TRIM Affect Overwritten File Recovery?
TRIM, also called a delete notification or unmap, tells the storage device that specified clusters are no longer needed. Windows enables NTFS delete notifications by default unless an administrator disables them.
TRIM does not mean that Windows immediately writes zeros over the corresponding NAND cells. Instead, the SSD controller can reclaim those blocks later, after which their previous contents may no longer be accessible to recovery software.
This matters when the old file’s blocks become free. For example, an application may create a replacement file elsewhere and then delete the previous file. It does not mean that every normal file edit sends a TRIM command for the file’s previous contents.
How to Recover Overwritten Files on Windows 11
There is no single method that works for every overwritten file because the right approach depends on what happened to the previous copy. If its data still exists on the drive, recovery software may find it. If Windows, OneDrive, Microsoft Office, or a backup saved an earlier version, you can restore that copy instead.
We’ll cover five options for overwritten file recovery:
Method 1: Recover Overwritten Files Using Data Recovery Software (Disk Drill)
If an older copy of the file or some of its data still exists on the drive, data recovery software may be able to retrieve it. However, software cannot reconstruct bytes that new data has physically overwritten. Recoverability depends on what remains intact, including file-system metadata, the file structure and format, and the actual file contents.
For this method, we’ll use Disk Drill, one of the best data recovery tools we’ve tested. It performed well across different data loss scenarios in our tests and offers several features that are particularly useful when you need to search for an older copy of a replaced file. Here’s why we chose it:
- 🗃️ File-system recovery. Disk Drill can identify deleted file-system records if an older copy still exists as recoverable deleted data. When the associated metadata survives, the recovered file may retain its original name and path.
- 📑 Signature recovery. If the original metadata is gone, Disk Drill can search for recognizable file signatures and may find surviving file contents. These results typically appear under Reconstructed without the original filename or folder path. Signature recovery cannot recreate portions that were physically overwritten.
- 🖼️ File preview. You can preview many files before recovery, which helps you check whether a found copy appears intact and contains the data you need.
- 💽 Disk images. If the affected drive is unstable or contains particularly important data, Disk Drill can create a disk image first. The image preserves the source’s currently readable state so you can perform later recovery attempts without repeatedly scanning the original device. It cannot restore data that was already overwritten or discarded before you created the image.
- 🔒 Read-only scanning. Disk Drill uses non-destructive scanning methods that do not intentionally write recovered data or file-system changes to the source. Keep in mind that Windows and other applications may still write to a mounted drive.
Before you start, connect another physical storage device for the recovered files. If practical, install Disk Drill on an unaffected physical drive as well. This reduces additional writes to the drive that contains the data you want to recover.
- Download Disk Drill, install it on an unaffected physical drive where practical, and launch the application.
- Select the physical disk or partition where the older file was stored.
- (Optional) If the drive is unstable or has hardware problems, open Byte-to-byte backup section and create a disk image. Save the image to another physical drive, then scan the image instead of repeatedly reading the original device.
- For a healthy drive, click Search for lost data.
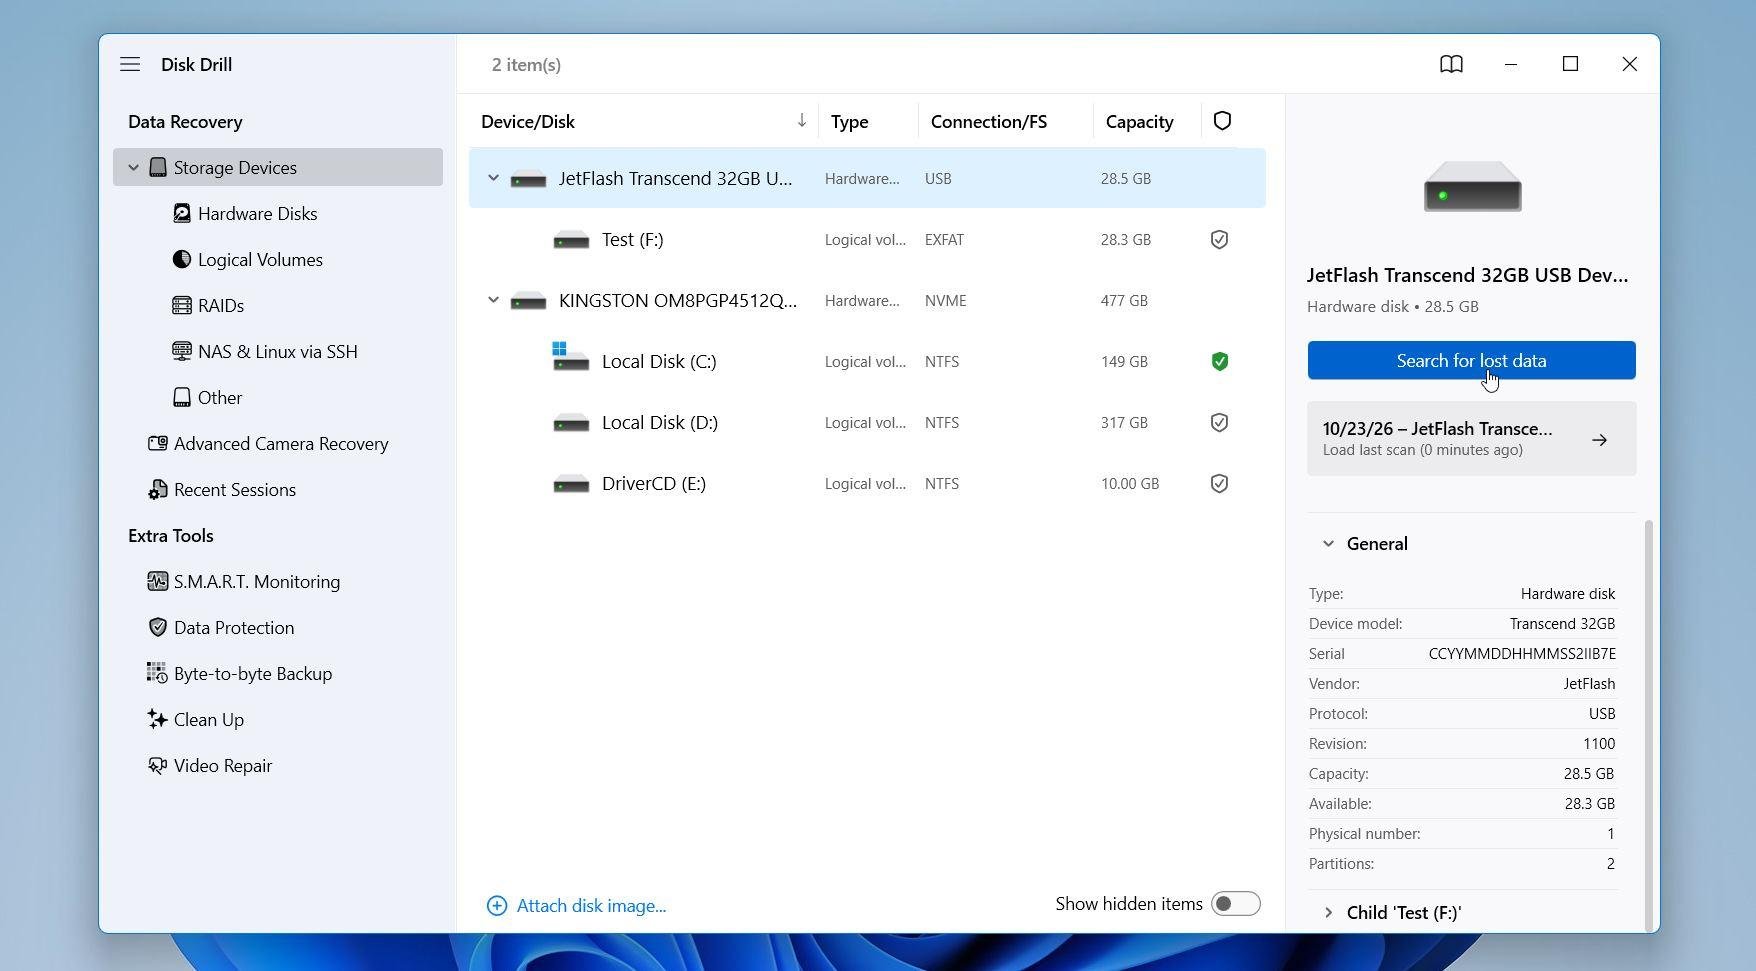
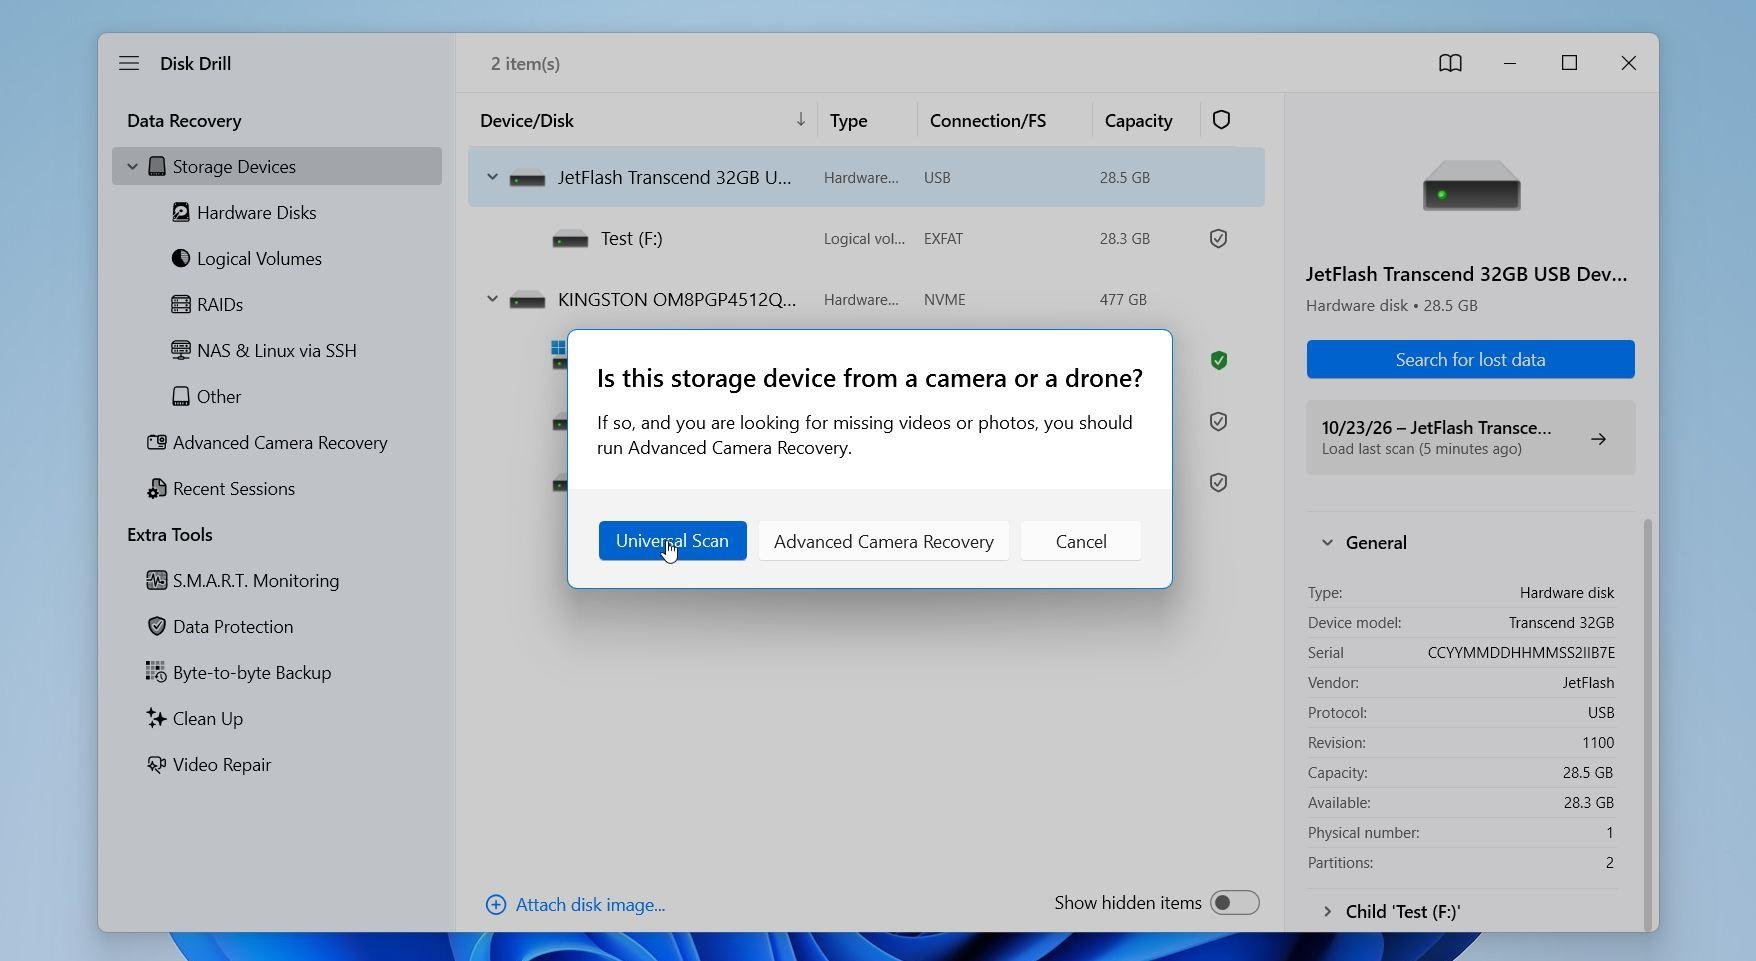
- Use Universal Scan if Disk Drill prompts to select the recovery mode.
- Once Disk Drill finds files, click Review found items.
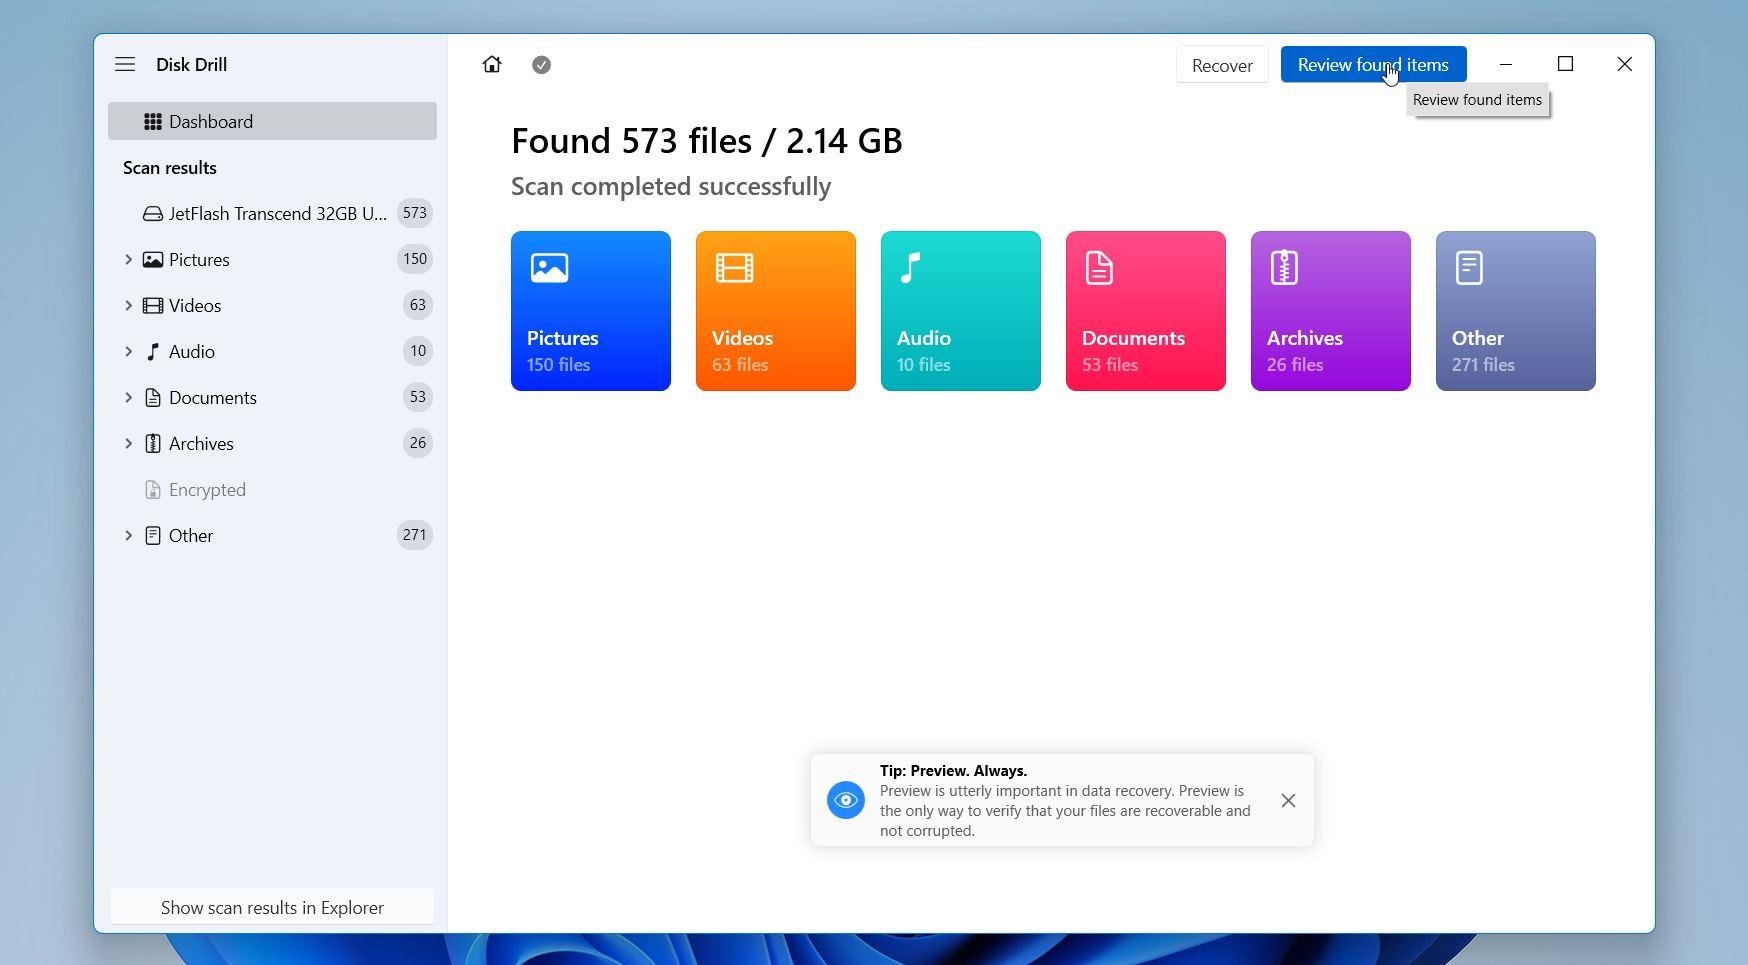
- Search for the original filename, the relevant file extension, and similarly named older copies. Check Deleted or Lost results for files whose original file-system metadata still survives. Also check Reconstructed for files Disk Drill identified by their signatures without the original filename or path.
- Preview likely candidates where possible to see whether they contain the data you need. Select the required file and click Recover.
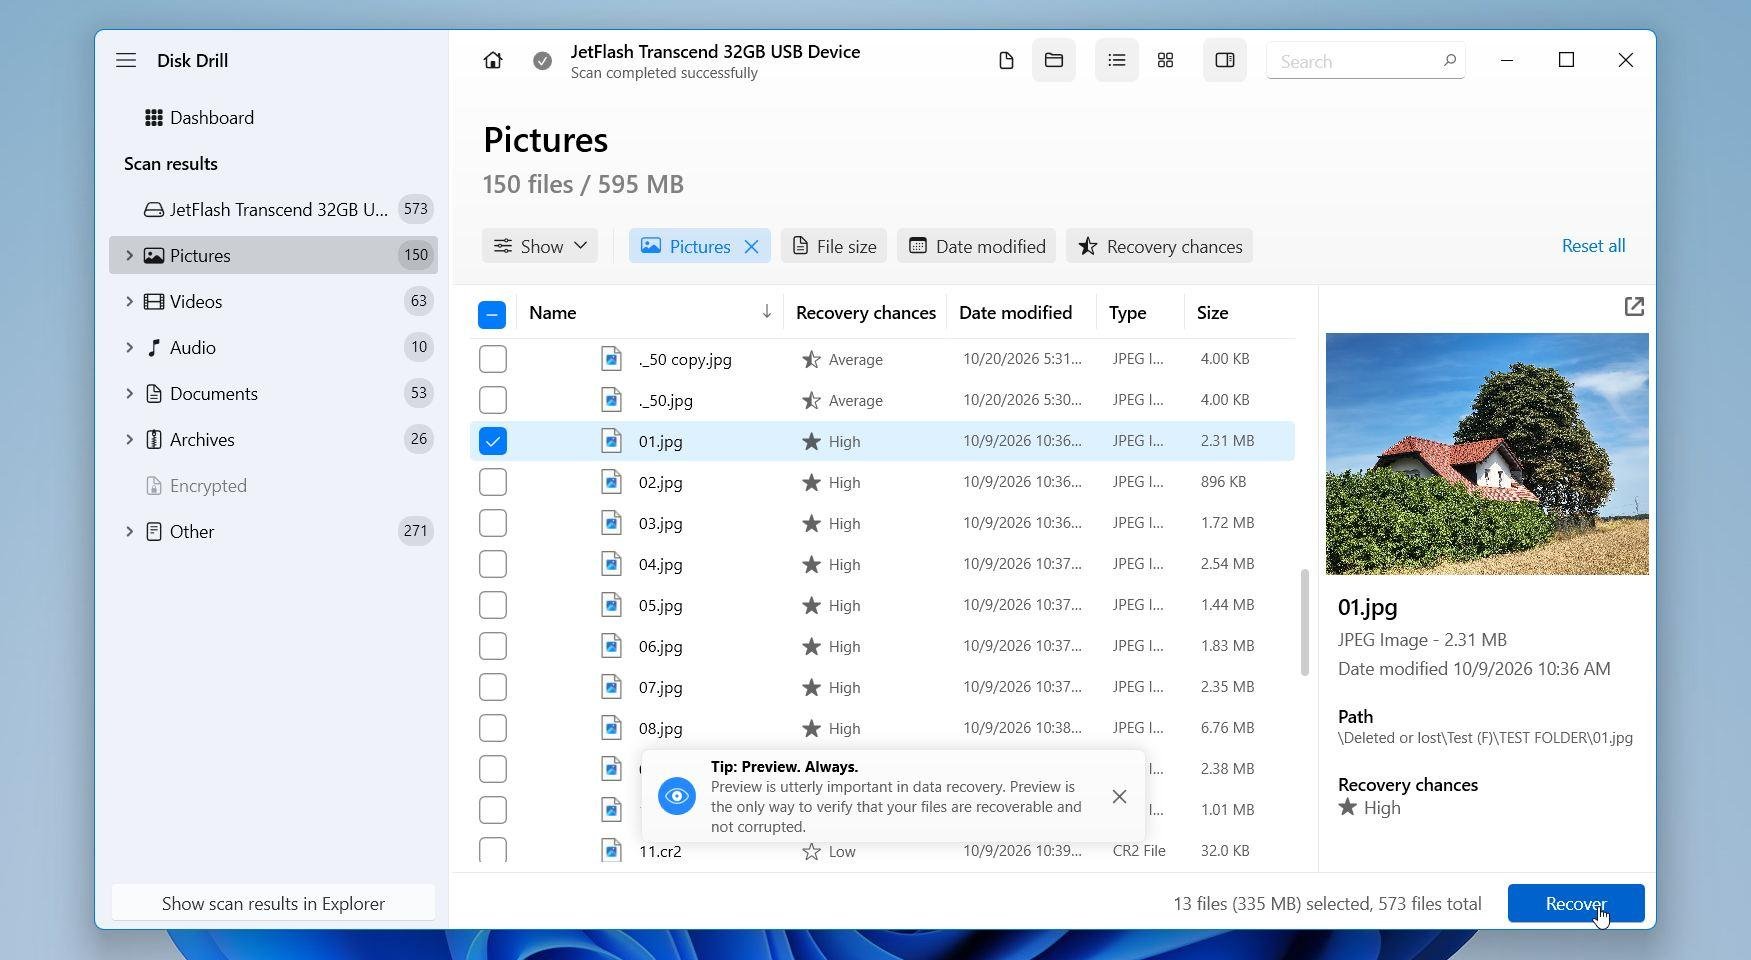
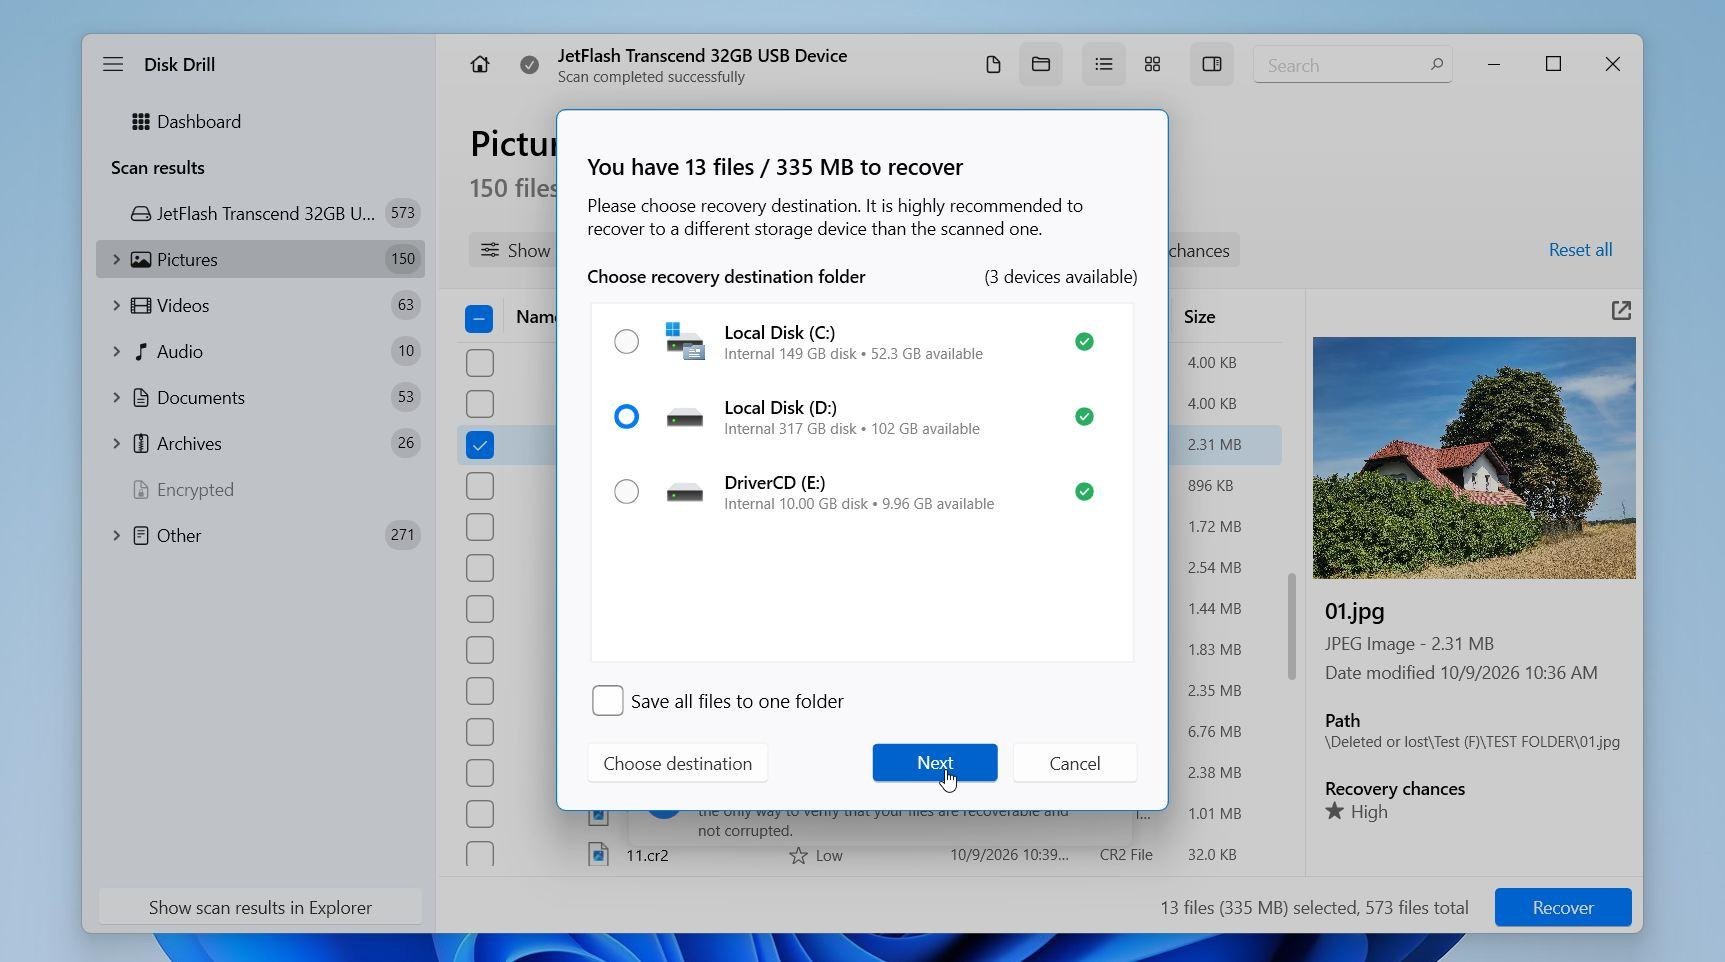
- Choose another physical drive as the recovery destination. Do not save the recovered file back to the affected drive, as this could overwrite other data that remains recoverable.

Method 2: Restore an Older File Using Previous Versions
The Previous Versions feature can restore an older copy only if Windows already has one available. On Windows 11, File History is the most relevant source of previous versions for personal files. If File History protected the file before it was overwritten, check for an older copy from before the replacement.
- Open File Explorer and go to the folder that contained the overwritten file.
- Right-click the file or folder, select Properties, and open the Previous Versions tab.
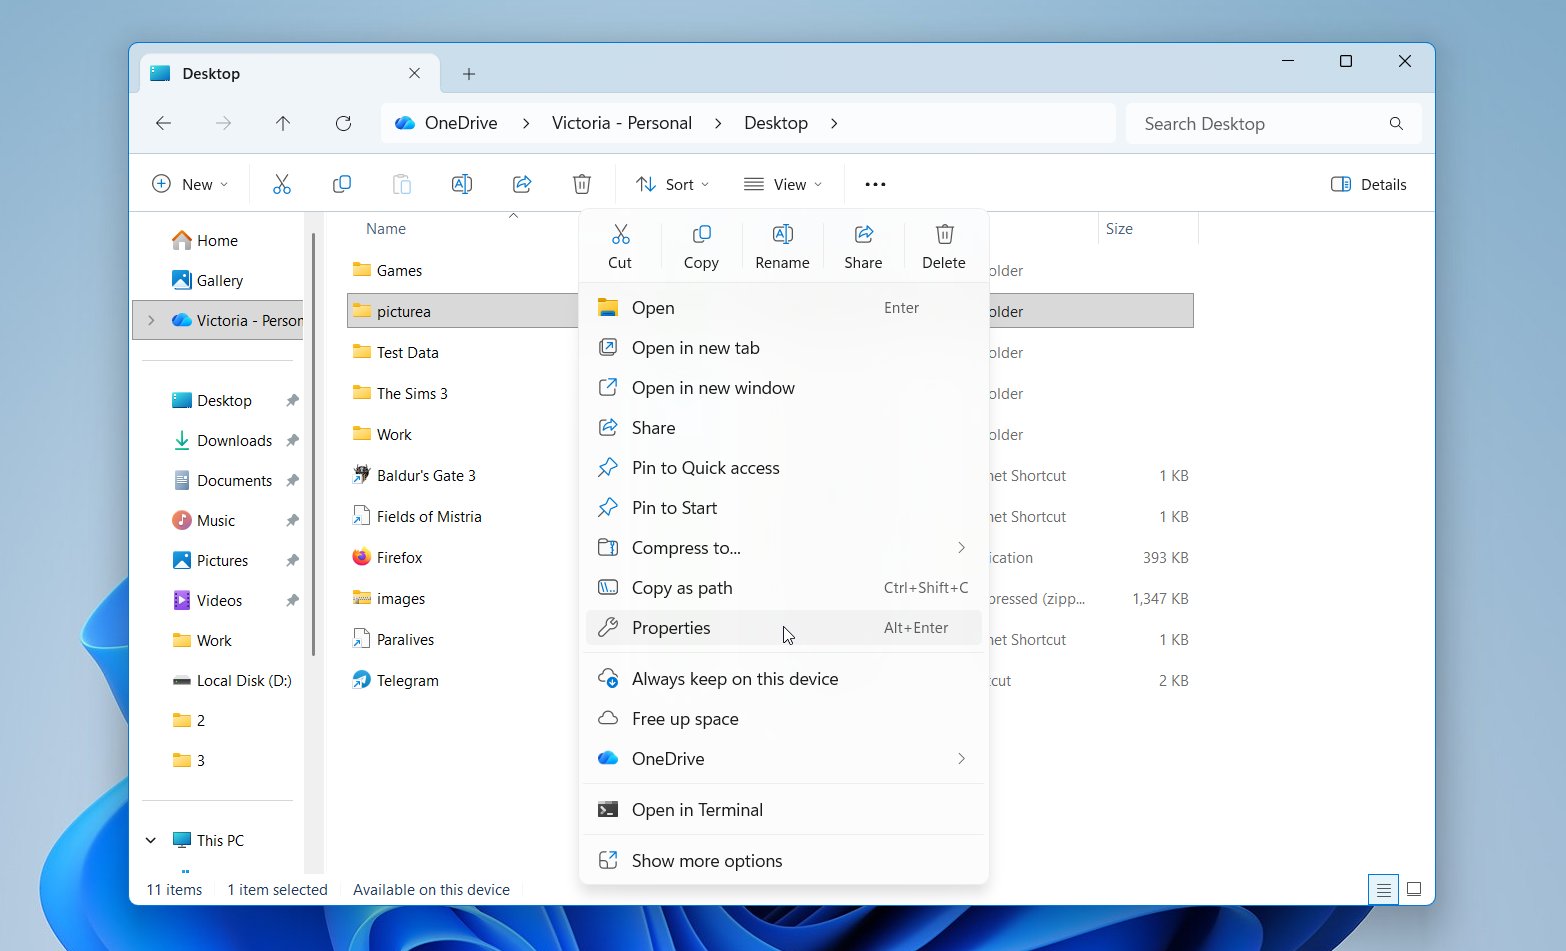
- Look for a version dated before the file was overwritten.
- Select it and click Open first to confirm that it contains the file you need.
- If available, choose Restore to… rather than Restore so you don’t immediately replace the current file.
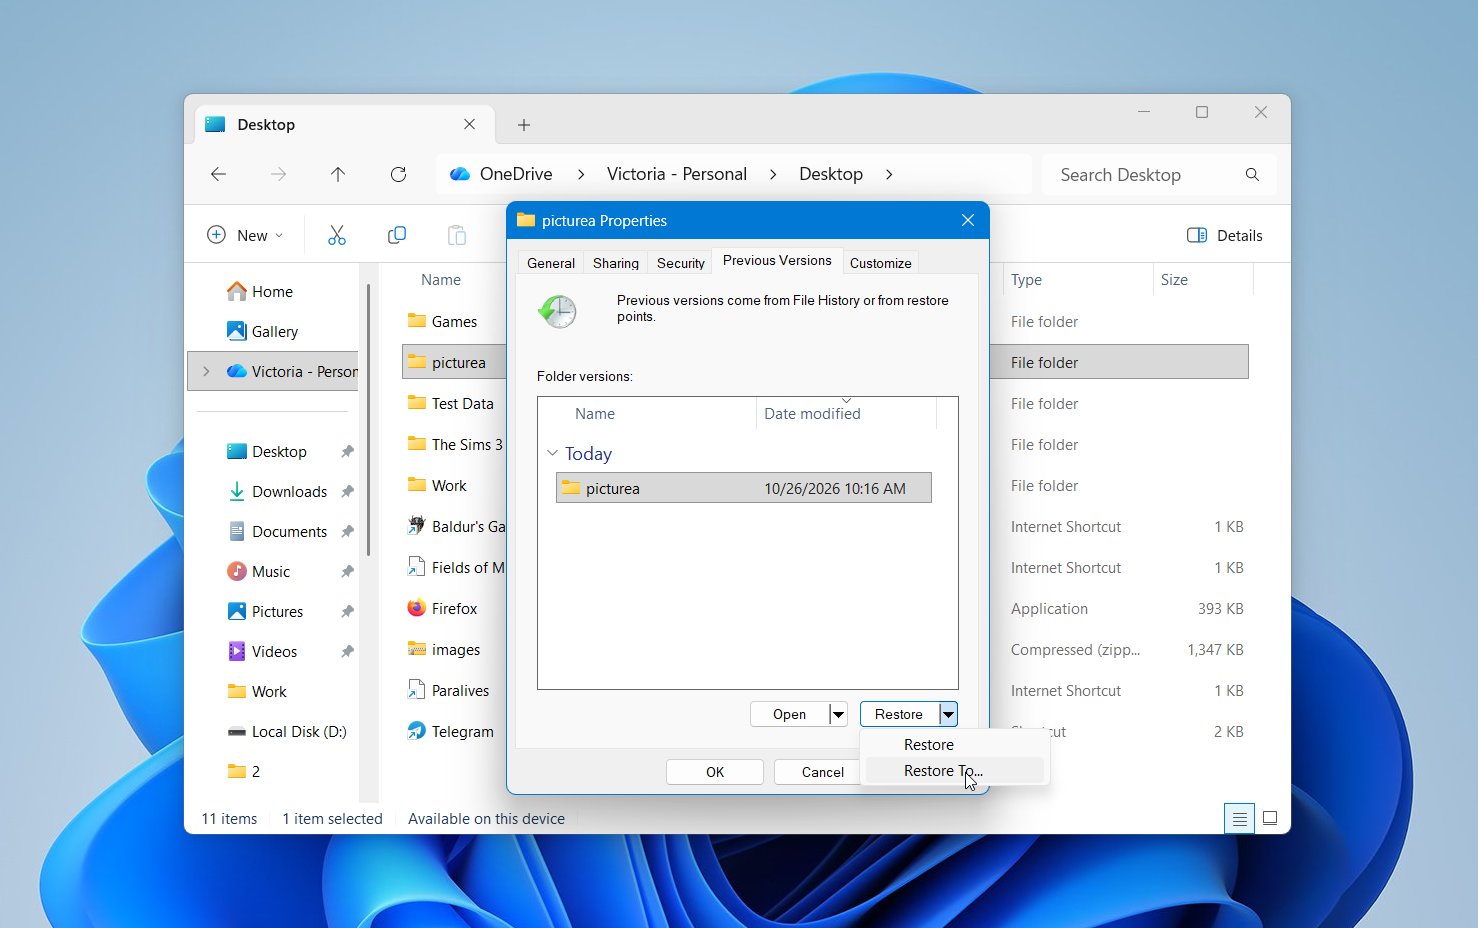
- Save or copy the older file to another location.
Method 3: Recover an Overwritten File From OneDrive Version History
If the overwritten file was stored in OneDrive, Version History may contain an older copy that exists independently of the current local file. This makes it one of the first options worth checking before you attempt data recovery.
- Open OneDrive on the web and sign in to your Microsoft account.
- Locate the overwritten file.
- Right-click the file and select Version history.
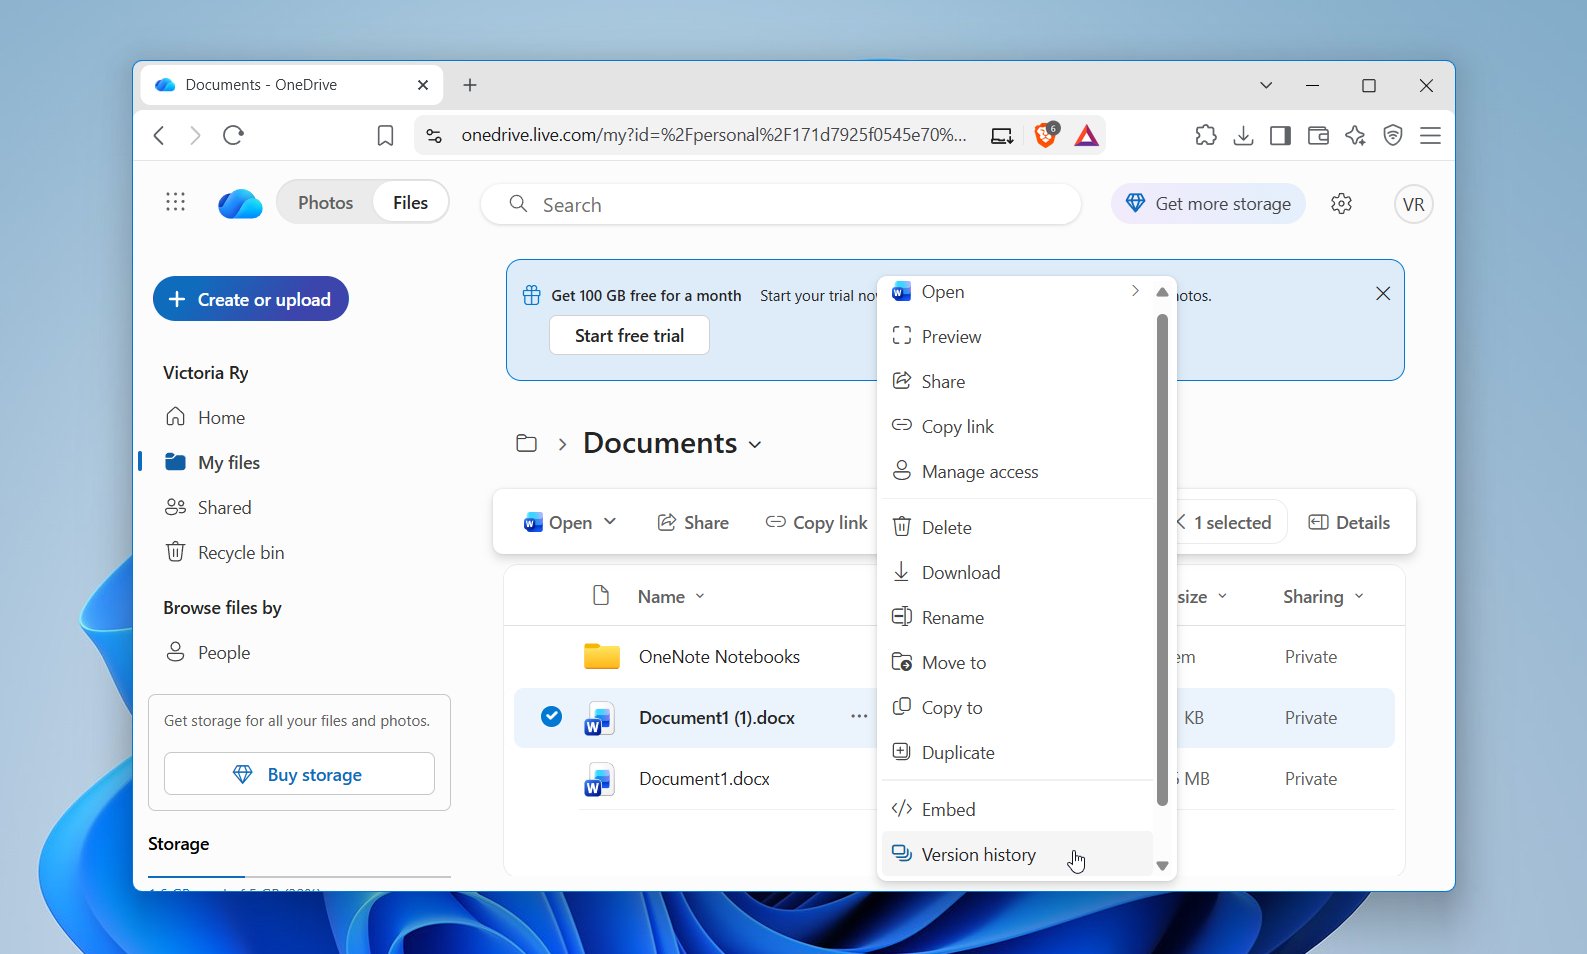
- Review the available versions and find one from before the unwanted replacement or edit.
- Open or download the older version first if you want to confirm its contents.
- Select Restore when you find the version you need.
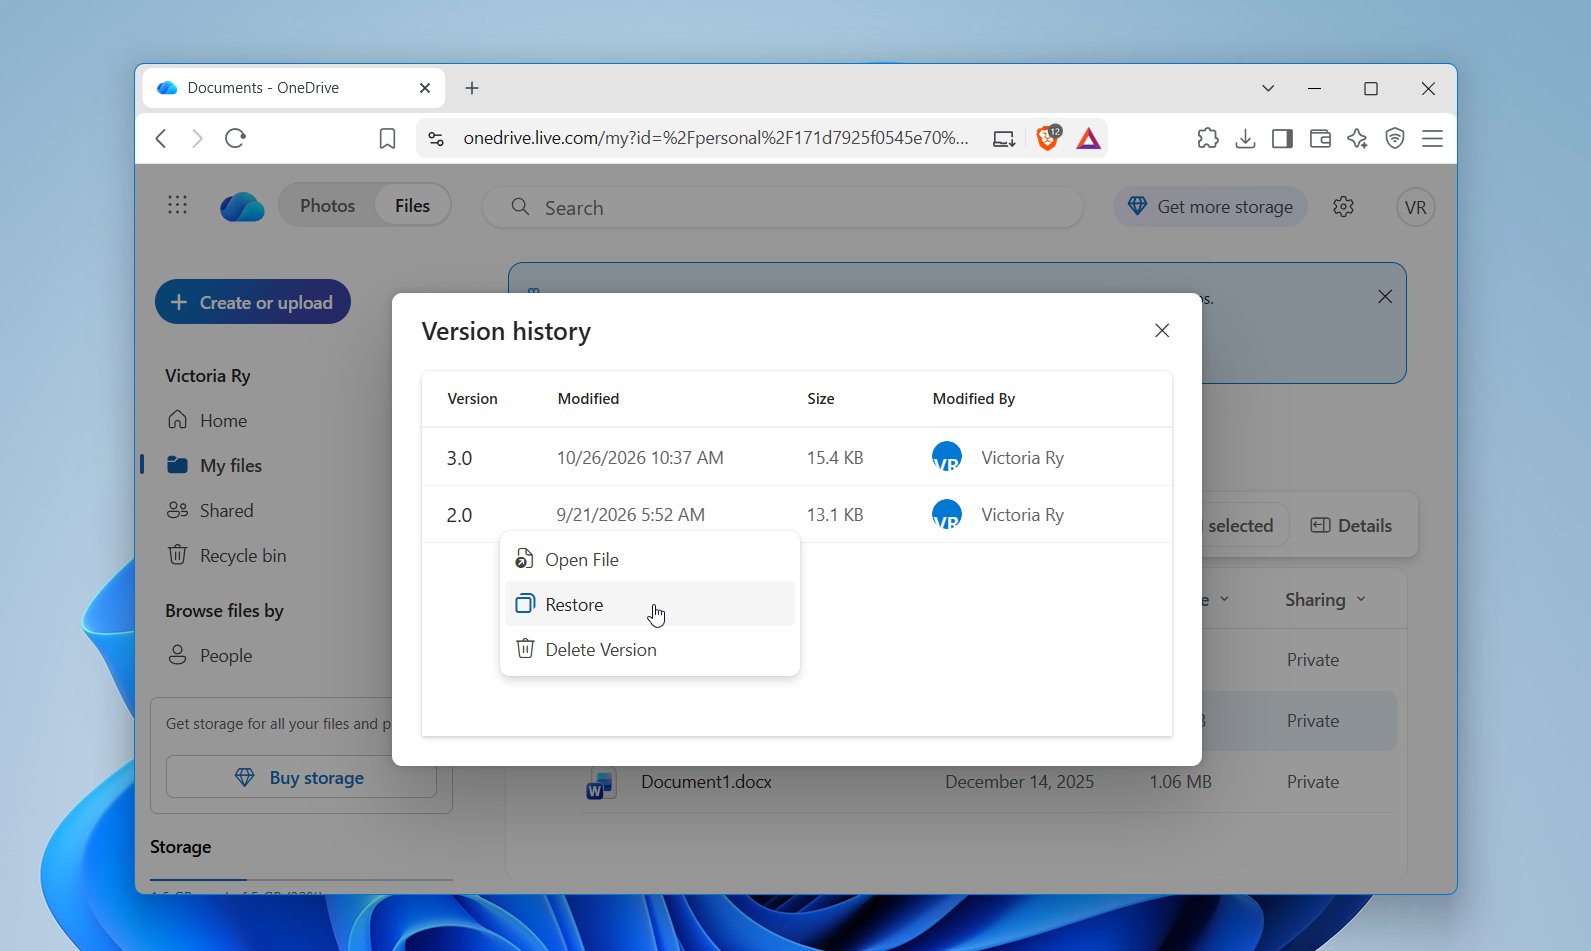
OneDrive will make the selected version current, while the version you replaced remains in Version History. If no older versions appear, OneDrive does not have the copy you need, so you will need to try another recovery method.
Method 4: Recover an Earlier Word, Excel, or PowerPoint Version
Microsoft Office may provide another way to recover an earlier version of a Word, Excel, or PowerPoint file. The available options depend on where the file was stored and whether Office saved an earlier version.
For a file stored in OneDrive or SharePoint:
- Open the file in Word, Excel, or PowerPoint.
- Go to File > Info > Version History.
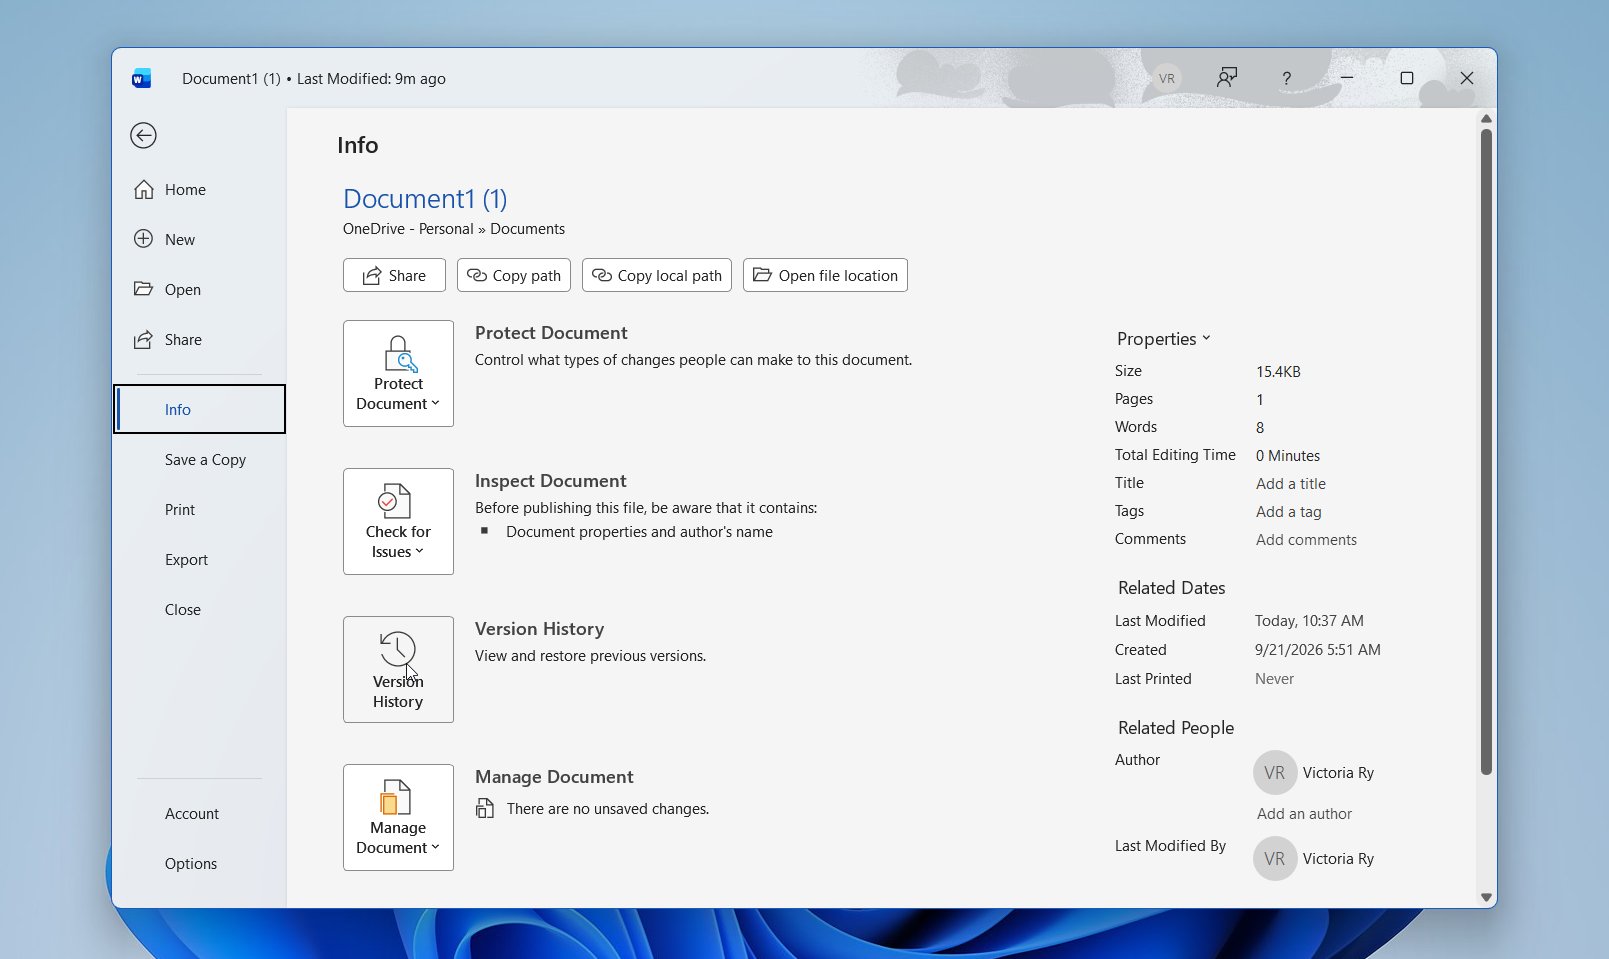
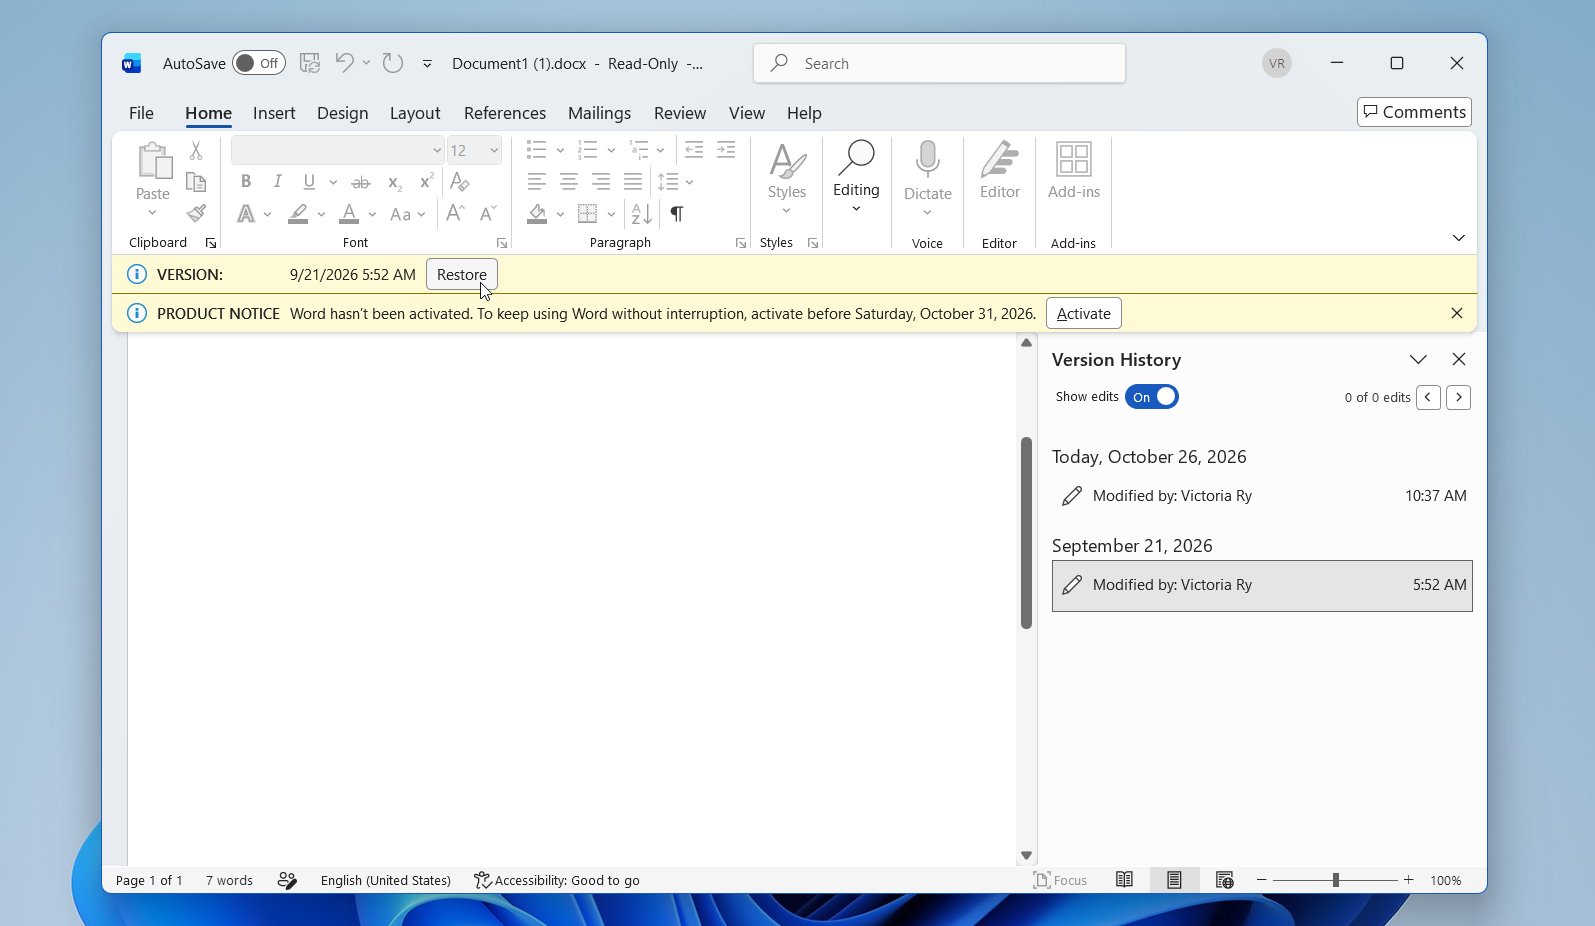
- Review the available versions and select one from before the unwanted changes.
- Open it first to confirm that it contains the content you need.
- Restore the older version or save it as a separate copy.
For a local Office file, you can also check for available AutoRecover copies:
- Open the file and go to File > Info.
- Look for Manage Document, Manage Workbook, or Manage Presentation.
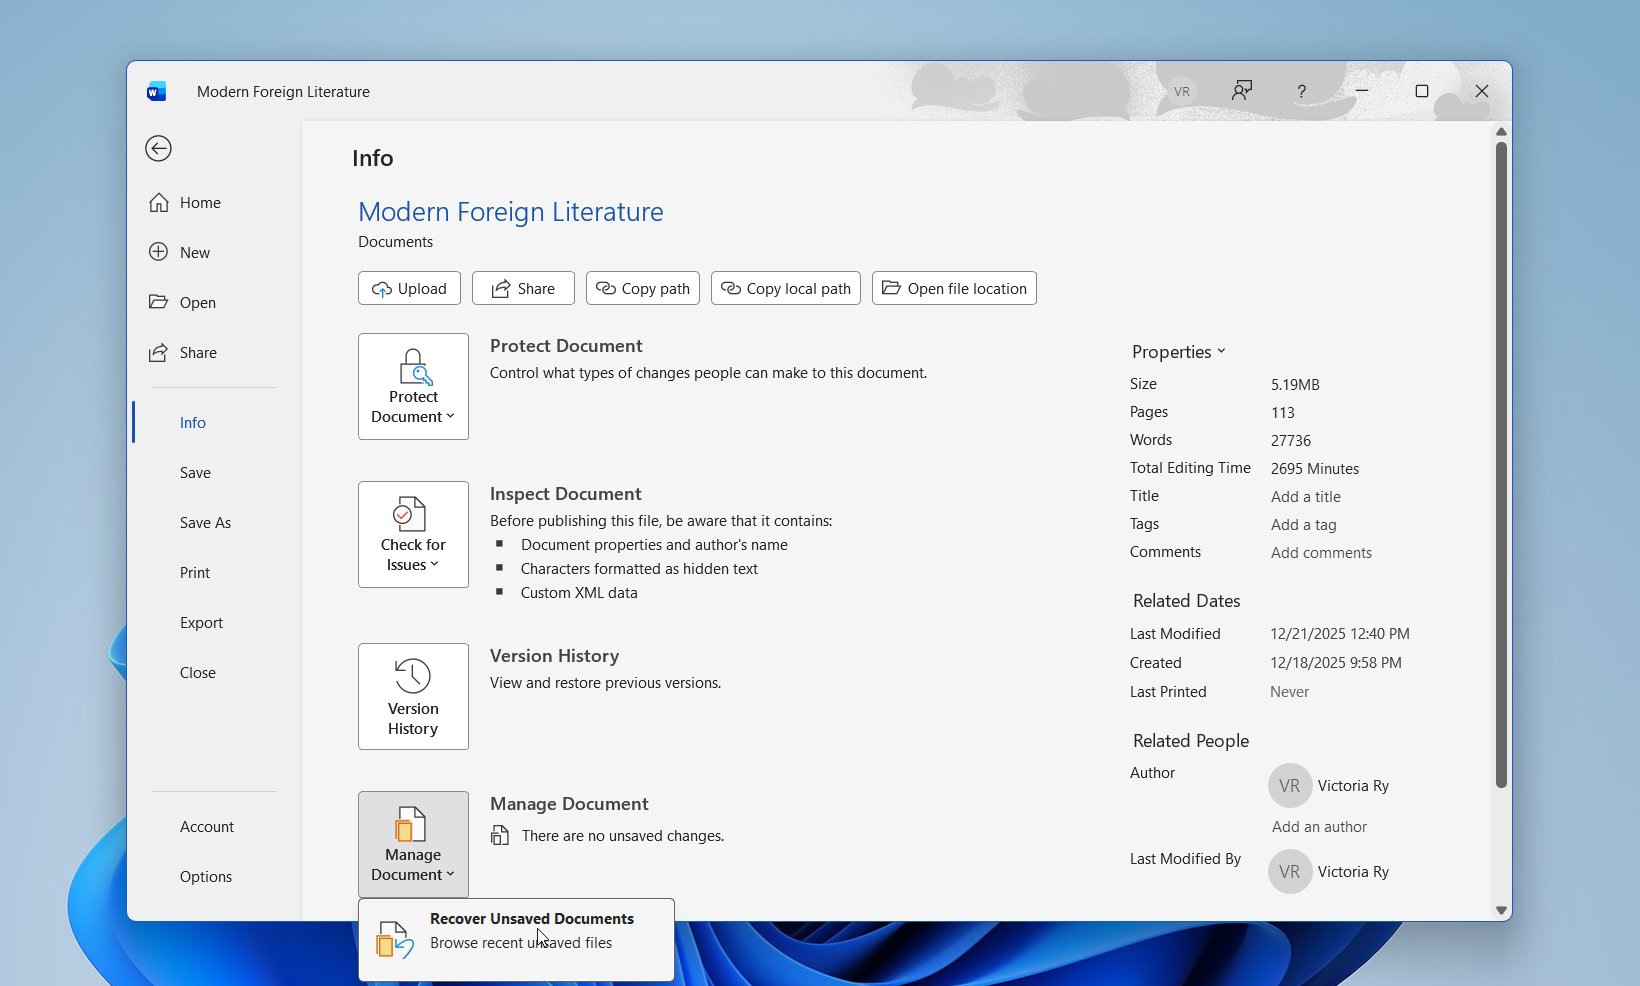
- Check whether an earlier or unsaved version is available.
- Open the version and review its contents.
- Use Save As to preserve it as a separate file.
Version History is most useful for files stored in OneDrive or SharePoint. AutoRecover can help in some cases, but it should not be treated as a complete version history or backup.
Method 5: Recover Files Using Backup and Restore
It’s worth checking to see if Backup and Restore is active and contains a working version of the file you wish to restore.
Follow these steps to restore a file using Backup and Restore:
- Open Start. Search for and open “Control Panel”.
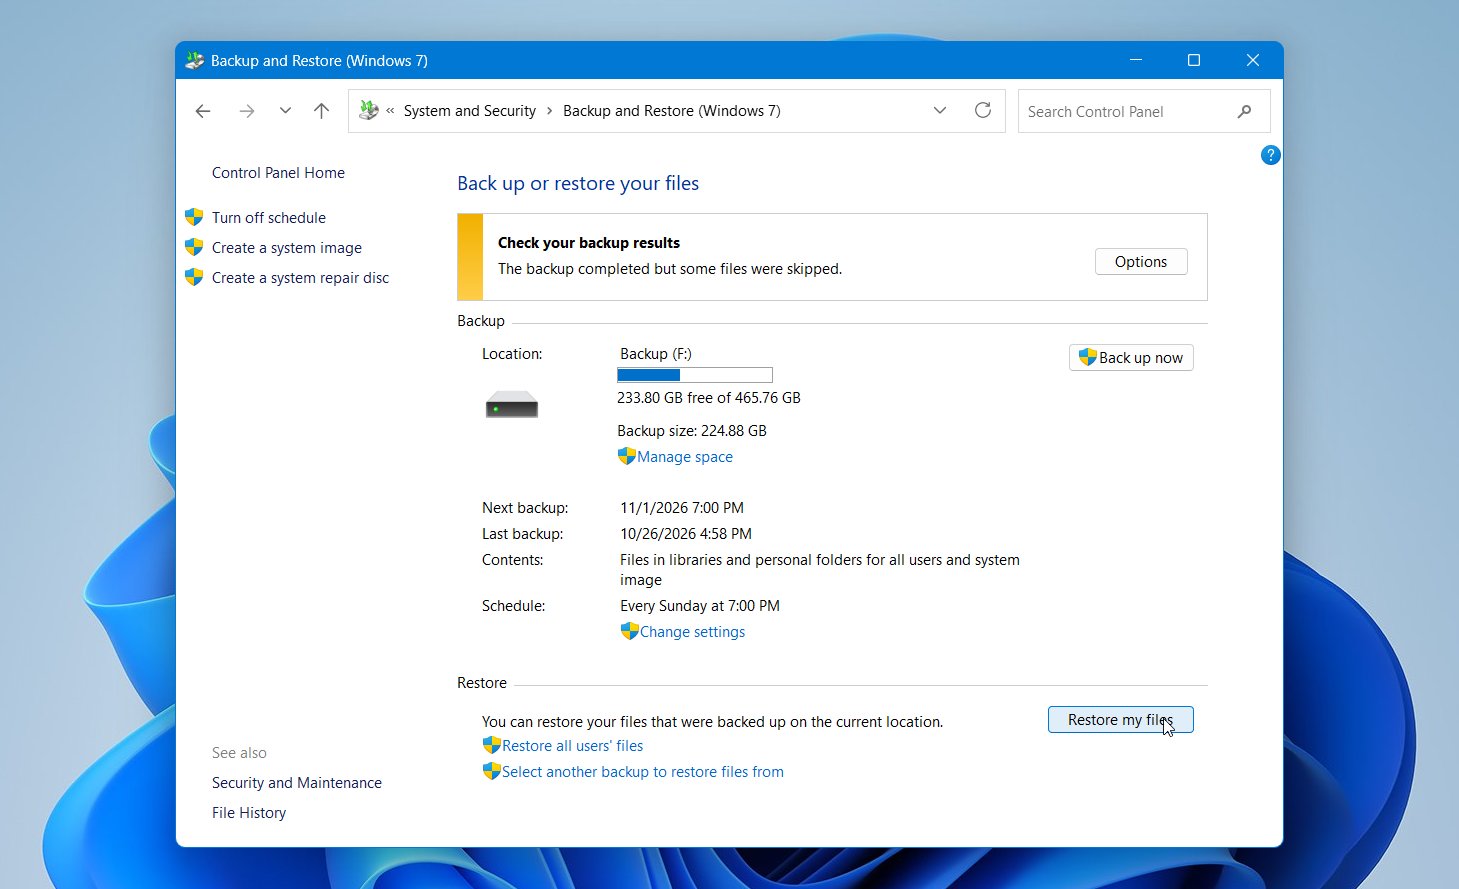
- Click Backup and Restore (Windows 7). You may need to switch your view mode to Small icons or Large icons if you do not see it.
- Click Restore my files.
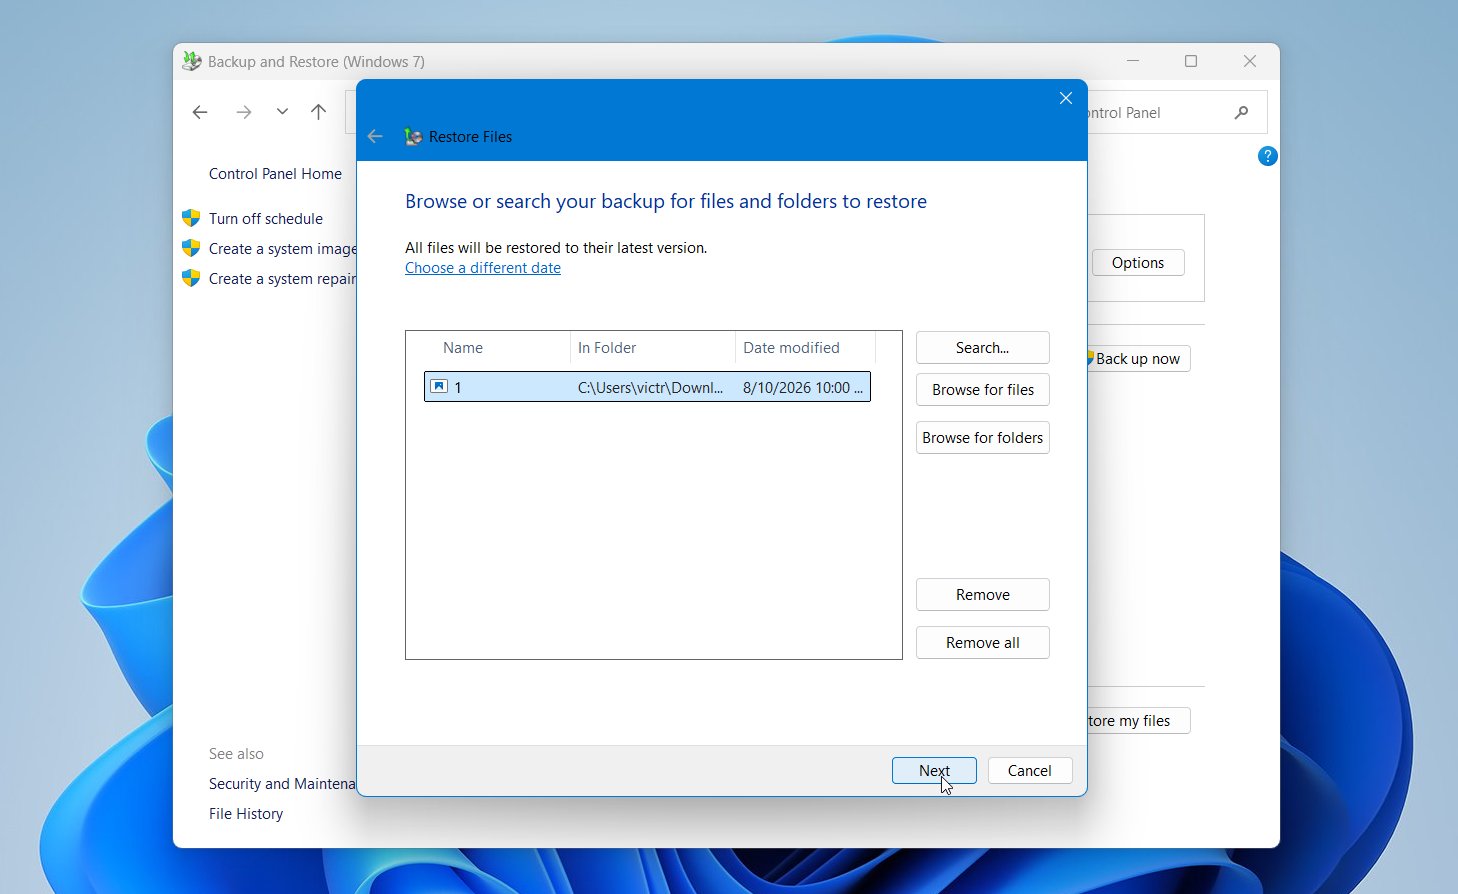
- Click Browse for files and select the files you wish to recover.
- Click Next.
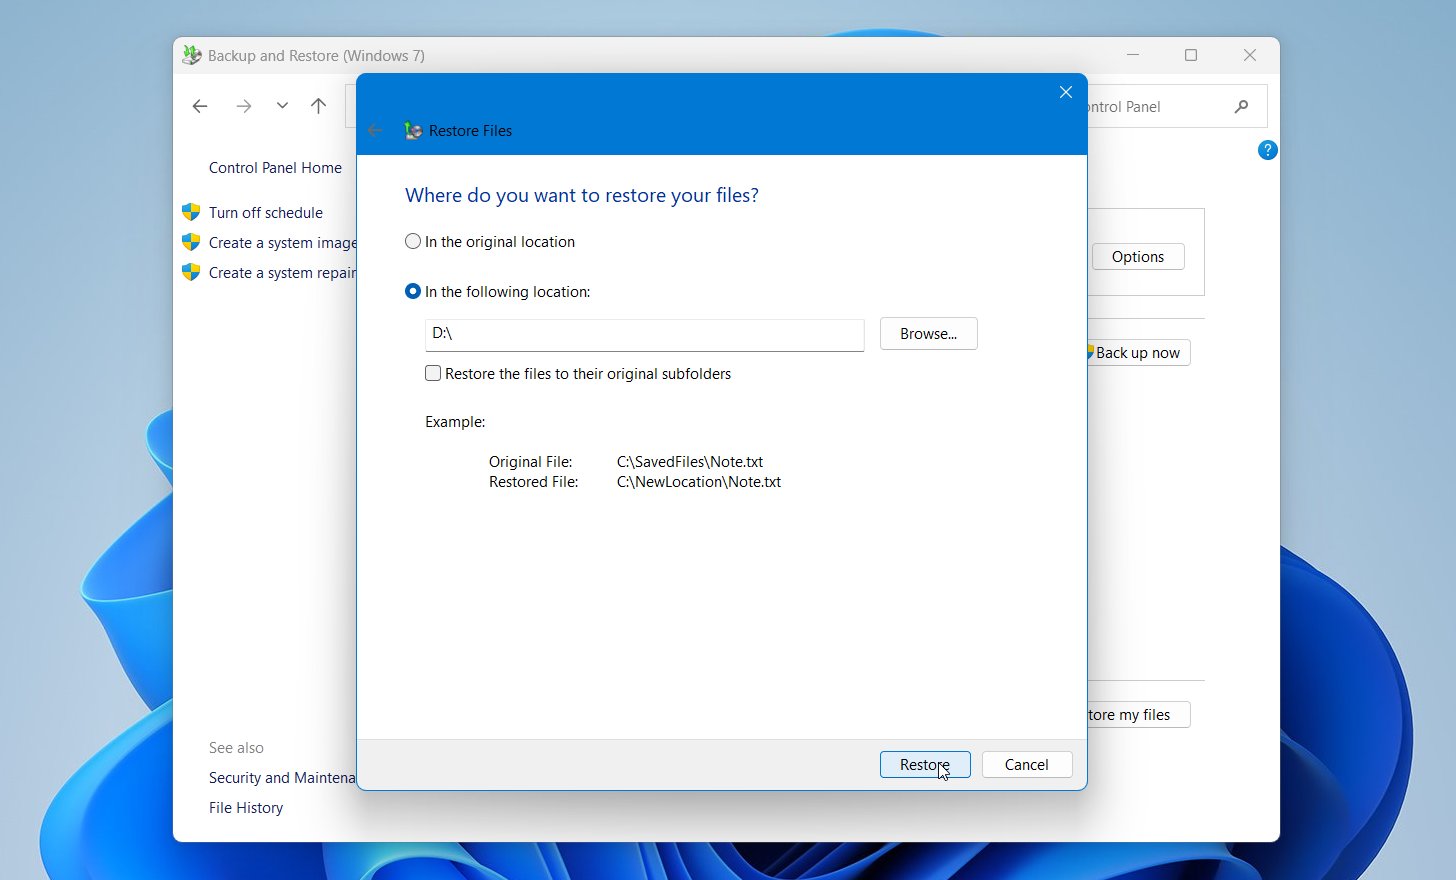
- Choose whether you want to restore the files to their original location or a new one. Then, click Restore.
How to Prevent Files From Being Overwritten
You cannot prevent every accidental replacement or unwanted edit, but you can keep older copies available so one mistake does not permanently remove the version you need.
Option 1: Enable File History for Important Local Files
File History periodically saves copies of files from supported Windows libraries to an external drive or network location. You can then restore an earlier version if you accidentally replace or modify a file.
To enable File History in Windows 11:
- Connect an external drive to your computer.
- Open Control Panel and select System and Security > File History.
- Click Select drive and choose the drive you want to use for File History.
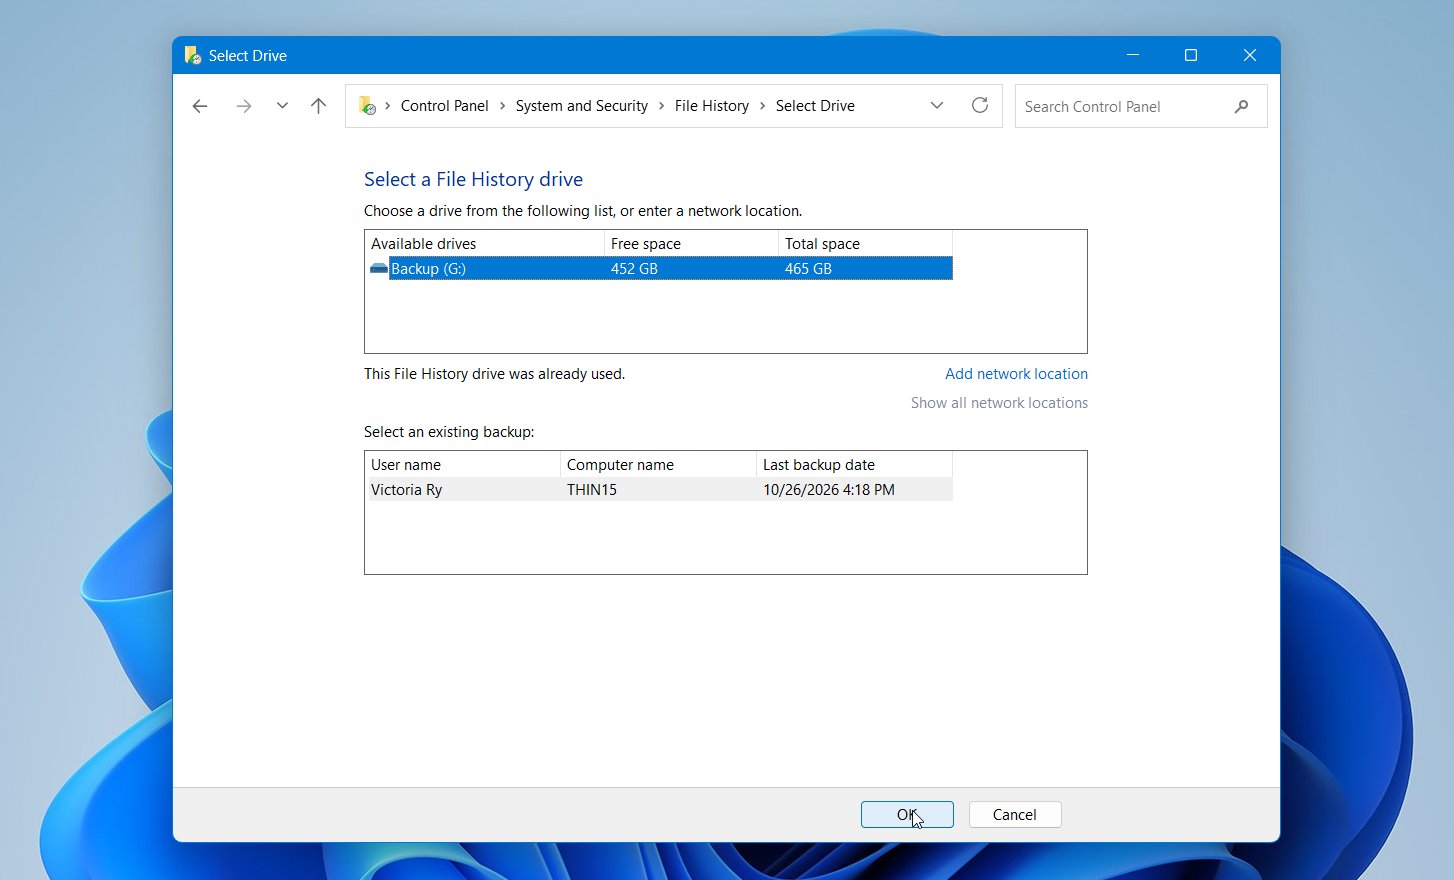
- Click Turn on.
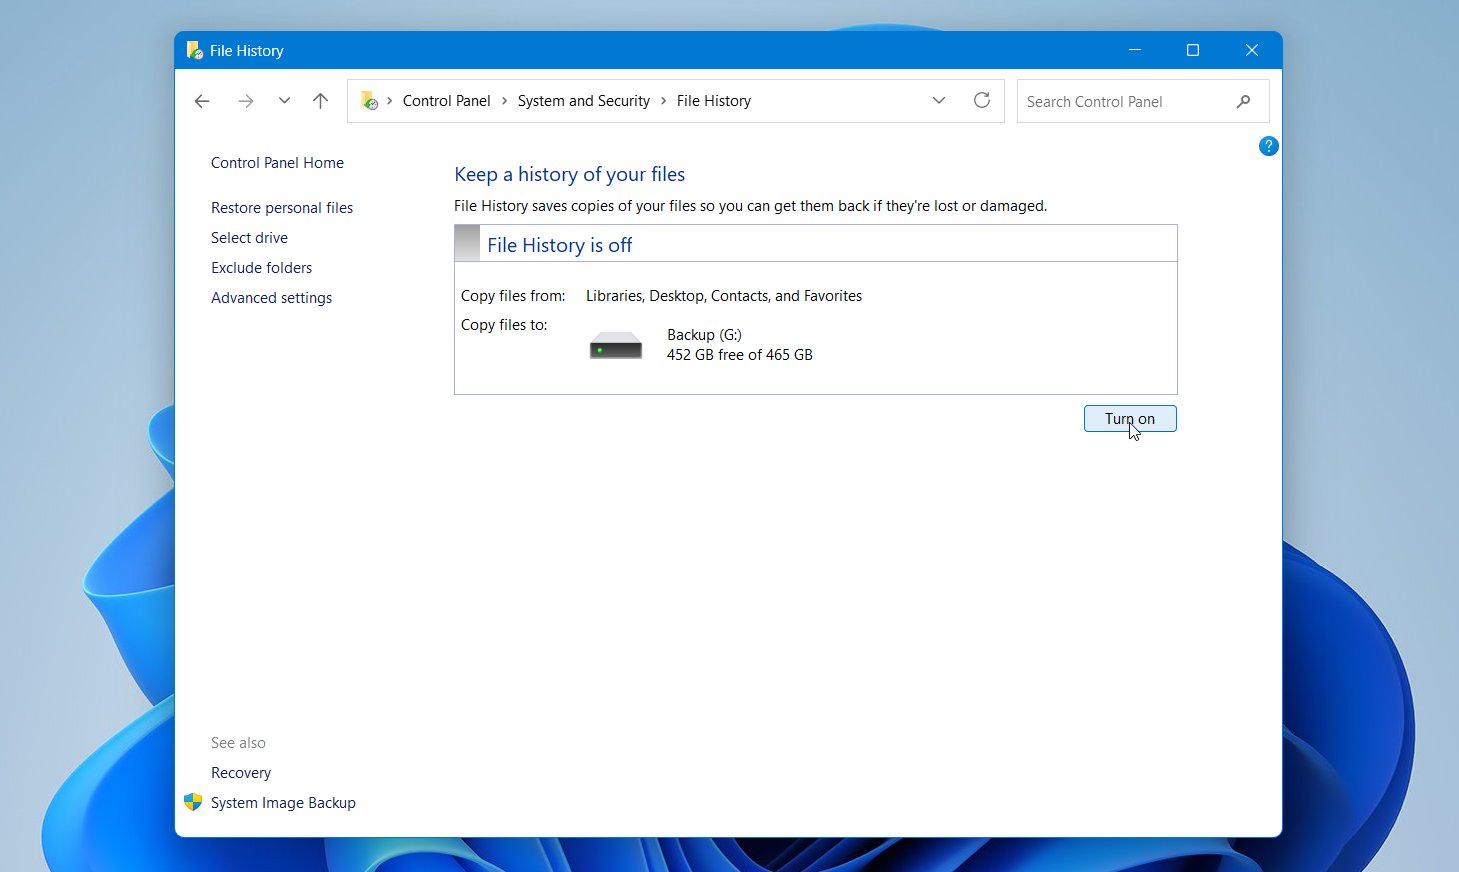
- Check which folders File History will protect. If an important folder is not included, add it to a supported library or make sure its contents are stored in a protected location.
- Click Advanced settings if you want to change how often File History saves copies and how long it keeps them.
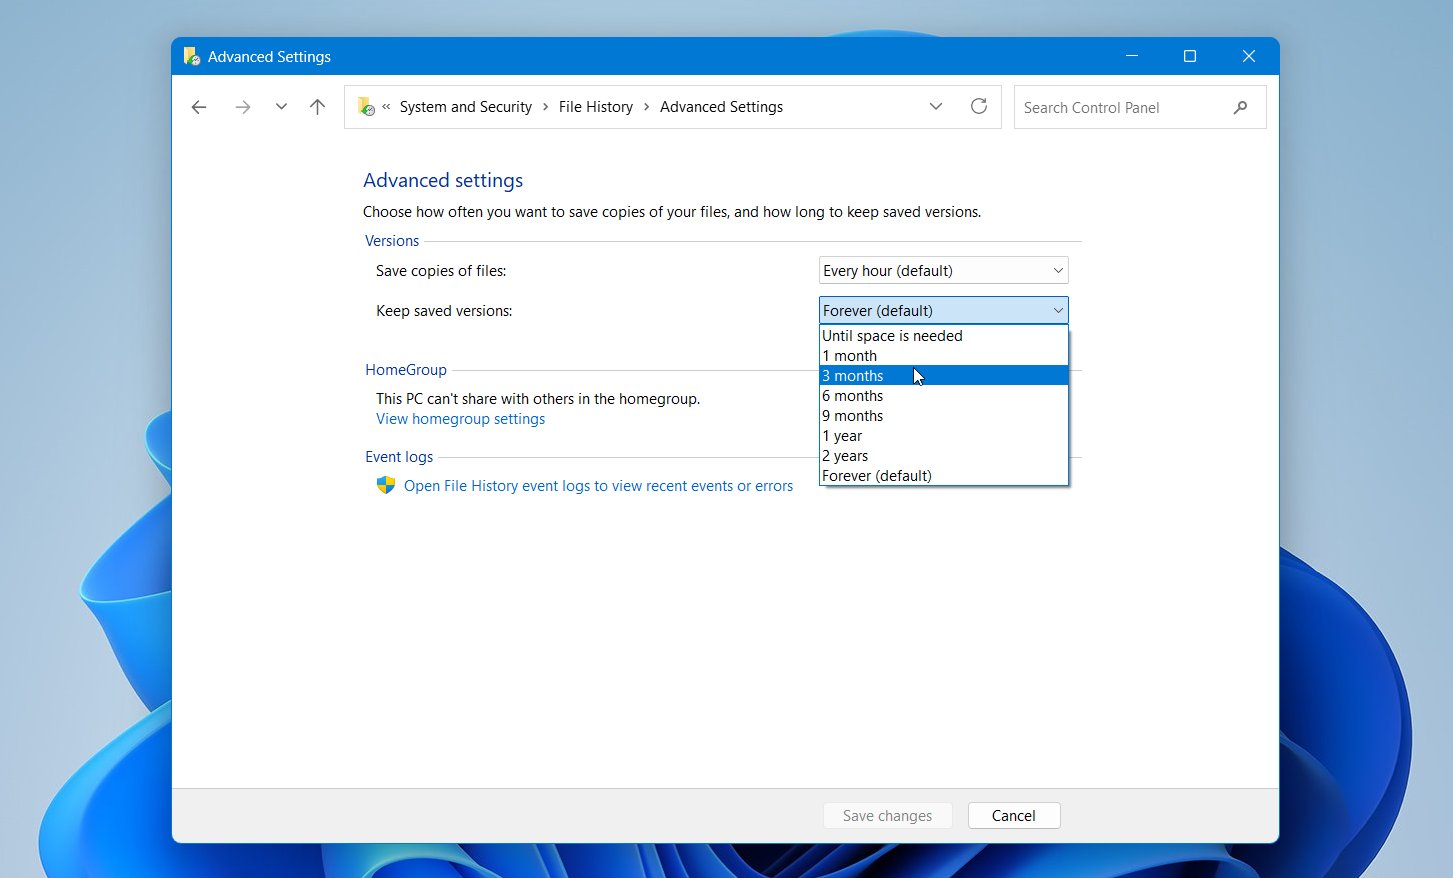
After setup, keep the backup drive connected regularly so File History can save updated versions of your files.
Option 2: Use Application Versioning and Save Copies Before Major Changes
For Word, Excel, and PowerPoint files stored in OneDrive or SharePoint, AutoSave and Version History provide an easy way to return to an earlier document state. For local files, you need to create separate copies yourself, so this method requires more discipline.
For Microsoft 365 cloud files:
- Save the file to OneDrive or SharePoint.
- Turn on AutoSave.
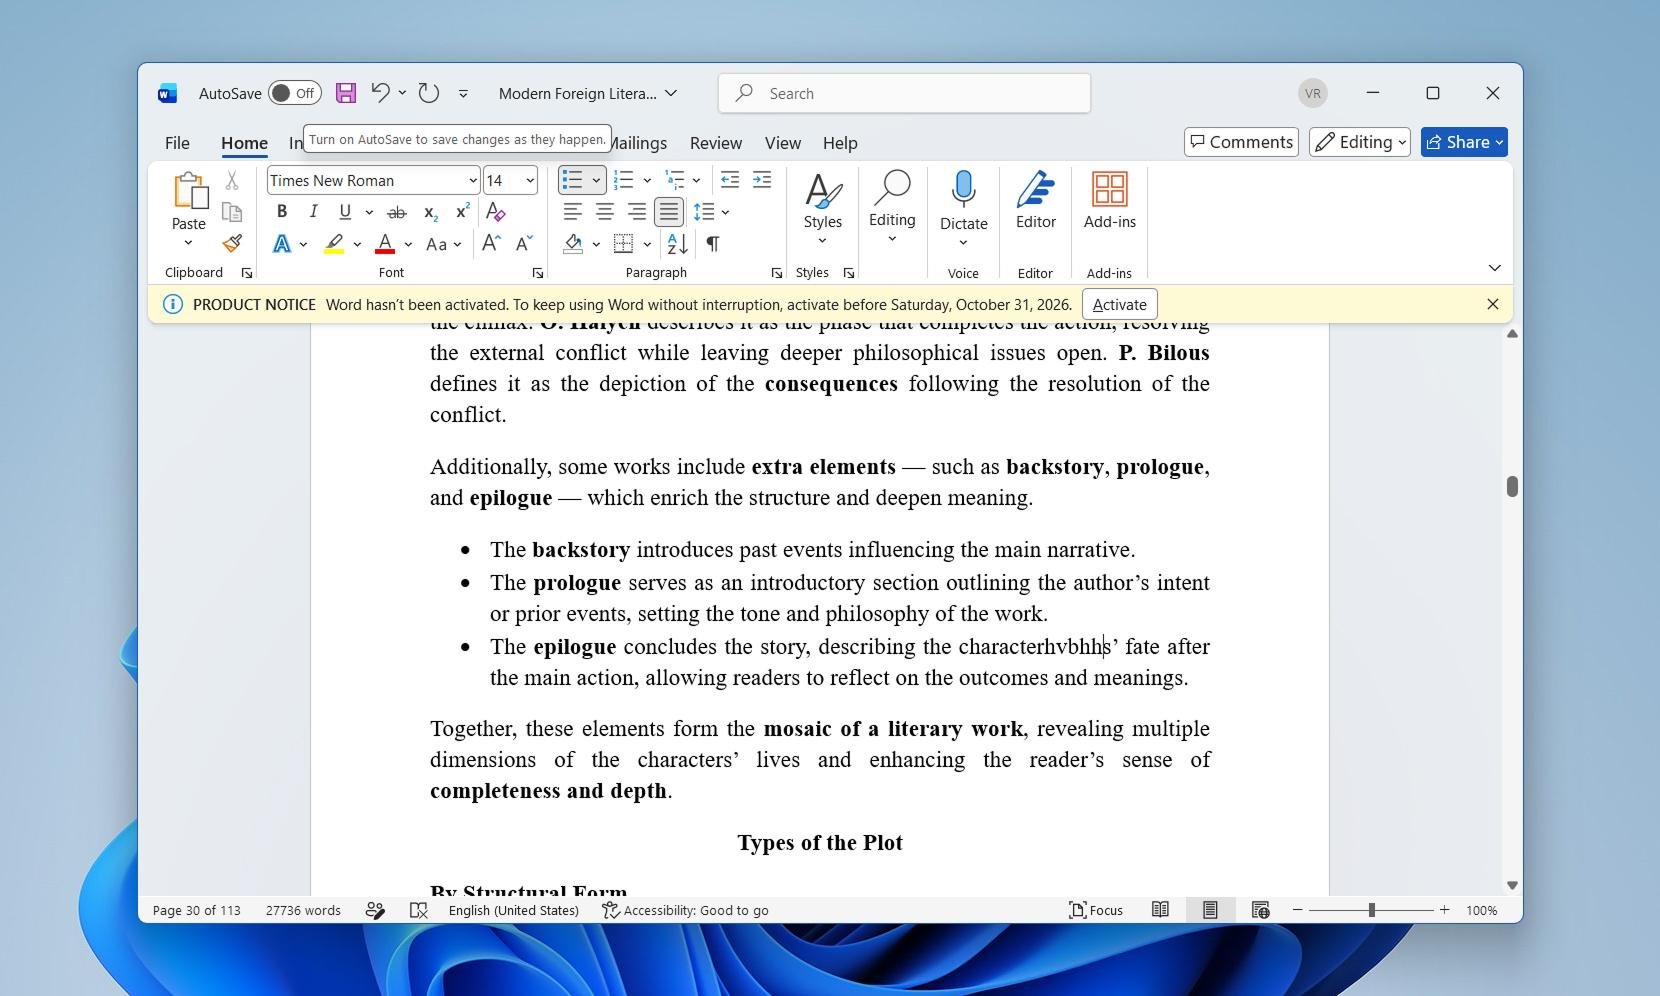
Before major changes to a local file, use Save As or Save a Copy and give the copy a meaningful name, such as Project_v1 or Project_2026-09-20.
Option 3: Keep an Independent Backup
An independent backup provides protection beyond individual applications or cloud version history. It requires extra storage and regular updates, but it gives you another copy if the original file gets replaced, deleted, or damaged.
To create a basic backup:
- Connect an external HDD or SSD, or access your NAS.
- Create a folder for your backups.
- Copy your important files and folders to it.
- Update the backup regularly and before major changes.
- Keep the backup on a different physical device from the original files.
For files that change frequently, backup software can automate the process and reduce the chance that your backup becomes outdated.
Frequently Asked Questions
What happens when I overwrite an existing file with the same name?
A file replacement with the same name doesn’t always mean the old data gets physically overwritten. Depending on Windows and the application:
- The application may update the existing file directly.
- It may create a new or temporary file and delete the old file afterward.
- If the old sectors remain untouched, recovery software may find the previous copy.
- If new data reuses those sectors, the overwritten portions cannot be recovered.
For an exact older copy, backups or version history offer the most reliable way to restore it.
Is it possible to recover overwritten data from an external hard drive?
Recovery may be possible if the old data has not been physically overwritten. Connect the external hard drive to a Windows 11 computer, avoid unnecessary writes, and scan it with data recovery software. Save any recovered files to another physical device. If new data has overwritten the original sectors, those portions cannot be recovered.
Why is data that has been overwritten hard to recover? What are the technical issues?
When new data physically overwrites the storage locations that held an old file, the original bytes are replaced, so recovery software has nothing left to read. Partial overwrites can leave some portions intact, but the recovered file may be incomplete or corrupt. SSDs add another complication: TRIM, garbage collection, and the SSD controller’s internal data management can further reduce access to deleted data.
How do I recover an overwritten Word or Excel file?
To recover an overwritten Word or Excel file, try these options in order:
- Open the file.
- Go to File > Info > Version History if the file is stored in OneDrive or SharePoint.
- Check Manage Document in Word or Manage Workbook in Excel for available AutoRecover copies.
- Check OneDrive Version History separately if you use OneDrive.
- Check File History / Previous Versions in Windows.
- Restore the file from another backup, if available.
- If no previous version or backup exists, scan the local storage with data recovery software for an older deleted copy.
Can an overwritten file be recovered from an SSD?
Sometimes. If new data physically replaced the flash cells that held the old file, those bytes cannot be recovered. If the old data still exists in blocks that the SSD has marked as no longer needed, recovery may still be difficult because of TRIM and the SSD controller’s garbage collection. Check version history and backups first, and avoid unnecessary SSD activity if you plan to attempt recovery.
Conclusion
An overwritten file is not necessarily gone for good. A file-level replacement does not always overwrite the same physical sectors, so an older copy may still exist on the drive or in Version History, File History, Office recovery data, or a backup. However, once new data physically replaces the original bytes, recovery software cannot bring those overwritten portions back.
For that reason, check existing versions and backups first. If none are available, stop unnecessary writes to the affected drive and use data recovery software to search for an older copy that may still exist. Going forward, File History, cloud versioning, and an independent backup can give you a much easier way to recover from the same mistake.

- 48 publishings
- Auckland, New Zealand
Jordan Jamieson-Mane is a content writer with a focus on technology-related content. He has spent much of his life studying and working with all types of technology. During his time as a writer, he has written countless articles in the field of data recovery, breaking down complex topics into articles that are easy to understand.
When he's not writing articles on data recovery, Jordan enjoys traveling the world, reading books, and building websites.
- LC Tech FILERECOVERY Professional Review – Can It Compete with Modern Recovery Tools?
- UFS Explorer Review – A Powerful Recovery Tool With Lots to Offer
- Cisdem Data Recovery for Windows Review – A Capable Copy
- AnyRecover Data Recovery Review – A Polished Solution for Basic Users
- iBoysoft Data Recovery Review: Not Much to Offer
- Frisco, Texas, United States
Yevgeniy Tolkunov is Hardware Engineer at ACE Data Recovery. Yevgeniy has a Master's Degree in Physics, Information Technology; 15+ years of experience.