

How to Restore Deleted Files and Folders from Your Desktop


Accidentally deleted a file or folder from your Windows 11 desktop? In many cases, you can recover deleted desktop files, but the right recovery method depends on what exactly happened. A normally deleted file may still be in the Recycle Bin, while a file deleted using Shift + Delete or removed after the Recycle Bin was emptied requires a different approach. If your Desktop is synced with OneDrive or included in a backup, you may also have a saved copy available.
Things become more complicated when you need to recover deleted files from desktop storage after permanent deletion. Continued use of the drive can overwrite the deleted data and reduce your recovery chances. SSDs require special caution because TRIM can make permanently deleted files unrecoverable.
In this article, we’ll start with the safest recovery options and work our way from the Recycle Bin to OneDrive and other backups, and finally to data recovery software for files deleted from an HDD or SSD. The article focuses primarily on Windows 11, but many of the same steps also apply to Windows 10.
Can You Recover Deleted Files From Desktop?
Quick answer: Yes, it’s often possible to recover deleted desktop files, but recovery isn’t guaranteed. Your chances depend mainly on what happened to the file, where your Desktop folder is located, and, in the case of permanent deletion, whether the data was stored on an HDD or SSD.
Detailed answer: Before you attempt recovery, it’s important to determine whether the file was actually permanently deleted. A file deleted normally is usually moved to the Windows Recycle Bin, while a Desktop backed up to OneDrive may have another copy in the cloud or in the OneDrive Recycle Bin. Files deleted using Shift + Delete or removed when the Recycle Bin is emptied are permanently deleted from the Windows file system and require a different recovery approach. In some cases, the file may not have been deleted at all and may simply be located in another Desktop folder, user profile, or OneDrive location.
The standard local Desktop folder in Windows 11 is normally located at: C:\Users\<username>\Desktop
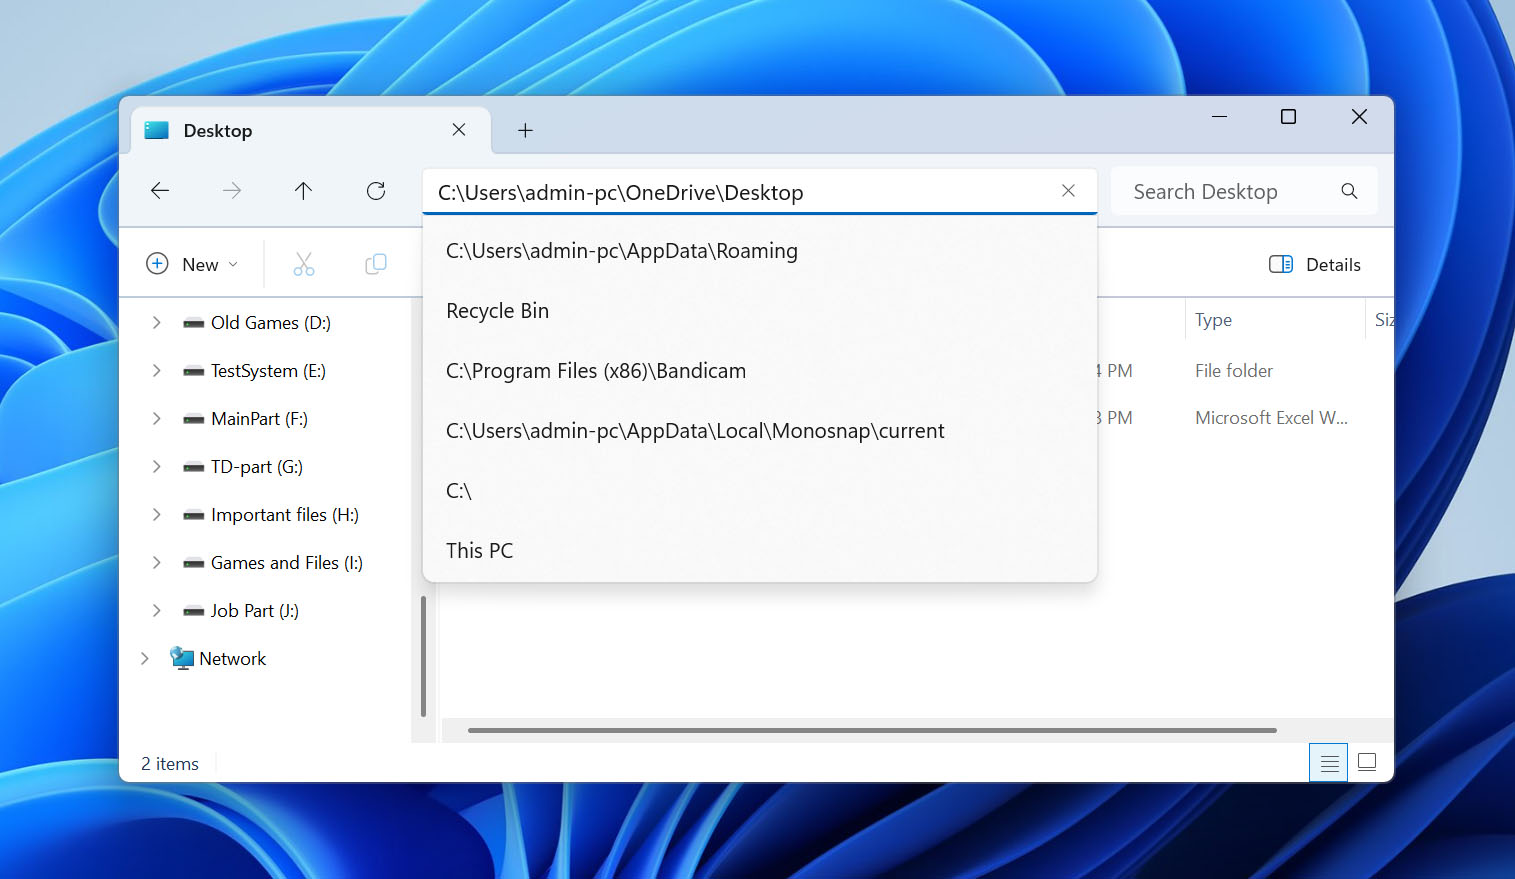
However, this isn’t always where your Desktop files are stored. If OneDrive folder backup is enabled, for example, the Desktop may be redirected to a location inside your OneDrive folder.
The type of storage device becomes particularly important after permanent deletion. On an HDD, the data belonging to a deleted file may remain on the drive until its sectors are overwritten by new data. Until that happens, specialized data recovery software may be able to recover the file.
SSDs work differently. Windows normally sends TRIM/delete notifications to supported SSDs, allowing the drive to discard data that is no longer needed. Once the underlying data associated with a deleted file has actually been discarded, data recovery software can’t restore it. You can check whether Windows has TRIM/delete notifications enabled using the following command: fsutil behavior query DisableDeleteNotify
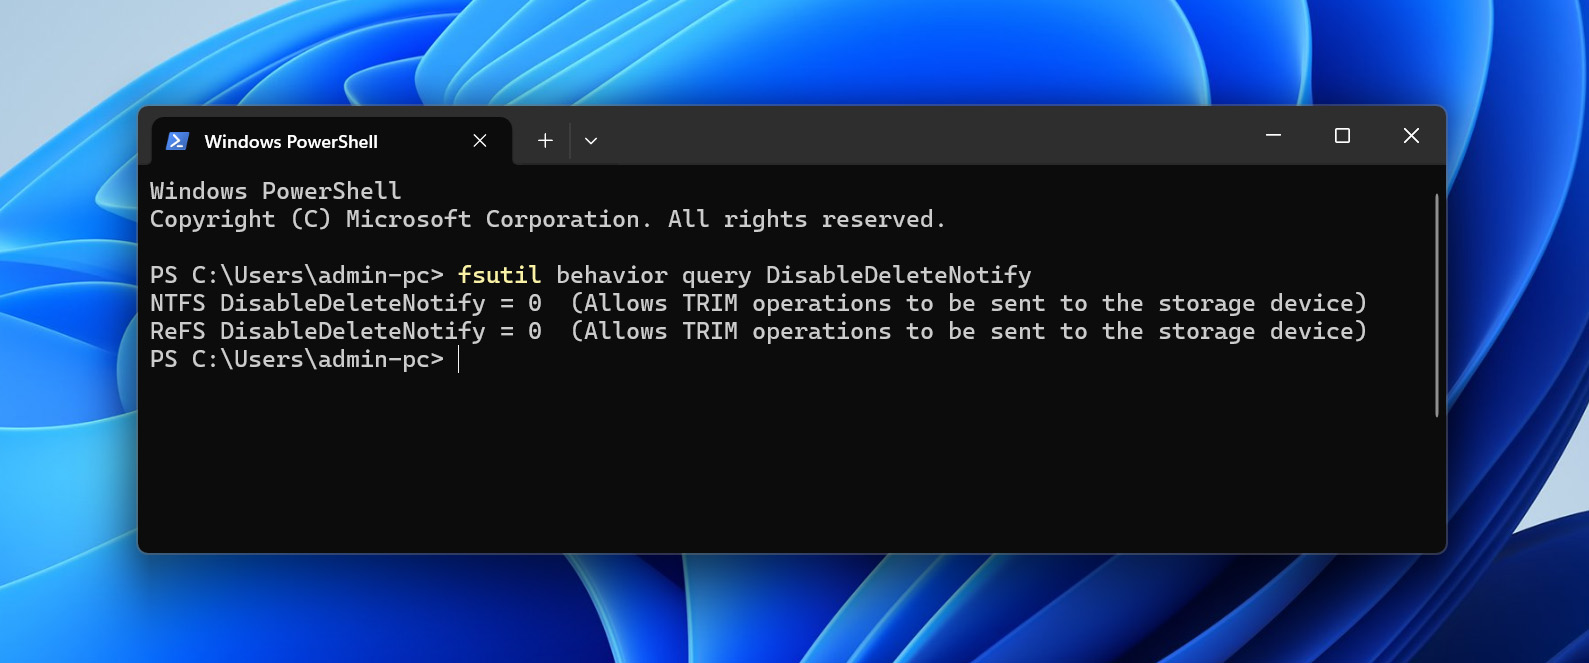
A result of 0 means that Windows has delete notifications enabled for the corresponding file system. However, this result doesn’t tell you whether TRIM has already been processed for a particular deleted file, so it shouldn’t be treated as proof that the file is already unrecoverable.
The table below can help you determine your recovery chances and which method you should try first:
| Situation | Recovery Chances | Best First Method |
| File deleted normally | High | Windows Recycle Bin |
| Desktop is backed up to OneDrive | High if the cloud copy or deleted item still exists | OneDrive Desktop / OneDrive Recycle Bin |
| Recycle Bin was emptied | Depends on storage type and subsequent use | Backup or data recovery software |
| File was deleted with Shift + Delete from an HDD | Medium–High if not overwritten | Backup or data recovery software |
| File was deleted with Shift + Delete from an SSD with TRIM | Low / unpredictable | Check backups and OneDrive first |
| File is missing but may not actually be deleted | High if it still exists elsewhere | Search Desktop locations, OneDrive, user profiles, and hidden files |
| Desktop folder was included in File History | High if an older copy exists | File History / Previous Versions |
| Existing Backup and Restore backup contains the file | High | Restore from backup |
As a general rule, start with methods that don’t require scanning the drive: check the Recycle Bin, OneDrive, and any available backups first. If the file was permanently deleted and no backup exists, data recovery software may be the next option, particularly when the Desktop was stored on an HDD.
What to Do Immediately After Deleting Desktop Files
If you’ve just deleted a desktop file or folder, try pressing Ctrl + Z while the Desktop or File Explorer window is active. If that doesn’t work, check the Recycle Bin before moving on to more involved recovery methods.
You should also determine where your Desktop files are actually stored. The standard Windows location is %UserProfile%\Desktop, which typically corresponds to C:\Users\<username>\Desktop. However, if OneDrive PC folder backup is enabled, your Desktop may be located inside OneDrive instead. In that case, check the cloud copy and OneDrive Recycle Bin before attempting to recover deleted desktop files from local storage.
If the files were permanently deleted from a local drive, minimize your use of that drive. Microsoft warns that continued computer use can overwrite the free space that may still contain deleted data. In particular, avoid installing programs, downloading large files, or copying new files to the affected drive.
How to Recover Accidentally Deleted Desktop Files and Folders
The following methods can help you recover both regularly and permanently deleted files from the desktop.
Method 1: Use Desktop Data Recovery Software
Desktop data recovery software applications for Windows represent the most effective method for recovering accidentally deleted files and folders from your desktop because they undelete data even if it’s not located in the Recycle Bin or a local/cloud backup location.
Our Pandora Recovery review team has tested many data recovery applications using our unique and comprehensive testing methodology, so we know which can retrieve accidentally deleted desktop folders and files the best.
If you would like to learn more information about the two desktop data recovery software applications described below, then we encourage you to read their full reviews and take advantage of our side-by-side software comparison feature.
Option A: Disk Drill
The longer you continue using the affected drive, the greater the risk that deleted data will be overwritten. This is particularly relevant to desktop file recovery because the Desktop is usually stored on the system drive, where normal Windows activity can write new data even when you’re not actively saving files yourself.
Follow these steps to recover deleted files from your desktop using Disk Drill:
- Connect a suitable external storage device to your computer. You will use it as a safe destination for the recovered desktop files.
- Visit Disk Drill’s official website and download the free version of the software. The free Windows version can currently recover up to 100 MB of data and lets you preview recoverable files before recovery.
- Install Disk Drill. If the deleted Desktop files were stored on your system drive, install Disk Drill on another physical storage device where possible to avoid writing additional data to the affected drive.
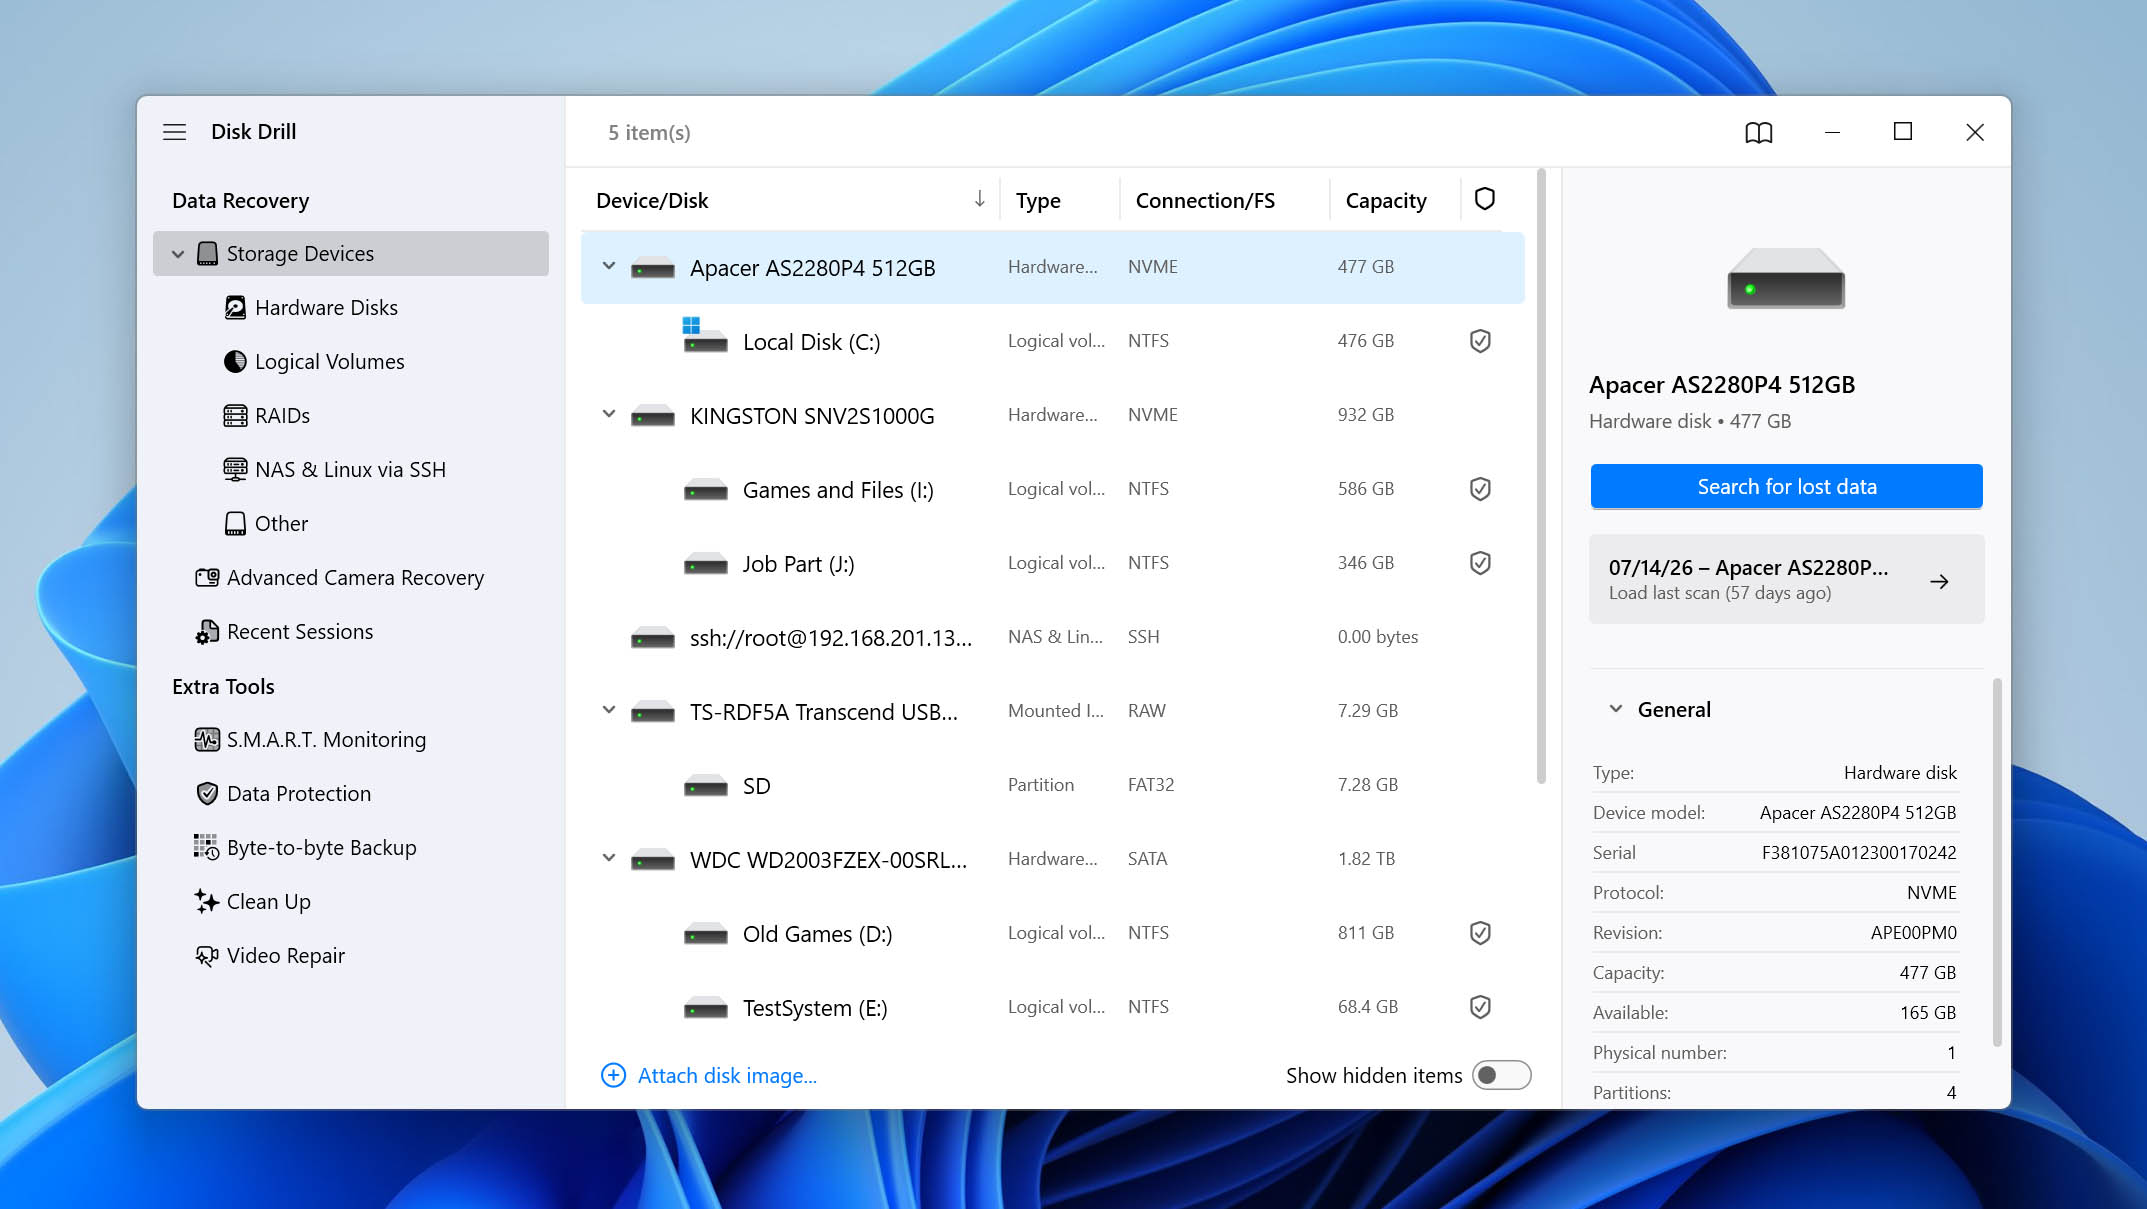
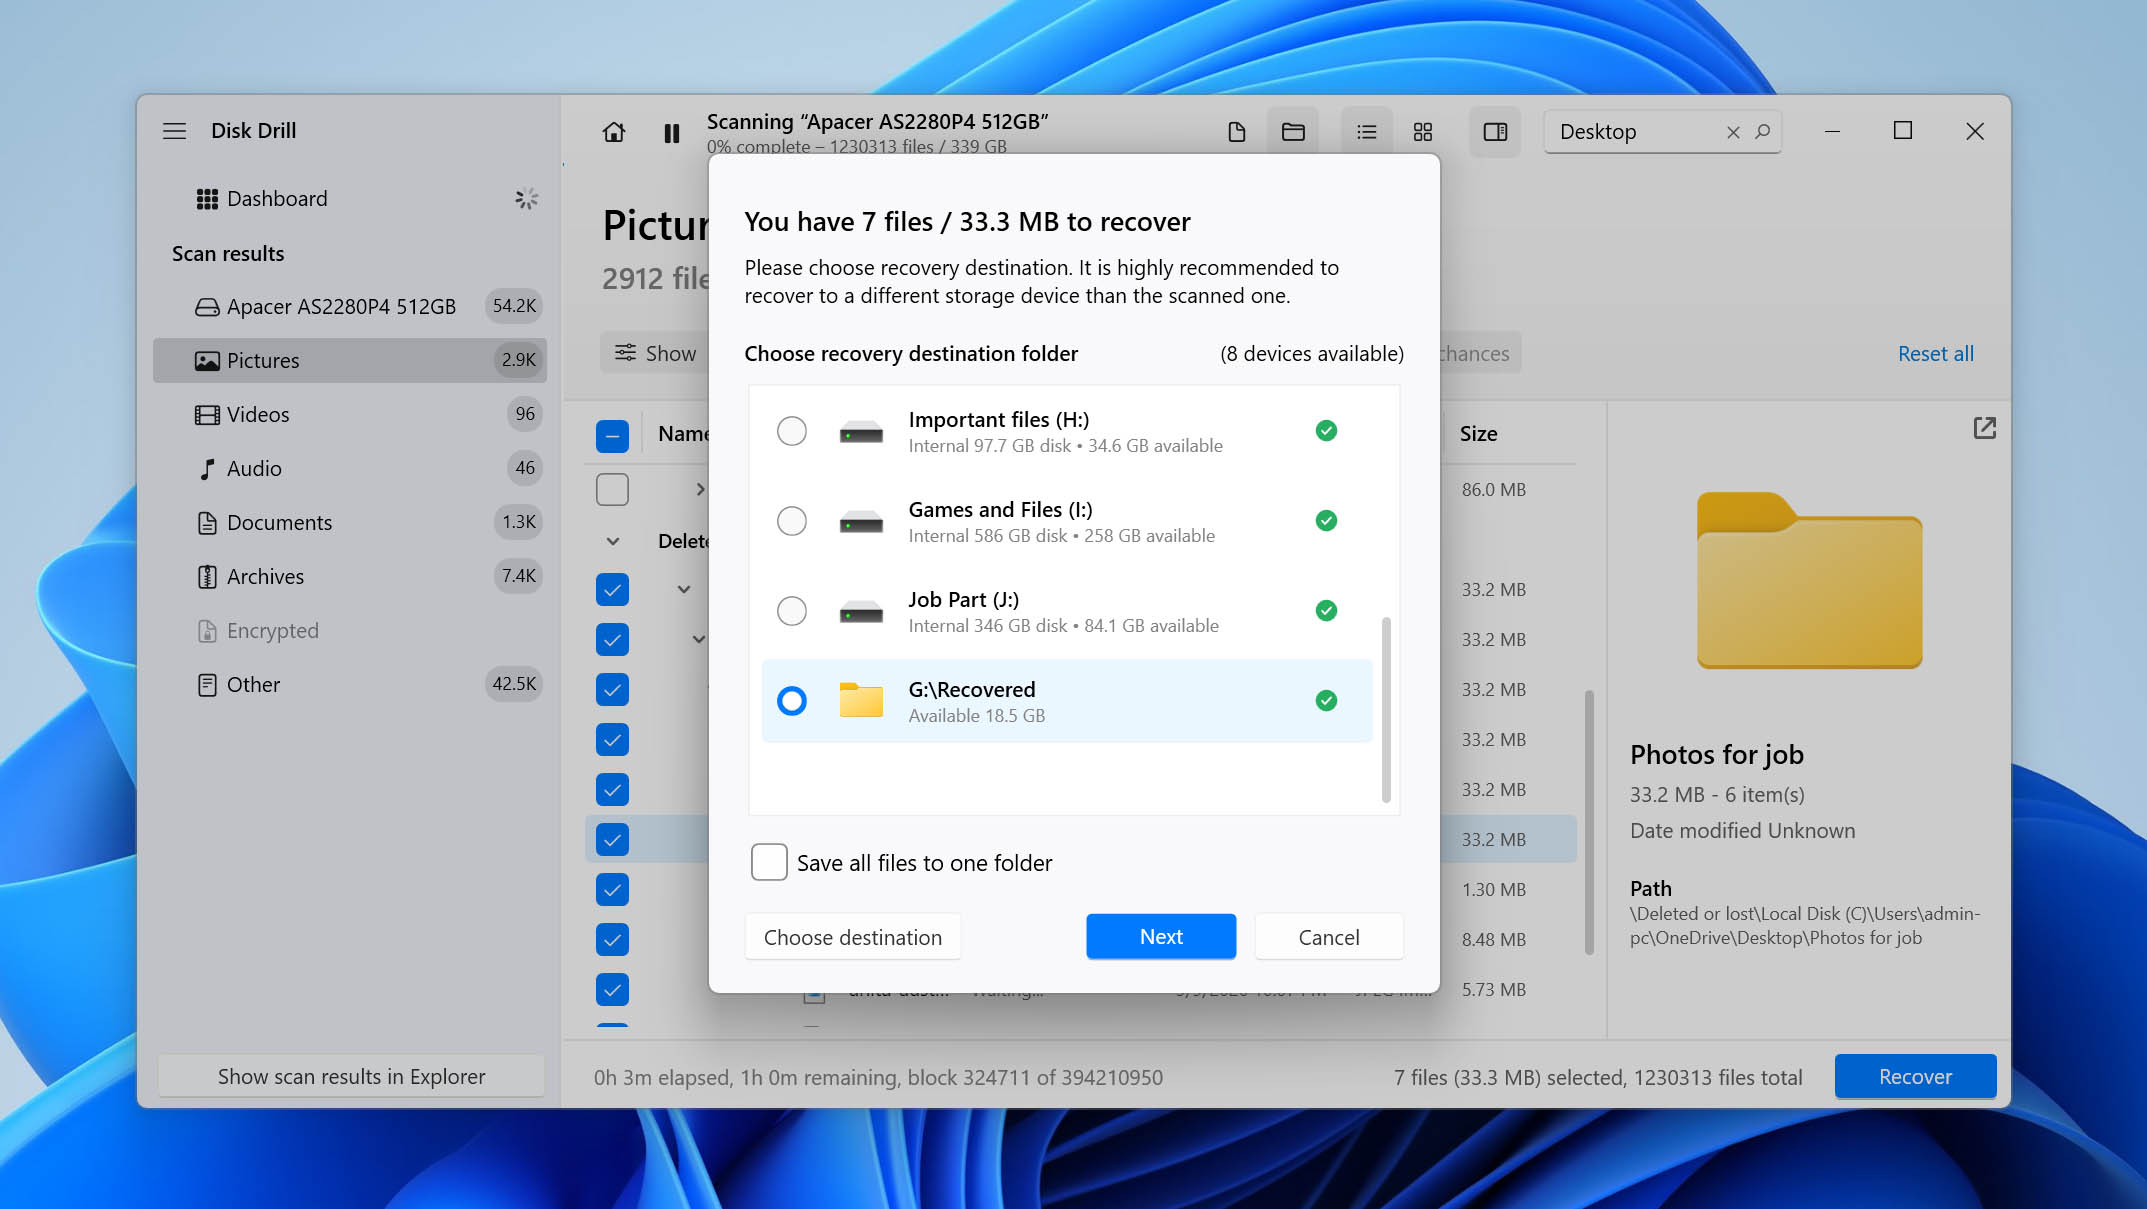
- Launch Disk Drill and select the physical disk that contained the deleted Desktop files. Click Search for lost data to start the scan.
- Allow the scan to run, or review files as they are discovered. Use the available filters and search bar to narrow down the results and locate your deleted desktop files.
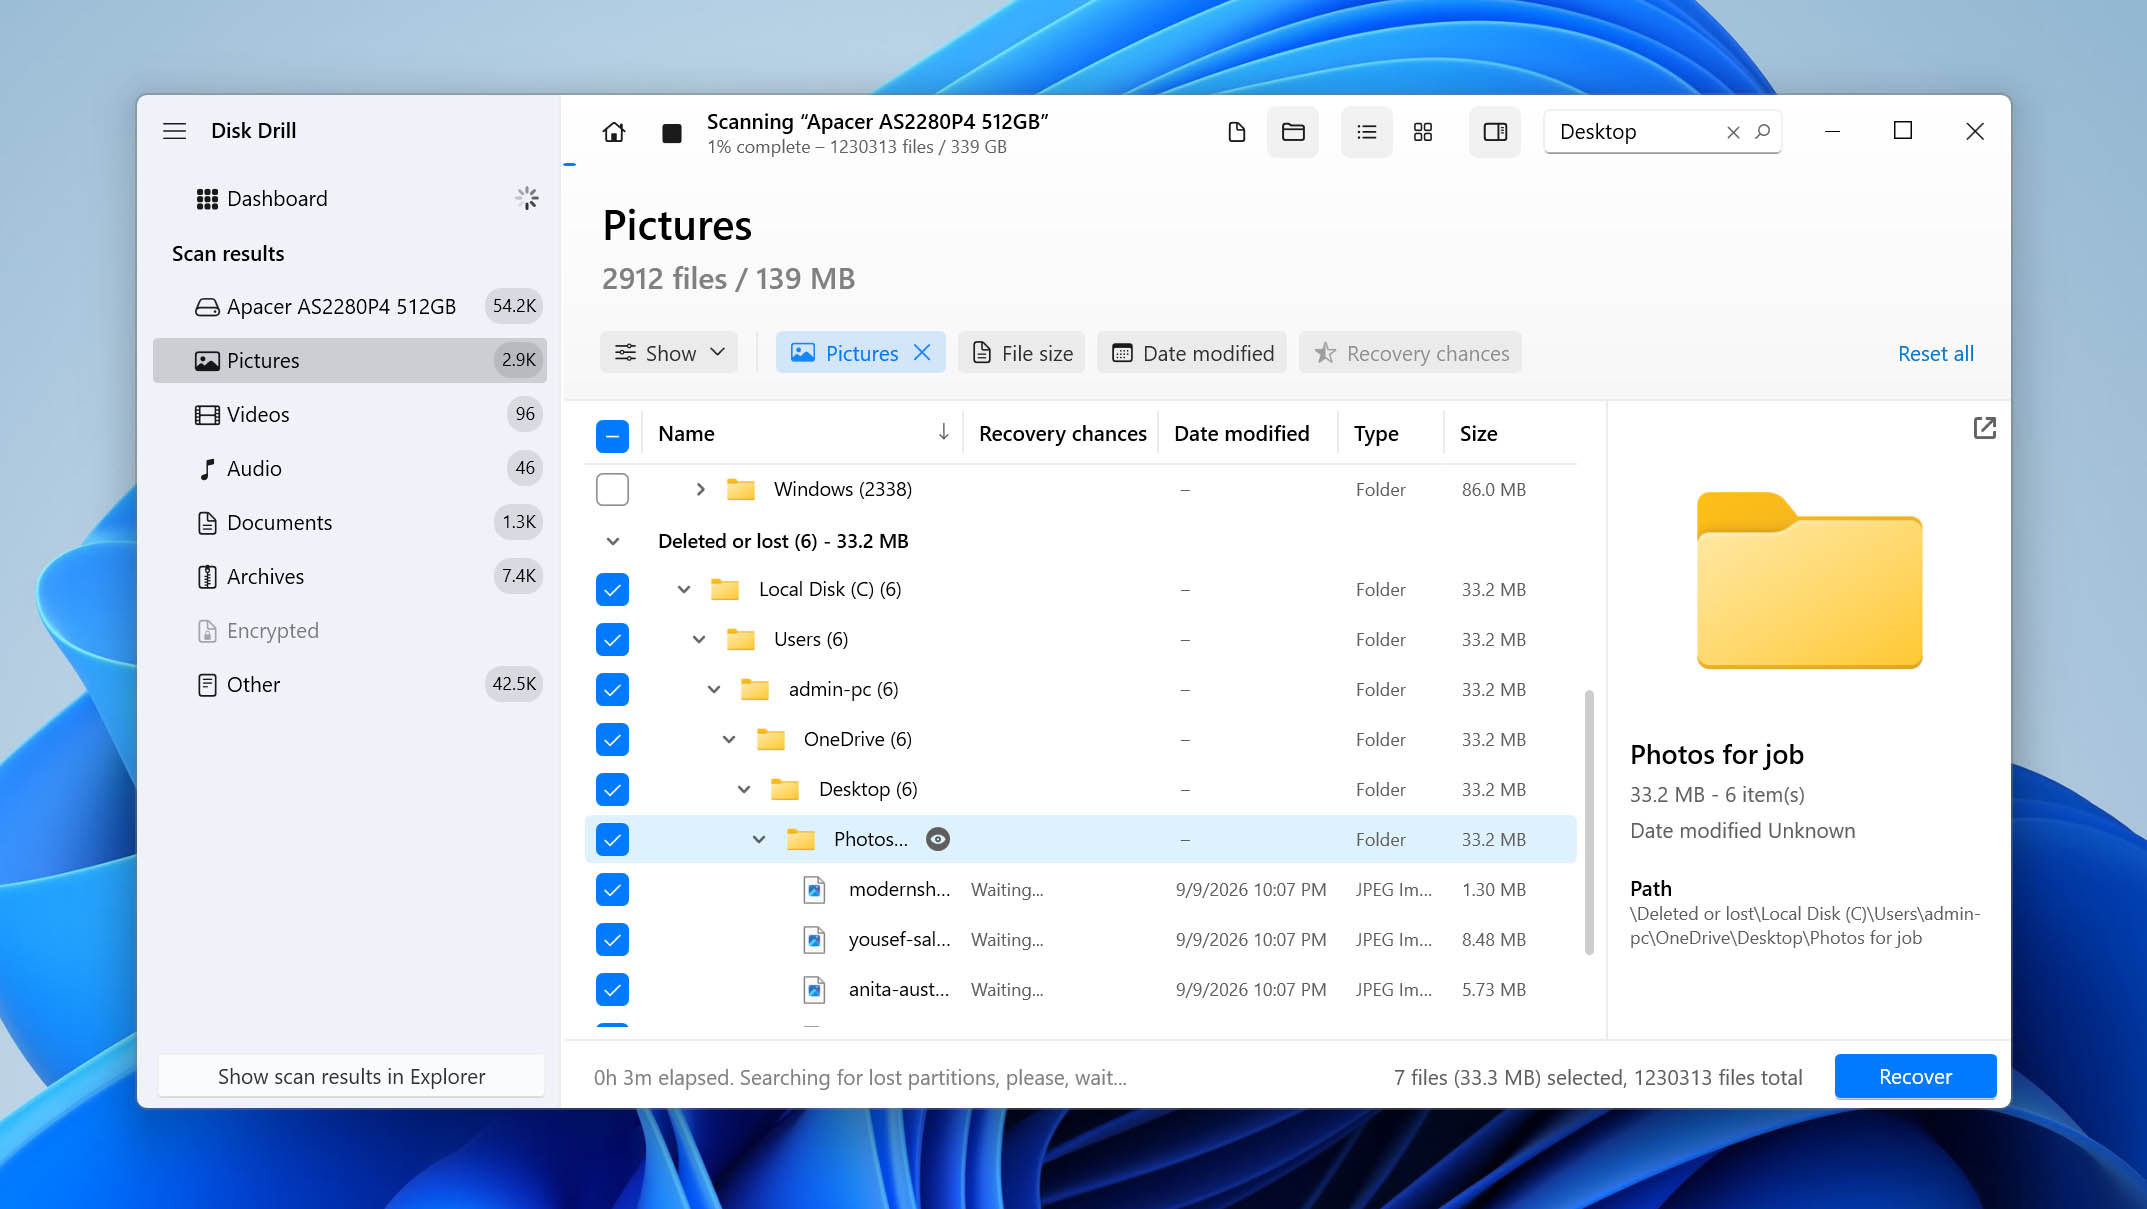
- Preview the files you want to recover where possible to verify that they can be opened correctly, then select them using the corresponding checkboxes.
- Click Recover and choose a recovery destination on a different physical drive. Avoid saving recovered files back to the drive you scanned because doing so could overwrite other deleted data.
Option B: Windows File Recovery Tool
Windows File Recovery is Microsoft’s own command-line data recovery utility for Windows. It’s completely free and can be useful when desktop files have been permanently deleted from local storage and are no longer available in the Recycle Bin or a backup. Unlike most commercial data recovery applications, however, Windows File Recovery doesn’t have a graphical user interface, so the entire recovery process is performed using commands.
The utility requires the source and recovery destination to be different drives or partitions. Microsoft currently provides two main recovery modes: Regular and Extensive. Regular mode is intended primarily for recently deleted files on a healthy NTFS drive, while Extensive mode provides a more thorough recovery option and can be used for other supported file systems and recovery scenarios.
To perform desktop folder recovery using Windows File Recovery, you need to:
- Connect a suitable external storage device to your computer. You will use it as the destination for your recovered desktop files.
- Download and install Windows File Recovery from the Microsoft Store.
- Open Windows File Recovery with administrator permission.
- If your Desktop uses the standard local location, enter the following command and press Enter: winfr C: E: /regular /n “\Users\<username>\Desktop\”. But replace C: with the drive that contained your Desktop files, E: with your recovery destination, and <username> with your Windows account folder name.
- If Regular mode doesn’t find the deleted files, repeat the recovery using Extensive mode: winfr C: E: /extensive /n “\Users\<username>\Desktop\”.
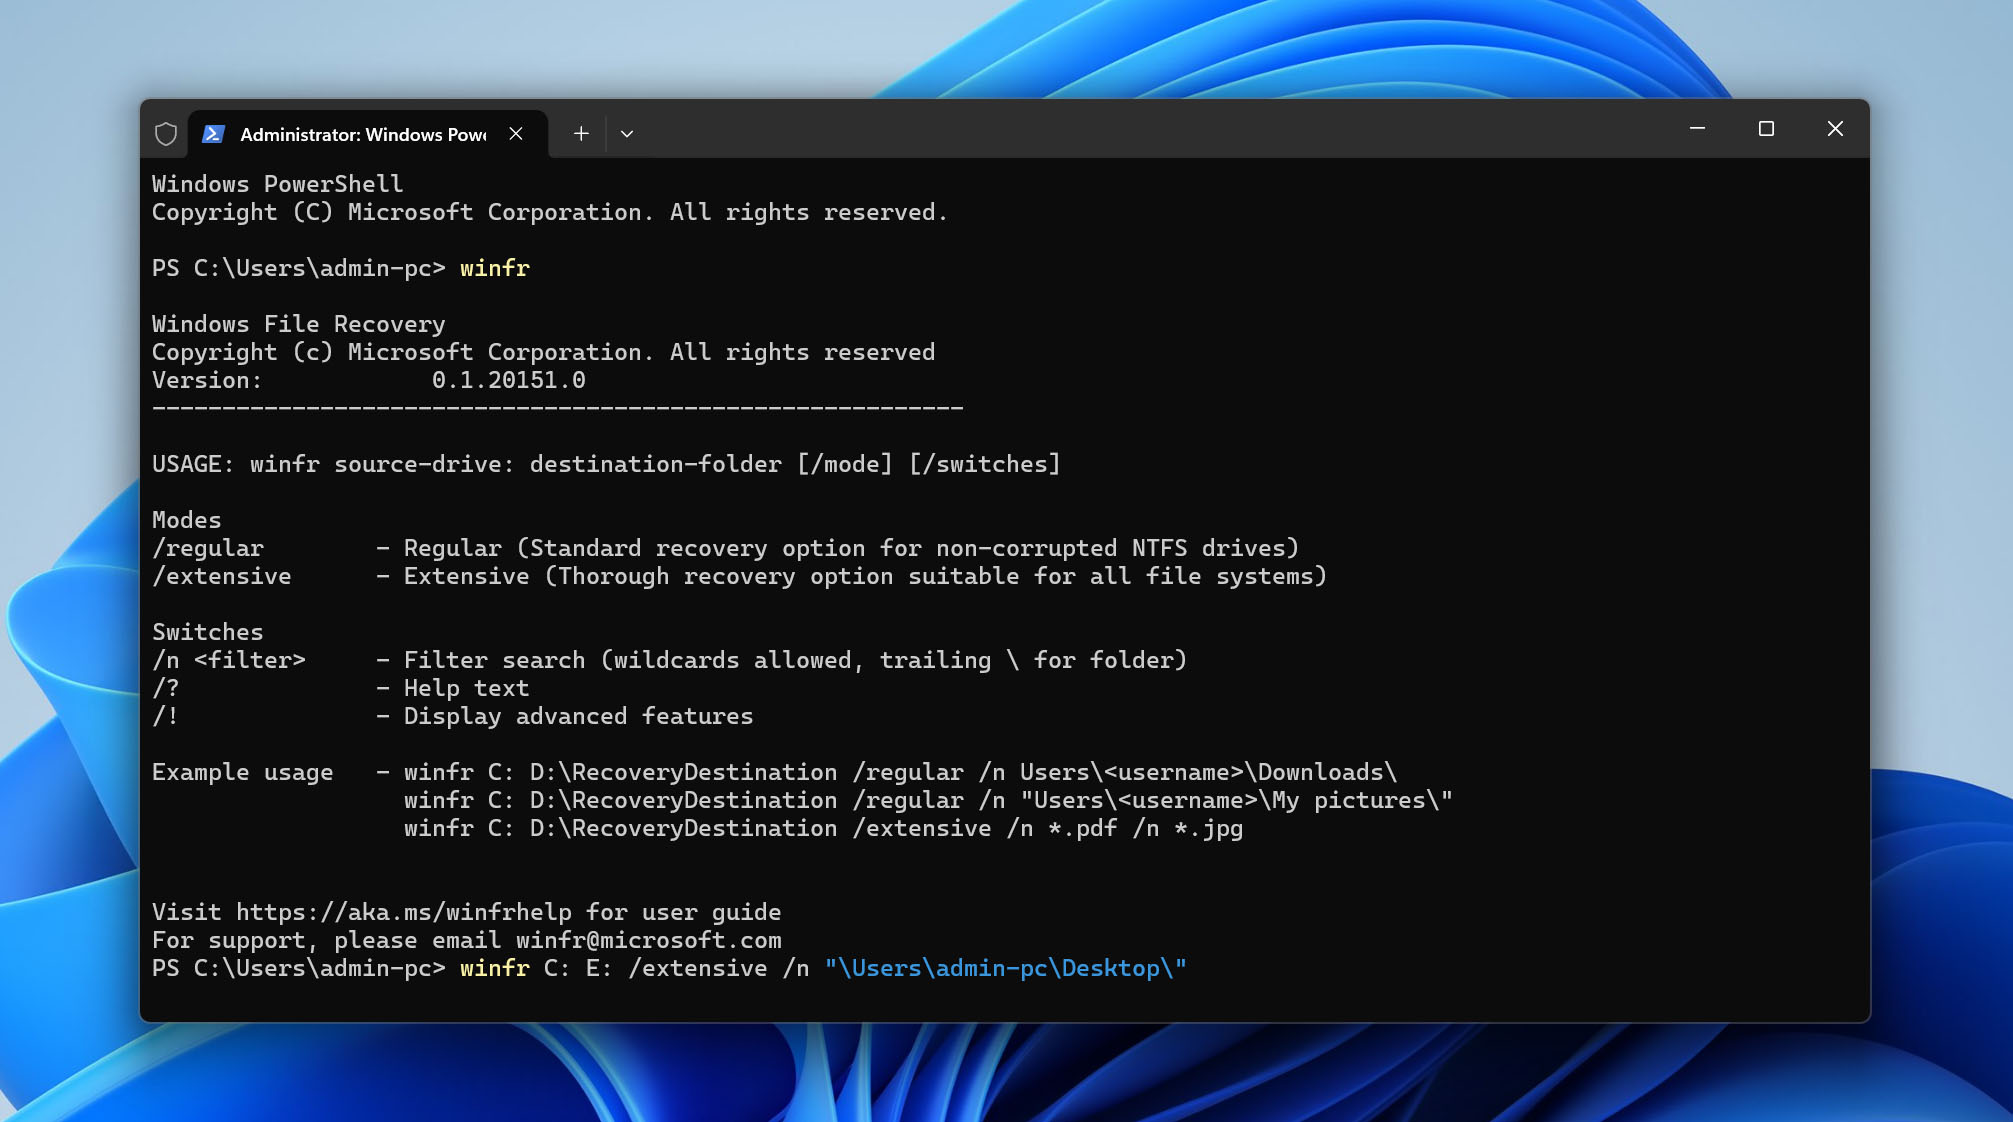
The /n switch filters the scan to the specified Desktop folder. Keep in mind that Windows File Recovery can recover only data that is still available on the source drive. If the deleted data has already been overwritten or discarded by TRIM on an SSD, switching recovery modes won’t make it recoverable.
Method 2: Get Back Deleted Files & Folders From Recycle Bin
Have you recently deleted desktop files and folders by pressing the Delete key on your keyboard or by clicking the Delete option in the context menu? If so, then it’s very likely that the missing can be painlessly recovered from the Recycle Bin.
Here’s how to get back deleted files and folders from the Recycle Bin:
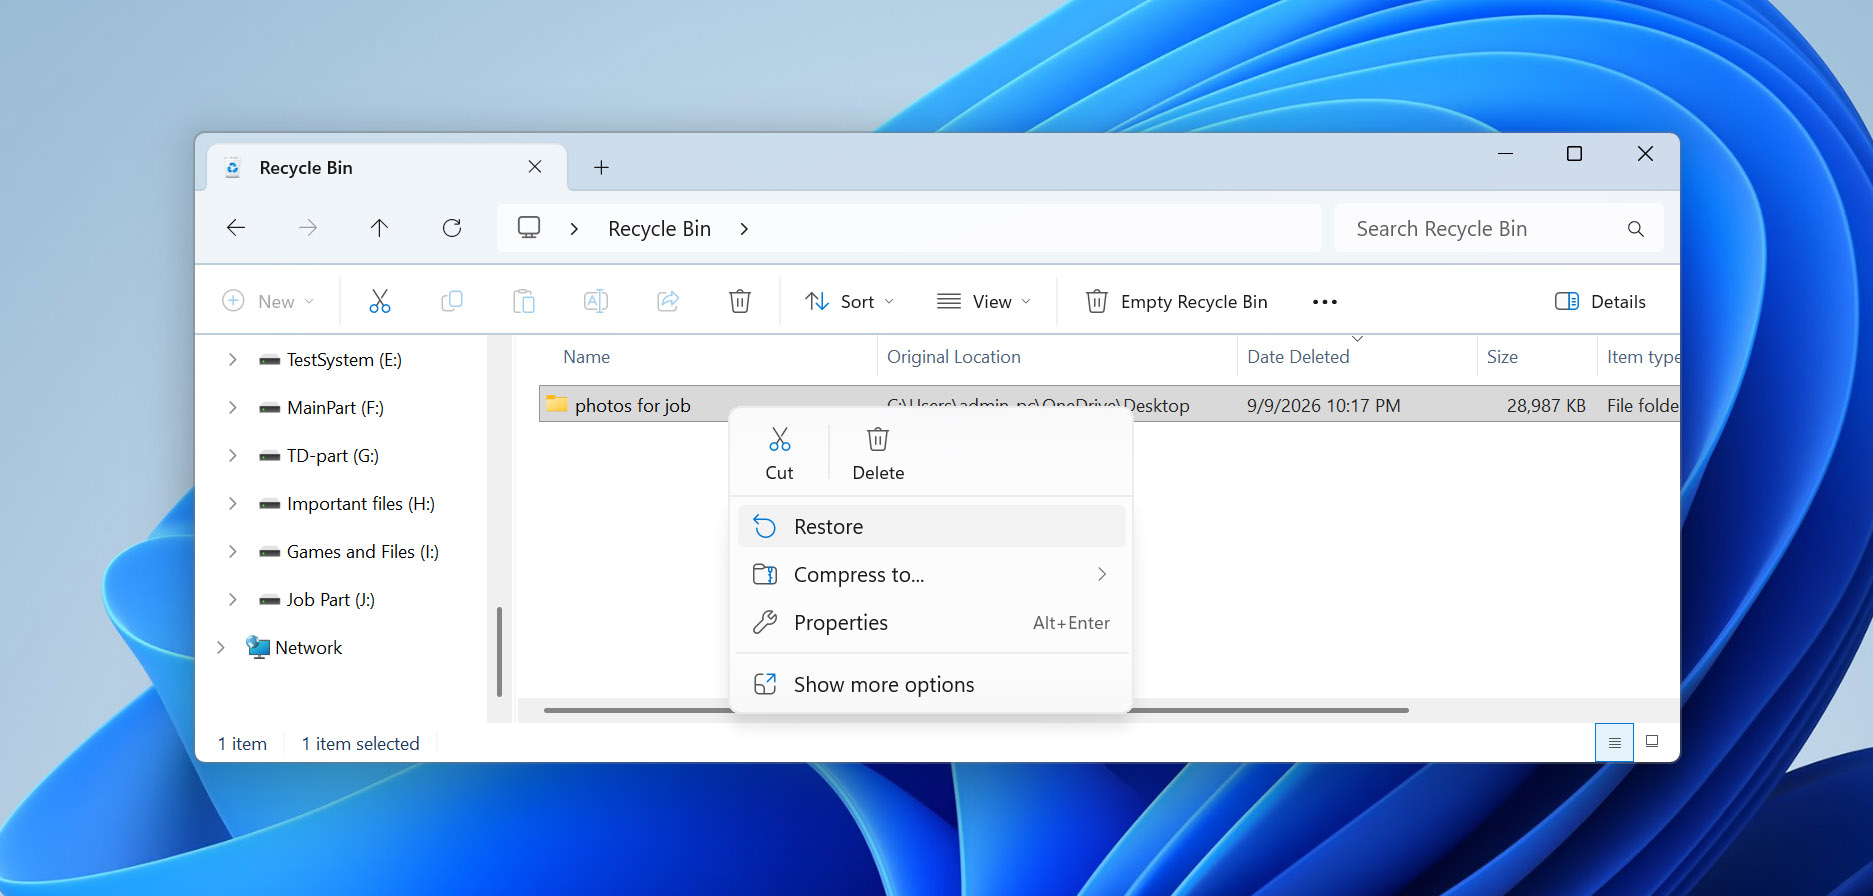
- Double-click the Recycle Bin icon on your desktop.
- Select the files and folders you want to restore. To select multiple files, you can either hold down the CTRL key on your keyboard and then click each file you want to select.
- Click any of the selected files and move the selection to a suitable location, such as your desktop. Alternatively, you can click the Restore the selected items button to move them back to their original locations.
Method 3: Restore Deleted Files Using File History
File History is a built-in Windows backup feature that can automatically save previous versions of personal files when enabled. In Windows 11, it can back up essential personal folders, including the Desktop and libraries such as Documents, Pictures, Videos, and Music.
For this method to work, File History must have been enabled before your desktop files were deleted. If you used an external drive to store File History backups, make sure it’s connected to your computer before you begin.
Here’s how to recover deleted desktop files using File History:
- Open the Start menu and search for Restore your files with File History.
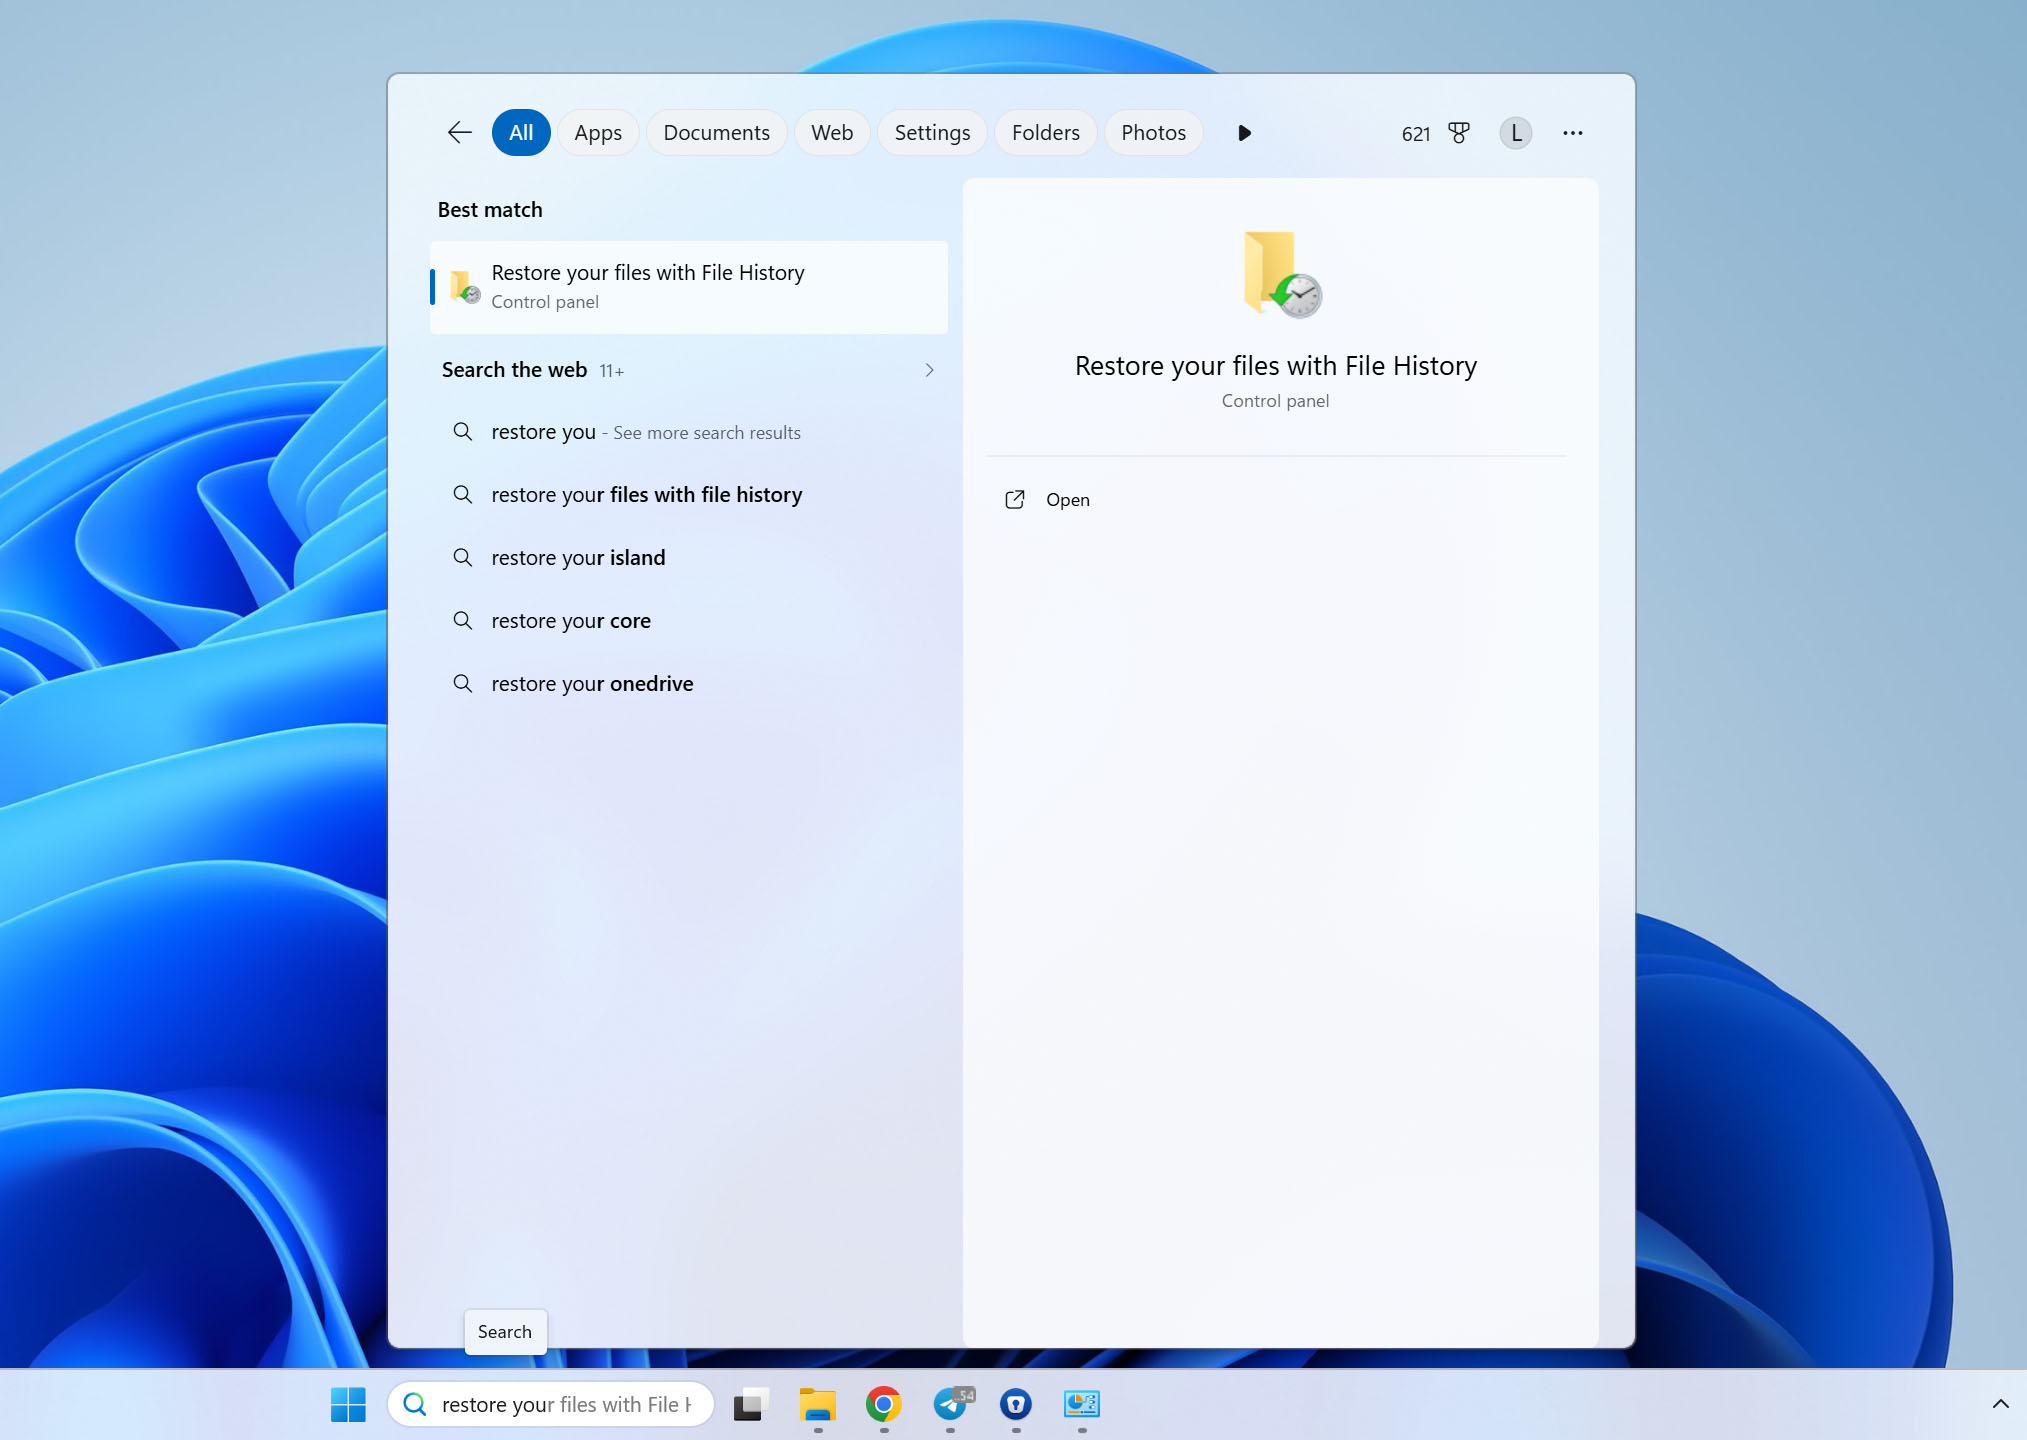
- Open the corresponding result to view the available File History backups.
- Navigate to the Desktop and use the arrows at the bottom of the window to move between available backup versions.
- Find a version created before the desktop file or folder was deleted.
- Preview or open the backed-up files where possible to verify that you’ve found the version you need.
- Select the files or folders you want to recover and click Restore to return them to their original location. If you want to check the recovered files first or avoid replacing a current version, right-click the Restore button and choose Restore to… to save them somewhere else.
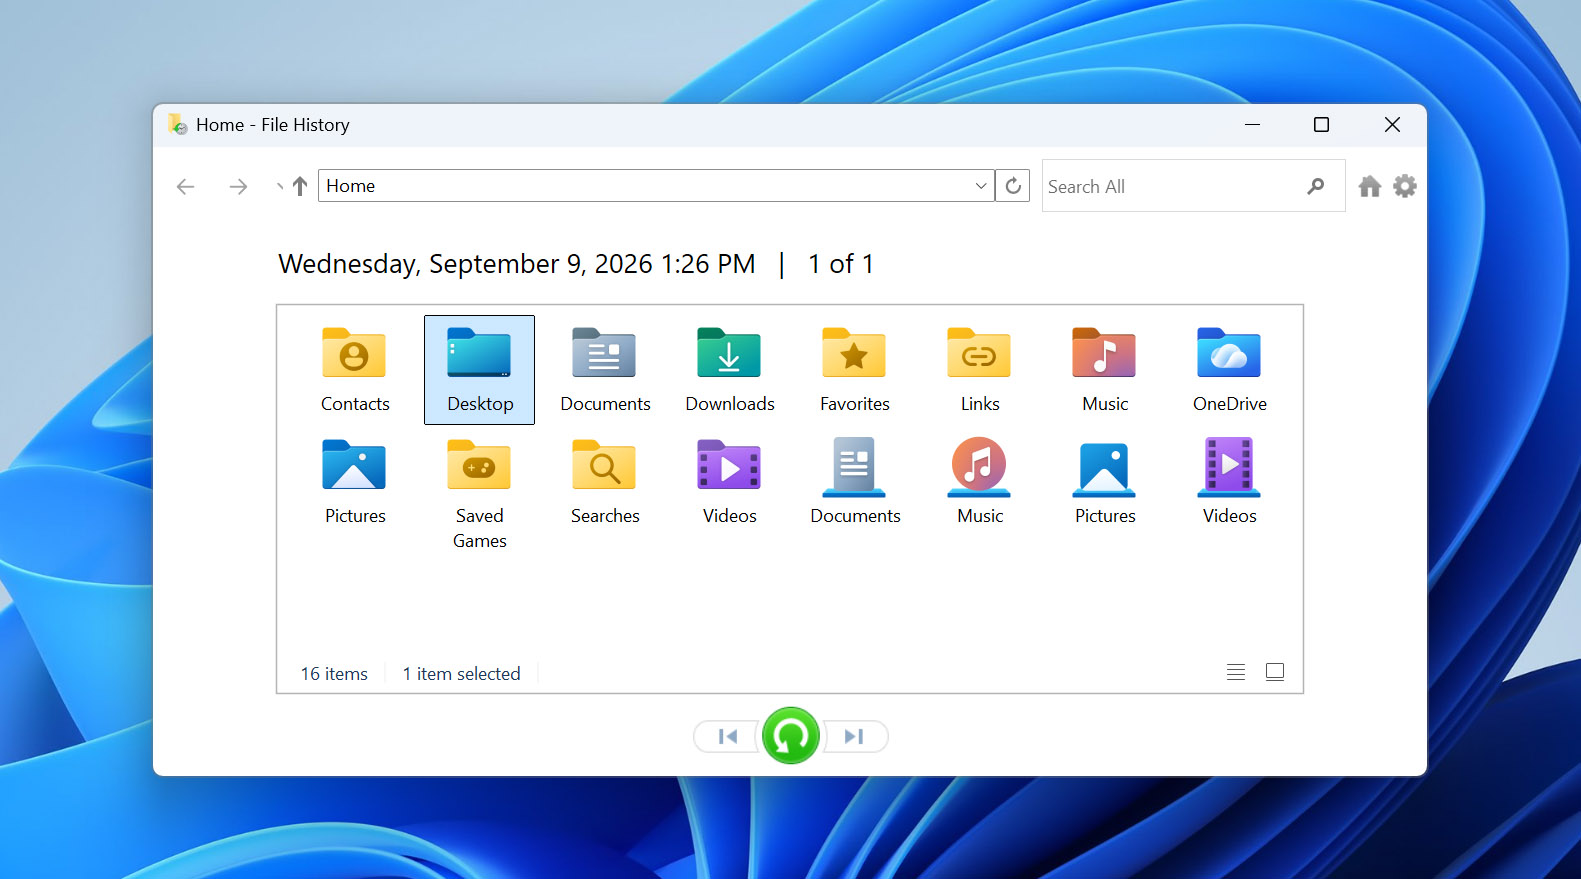
You can also check available versions directly from File Explorer. Navigate to the Desktop folder or its parent folder, right-click it, select Properties, and open the Previous Versions tab. If File History contains an earlier version, you can open it first to check its contents and then restore the files you need
Method 4: Retrieve Deleted Desktop Folder Using Backup & Restore
Backup & Restore is a legacy backup feature that’s still present even in the newest versions of Windows, so you can use it to retrieve deleted files from the desktop in Windows 10 and Windows 11.
The Backup & Restore feature is based on backup images containing files saved on the desktop, in libraries, and in default Windows folders. The backup images also contain system data, so they can be used to restore a computer that has stopped working properly.
You can follow the steps below to retrieve deleted desktop folder using Backup & Restore:
- Open the Start menu.
- Enter the following in the search bar: control panel
- Open the corresponding search result.
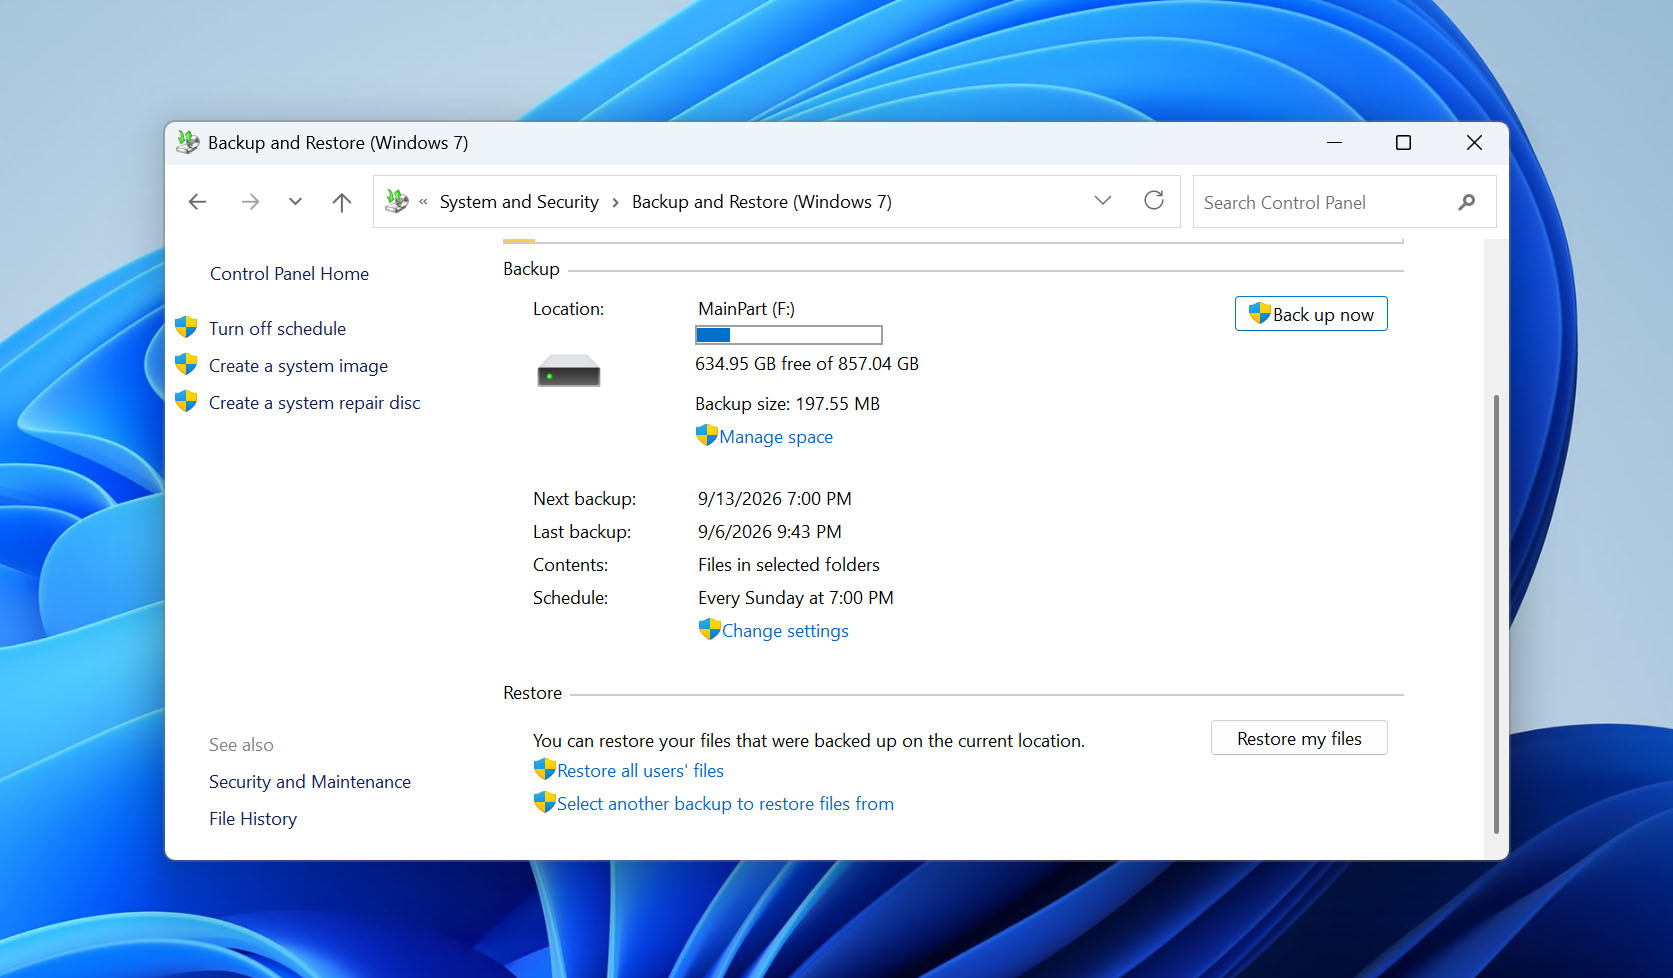
- Navigate to System and Security > Backup and Restore (Windows 7).
- Click the Restore my files option.
- Click Browse for folders, select a backed-up version of the desktop folder, and then click Add folder.
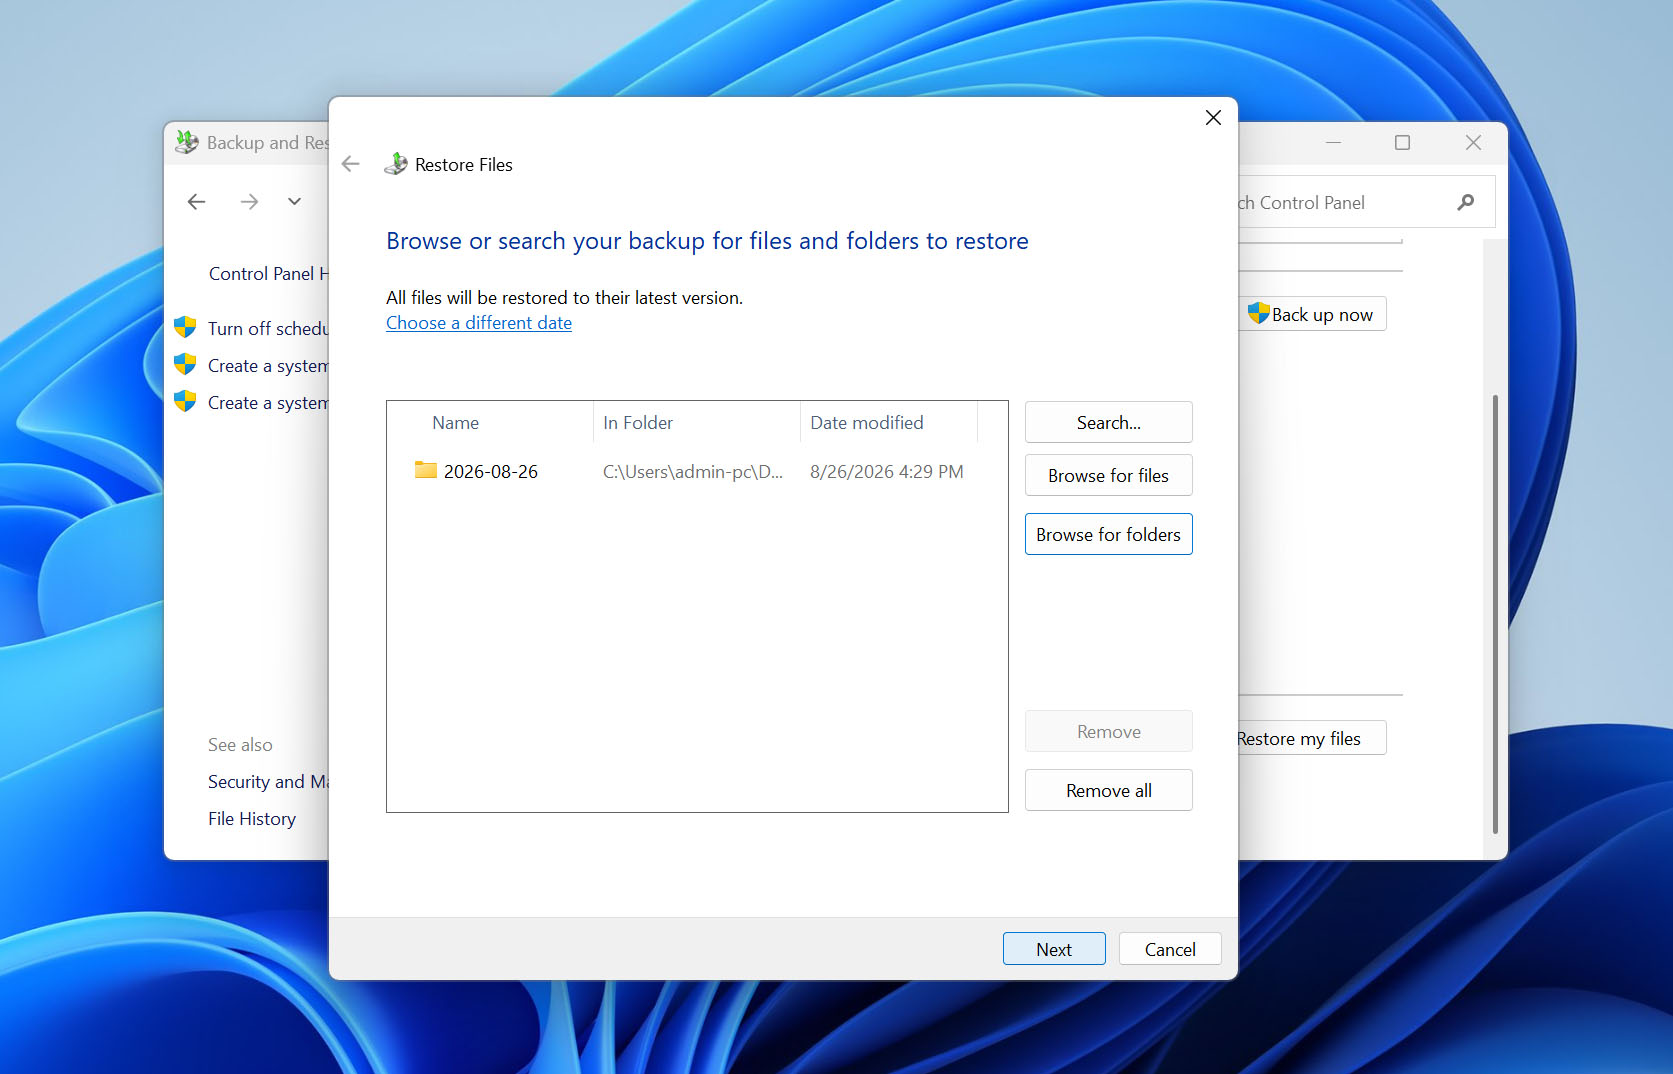
- Click Next and choose where you want to restore your files.
- Click Restore to continue.
Method 5: Recover Deleted Files & Folders From OneDrive
If you need to recover deleted files in Windows 10/11 and newer, you have one more recovery option available: OneDrive, Microsoft’s cloud storage service that lets you store files on the company’s servers and seamlessly sync them between computers.
The desktop folder is synchronized by OneDrive by default, so there’s a good chance that your lost files are safely backed up even if you don’t realize it.
This is what you need to do to recover deleted files and folders from OneDrive:
- Go to: https://onedrive.com/
- Log in with your Microsoft account.
- Navigate to the Desktop folder in OneDrive.
- Choose the files you want to recover.
- Click the Download button.
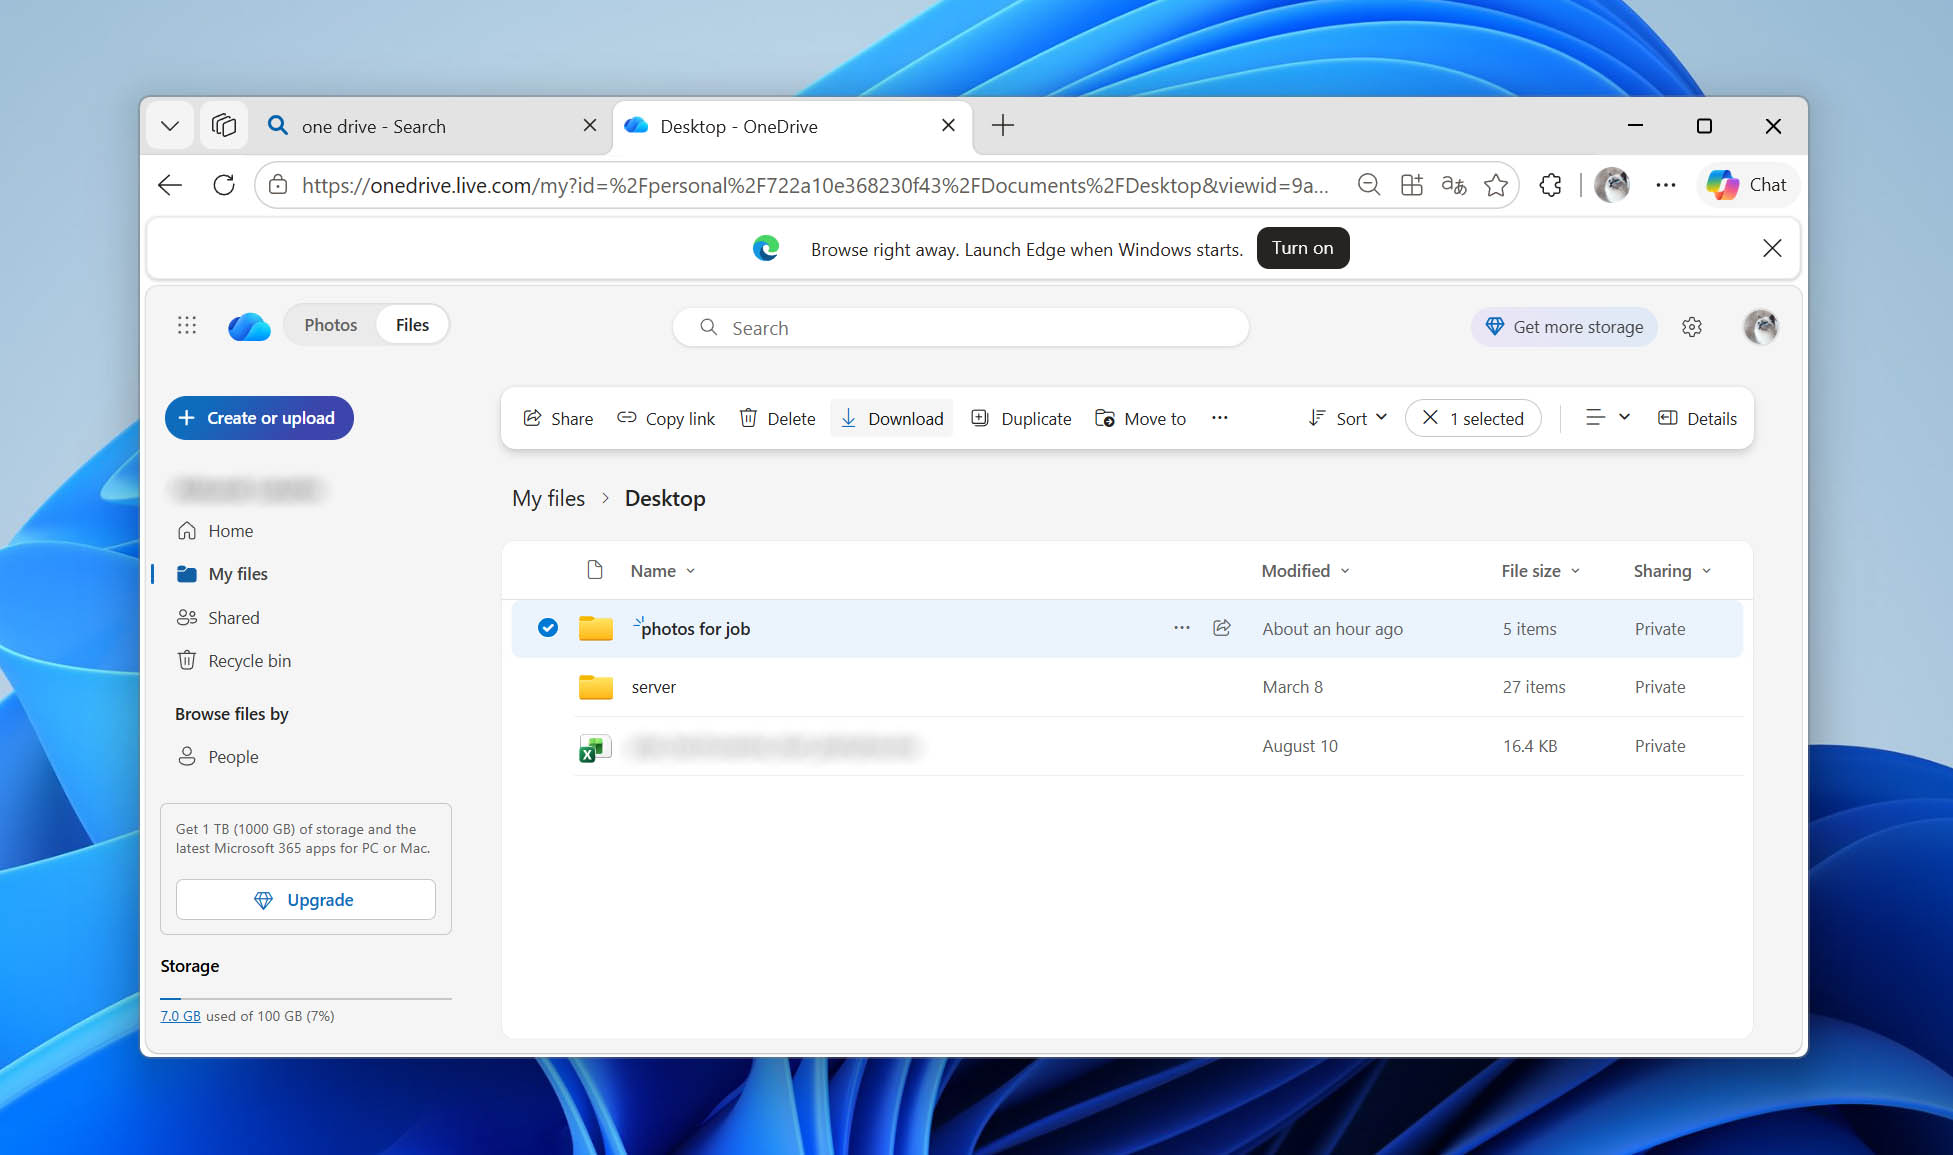
OneDrive will then download your lost files from the internet, so the speed of their recovery will depend primarily on the speed of your internet connection.
Frequently Asked Questions
What happens if you delete the desktop folder?
When you normally delete files or folders from the desktop, they are usually moved to the Recycle Bin, where they remain until you empty it or Windows removes older items to make room. However, files deleted using Shift + Delete bypass the Recycle Bin. The same may happen if the deleted data is too large for the Recycle Bin or its settings are configured to remove files immediately.
Will deleting desktop icons delete everything?
Some desktop icons are shortcuts to applications, documents, folders, or other items. Deleting a shortcut removes only the shortcut itself and doesn’t delete the original file or application it points to. However, if the icon represents an actual file or folder stored on the Desktop, deleting it deletes that item.
What to do if you accidentally deleted the Desktop folder?
If you accidentally deleted the Desktop folder, check the Recycle Bin first and restore it from there. If it’s not available, check OneDrive, File History, or another backup. For a permanently deleted local Desktop folder, you can use data recovery software to scan the drive where it was stored and recover its contents.
Conclusion
Microsoft is well aware that many users of its operating system keep more valuable files and folders on the desktop than they probably should. To minimize the chance of their accidental deletion, Windows provides multiple safety nets in the form of the Recycle Bin and backup features like File History and OneDrive. Users can also take advantage of specialized data recovery software to recover files from the desktop even if they are not present in the Recycle Bin or any backup location.

David Morelo is a professional content writer with a specialization in data recovery. He spends his days helping users from around the world recover from data loss and address the numerous issues associated with it.
When not writing about data recovery techniques and solutions, he enjoys tinkering with new technology, working on personal projects, exploring the world on his bike, and, above all else, spending time with his family.
- Klennet Recovery Review (Formerly Zero Assumption Recovery)
- iBeesoft Data Recovery Review – A Likable Clone With Limited Features
- DMDE Review – A Data Recovery Powerhouse or a Usability Nightmare?
- Cisdem Data Recovery for Mac Review – A Clone in Disguise
- Tenorshare 4DDiG Review – All That Glitters Is Not Gold
- Houston, Texas, United States
Nikolay Lankevich has over 15 years of strong experience in various fields and platform includes Disaster Recovery, Windows XP/7. System analysis, design, application (Inter/Intranet) development, and testing. Provided technical supports on desktop and laptops on Win-XP and Macintosh for about 2000 employees.