Recover Formatted Hard Drive on Mac & Windows in 5 Steps
Can I recover data from a fully formatted drive on Mac OS X and Windows?
Yes, you can recover any formatted hard drive on Mac and Windows. In fact, there are several ways how you can approach the task. One of the best ways to recover a formatted hard drive on Mac and Windows is to use a data recovery software application and let it handle the dirty work while you kick back and wait for your files to reappear.
How to Recover Data from Formatted Hard Drive on Mac
Step 1: Learn the Basics
While you don’t have to understand the ins and outs of the hard drive formatting process, knowing what has happened to your hard drive can help you successfully recover data from it.
When most people hear the term hard drive formatting, they immediately think of a process experts call high-level formatting. This type of formatting is actually the last of three different processes that make a hard drive usable by the operating system and applications, and its purpose is to create a file system within a disk partition.
The disk partition is created prior to high-level formatting, during a process called partitioning, which divides the hard drive into one or more regions, called partitions, indicating where each partition starts and where it ends. The information about individual partitions is stored in a special region on the hard drive, called the partition table.
The way a hard drive is partitioned is completely in the hands of the user, but the same can’t be said about the first formatting process, called low-level formatting, because it usually happens in the factory. During low-level formatting, the surface of the hard drive is marked to indicate the start of recording blocks.
The good news is that the three formatting processes leave most—if not all—data on the hard drive intact, making complete data recovery easily possible.
Step 2: Download & Install Disk Drill for Mac
If you want to recover a formatted hard drive on Mac, then you need to begin the recovery process in a timely manner and avoid using the hard drive until your data are recovered. Any write operation that happens on the formatted hard drive could result in your data becoming overwritten, and that would make complete recovery impossible.
Start by downloading and installing Disk Drill for Mac from its website.
Disk Drill for Mac is a data recovery software application capable of recovering hundreds of file formats from formatted, corrupted, as well as healthy storage devices. Besides recovering data from formatted internal hard drives, it can also recover formatted external hard drives connected to Mac computers, USB flash drives, iOS devices, Android devices, memory cards, and more.
Open the downloaded image file and drag Disk Drill.app to the Applications folder.
Step 3: Run Disk Drill & Select the Available Drive to Scan
You should now be able to run Disk Drill just like any other Mac application. If you’re asked to provide your admin password, do so. Disk Drill won’t attempt to recover any data from the formatted hard drive until you tell it, and it won’t make any changes to your system.
The formatted hard drive should be listed among hardware disks. It should be completely empty, which is how you can recognize it even if you don’t know its name (see Generic UDISK in the screenshot above).
If the hard drive isn’t listed among hardware disks, make sure it’s connected to your Mac properly and re-launch Disk Drill.
Click the Search for lost data button to analyze the hard drive. Don’t worry: Disk Drill won’t copy any files from the hard drive just yet. It will only scan it and present you a list of recoverable data.
Step 4: Preview the Recoverable Drive Data
When the scan is finished, you will be able to preview the recoverable drive data and select which files you want to recover.
We highly recommend you take advantage of the preview feature as much as possible and use it to avoid recovering files you don’t need, such as system and application files, documents and multimedia that you have backed up elsewhere, and so on.
When you encounter a file you want Disk Drill to recover, click on the small checkbox next to it to add it to the recovery queue. You can recover as many files at the same time as you want as long as the target storage device has enough free space for them.
Step 5: Recover Your Drive
Once you’ve selected all files for recovery, you can begin the recovery process by clicking on the Recover button. Notice the Choose folder… option on the next window.
You can use this option to specify the recovery destination. You should never recover files from a formatted hard drive to the same hard drive because you could overwrite the very same files you’re trying to recover.
Wrapping Up
Provided you use a capable and user-friendly data recovery software application like Disk Drill for Mac, you have absolutely nothing to fear when it comes to recovering a formatted hard drive on Mac. The entire recovery process can actually be summarized in just a few sentences:
To recover formatted hard drive on Mac:
- Download Disk Drill for Mac from its website.
- Install it just like you would any other Mac application.
- Launch Disk Drill and select the formatted hard drive.
- Click the Recover button next to it to scan it.
- Select which files you want Disk Drill to recover and click Recover.
That’s how easy it is to recover formatted hard drive on Mac with the help of Disk Drill.
How to Restore Data from Formatted Hard Drive on Windows 10 and Earlier
Step 1: Stop Using the Formatted Hard Drive
In most cases, formatting doesn’t erase the content of the formatted hard drive. It simply marks all sectors as empty, causing Windows to see the hard drive as blank.
In reality, your files are still physically present on the hard drive, and you can undelete them if you act in time and stop using the formatted hard drive until you get your files back.
If nothing else, make sure that you don’t write any data to the formatted hard drive because you could overwrite the same files you’re trying to undelete. By writing, let’s say, 50 GB of data to a 250 GB hard drive, there’s one in five chance of your files getting overwritten.
Step 2: Download & Launch Disk Drill for Windows
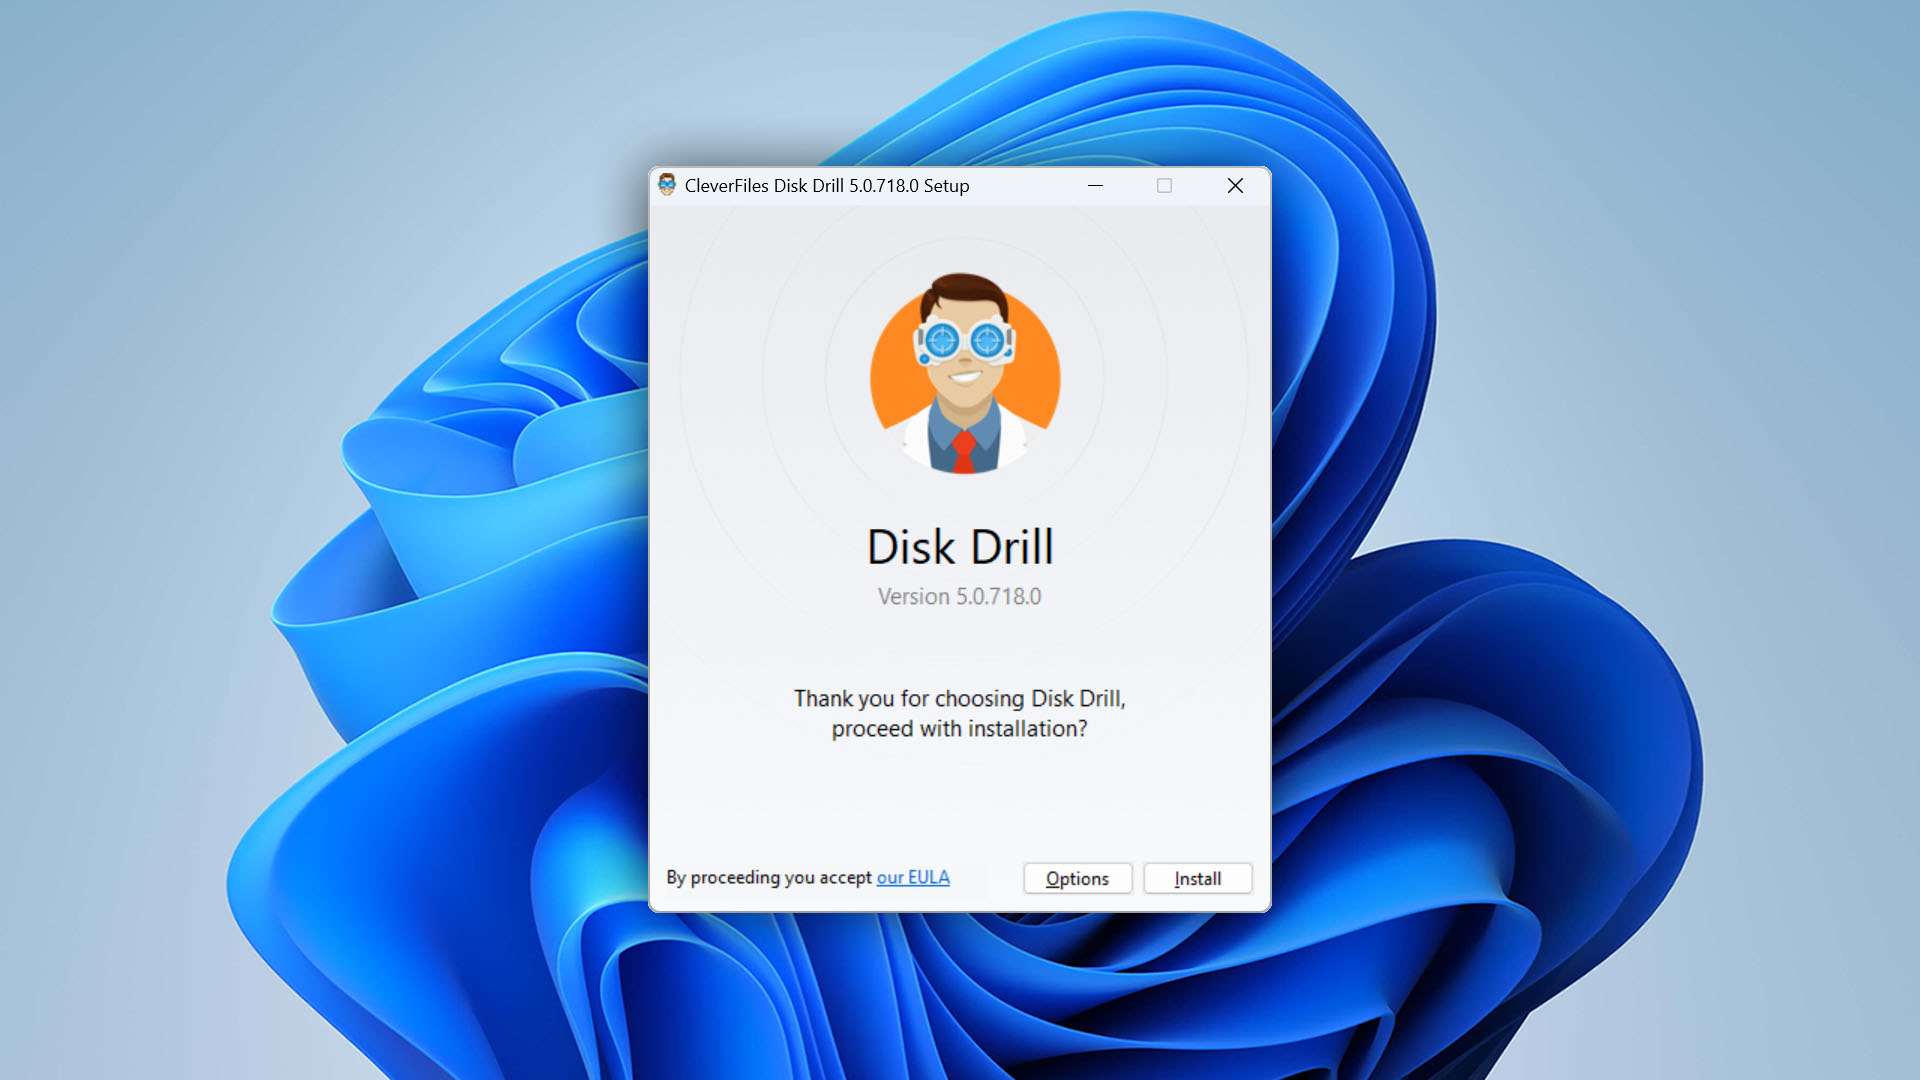
If you want to restore data from a formatted hard drive on Windows 10 or earlier, you’re in luck because Disk Drill is also available for Windows, offering the same performance and one-click approach.
With Disk Drill for Windows, you can restore up to 500 MB for free and use its data protection and backup features to prevent future data loss.
Again, make sure you don’t write any new data to the formatted hard drive because you could overwrite the data you’re trying to get back, so download and install Disk Drill for Windows on a different hard drive. If you don’t have another hard drive, we strongly recommend you disconnect the formatted hard drive from your computer and perform the restore process using another machine.
Step 3: Select the formatted hard drive and click Search for lost data
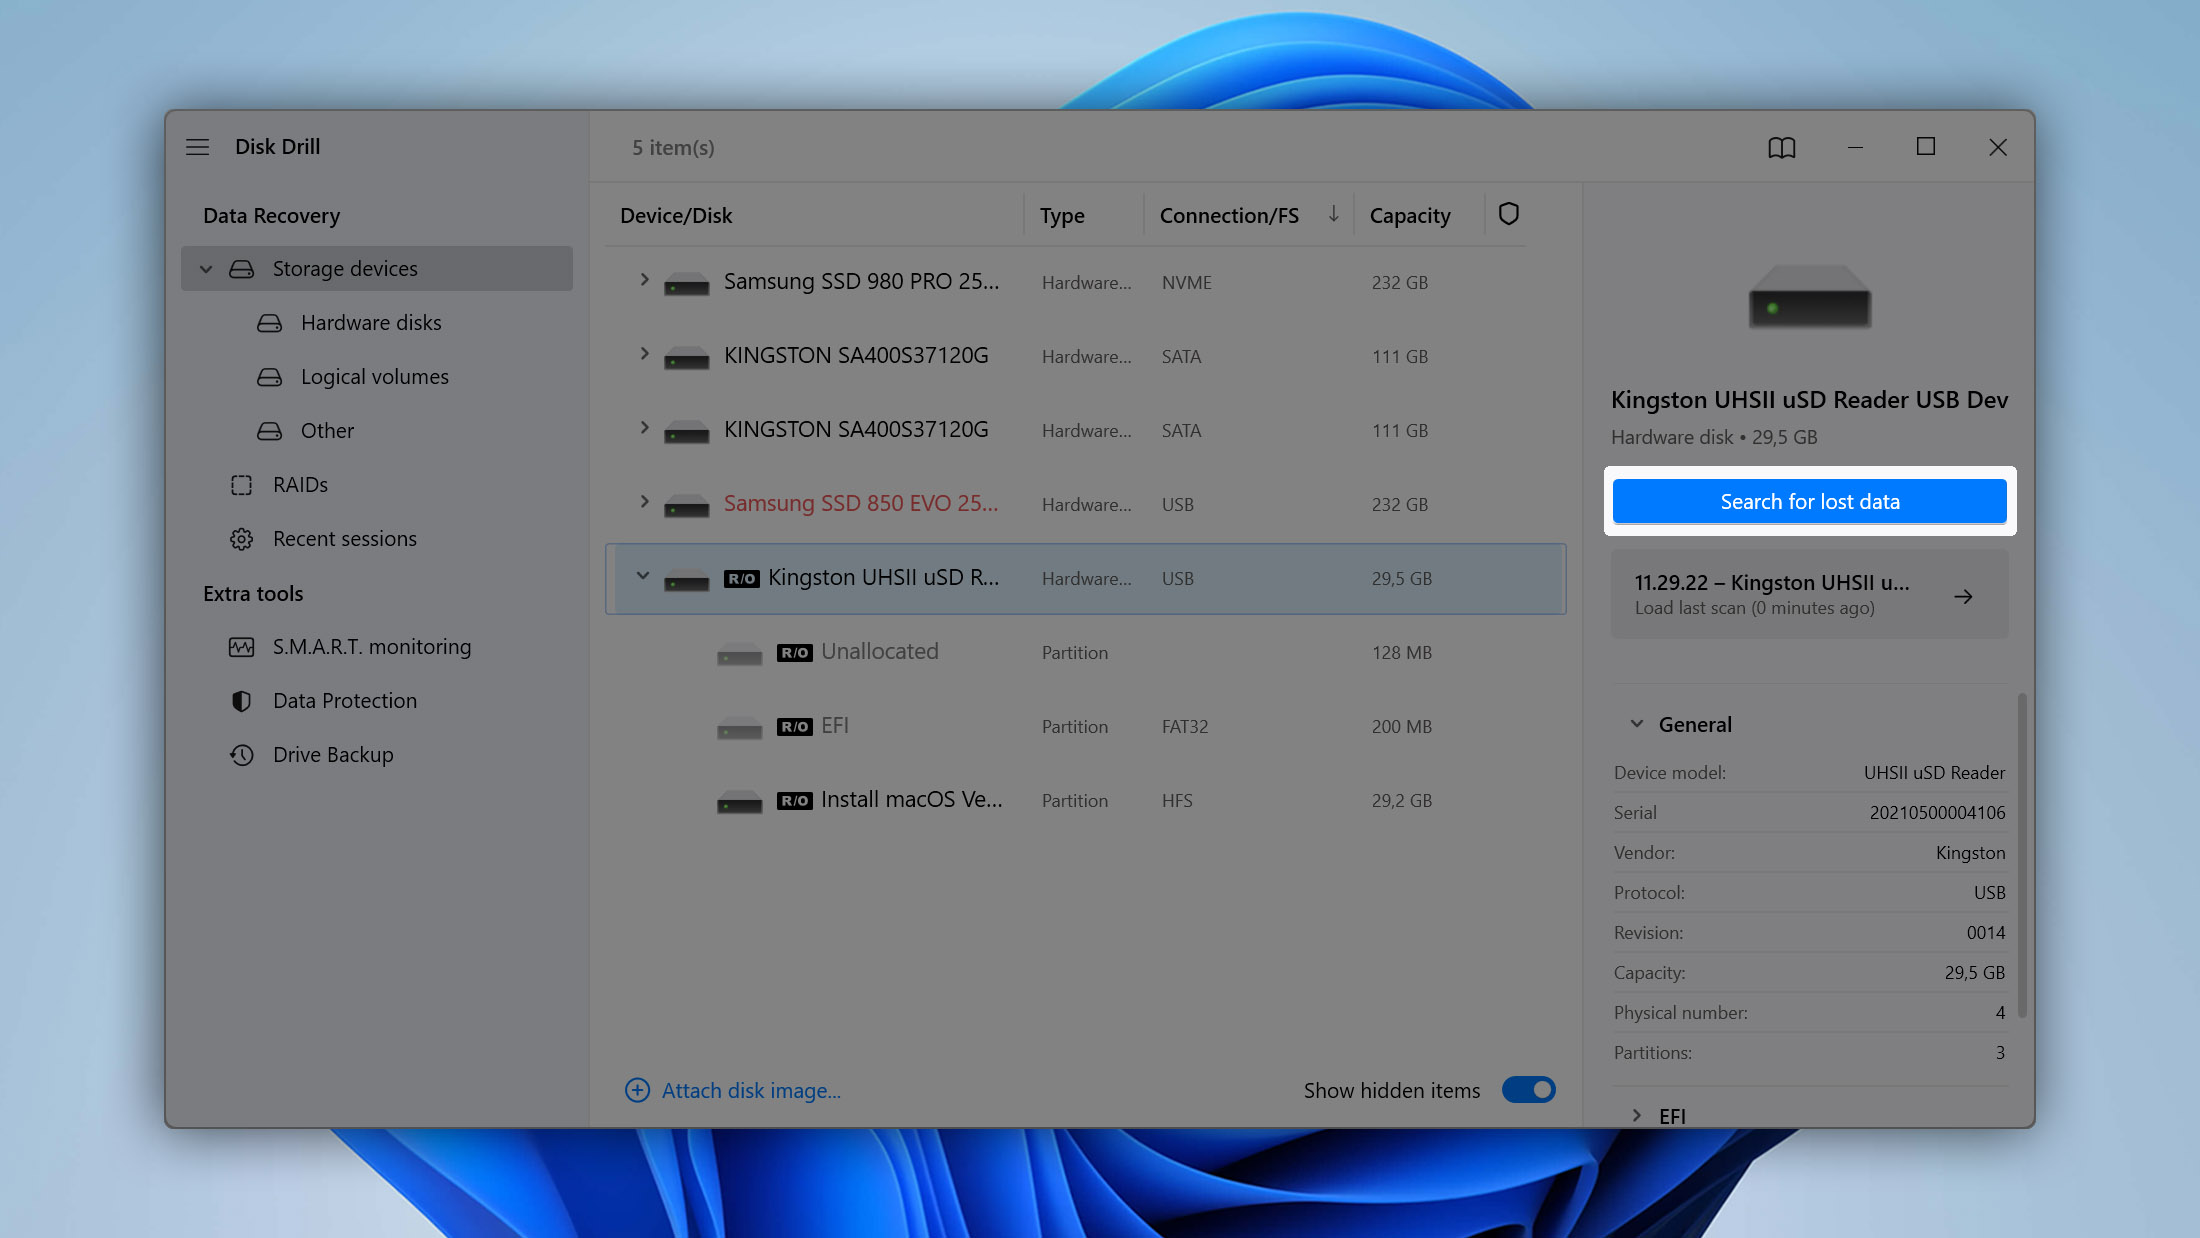
Once Disk Drill launches, you should see a list with all storage devices connected to your computer. Look for the formatted hard drive and select it.
You can switch to the Info tab in the right pane to verify that you’ve selected the correct hard drive. Feel free to also take a look at the S.M.A.R.T. tab, which displays the health status of the hard drive, including its wear level, power cycle count, and temperature.
Are you certain that you’ve selected the correct hard drive? Great! Then go back to the Recovery tab and click the Search for lost data button at the bottom.
Step 4: Select all files you want to restore
As soon as you click the Search for lost data button, Disk Drill will start scanning your hard drive for lost data, displaying its progress.
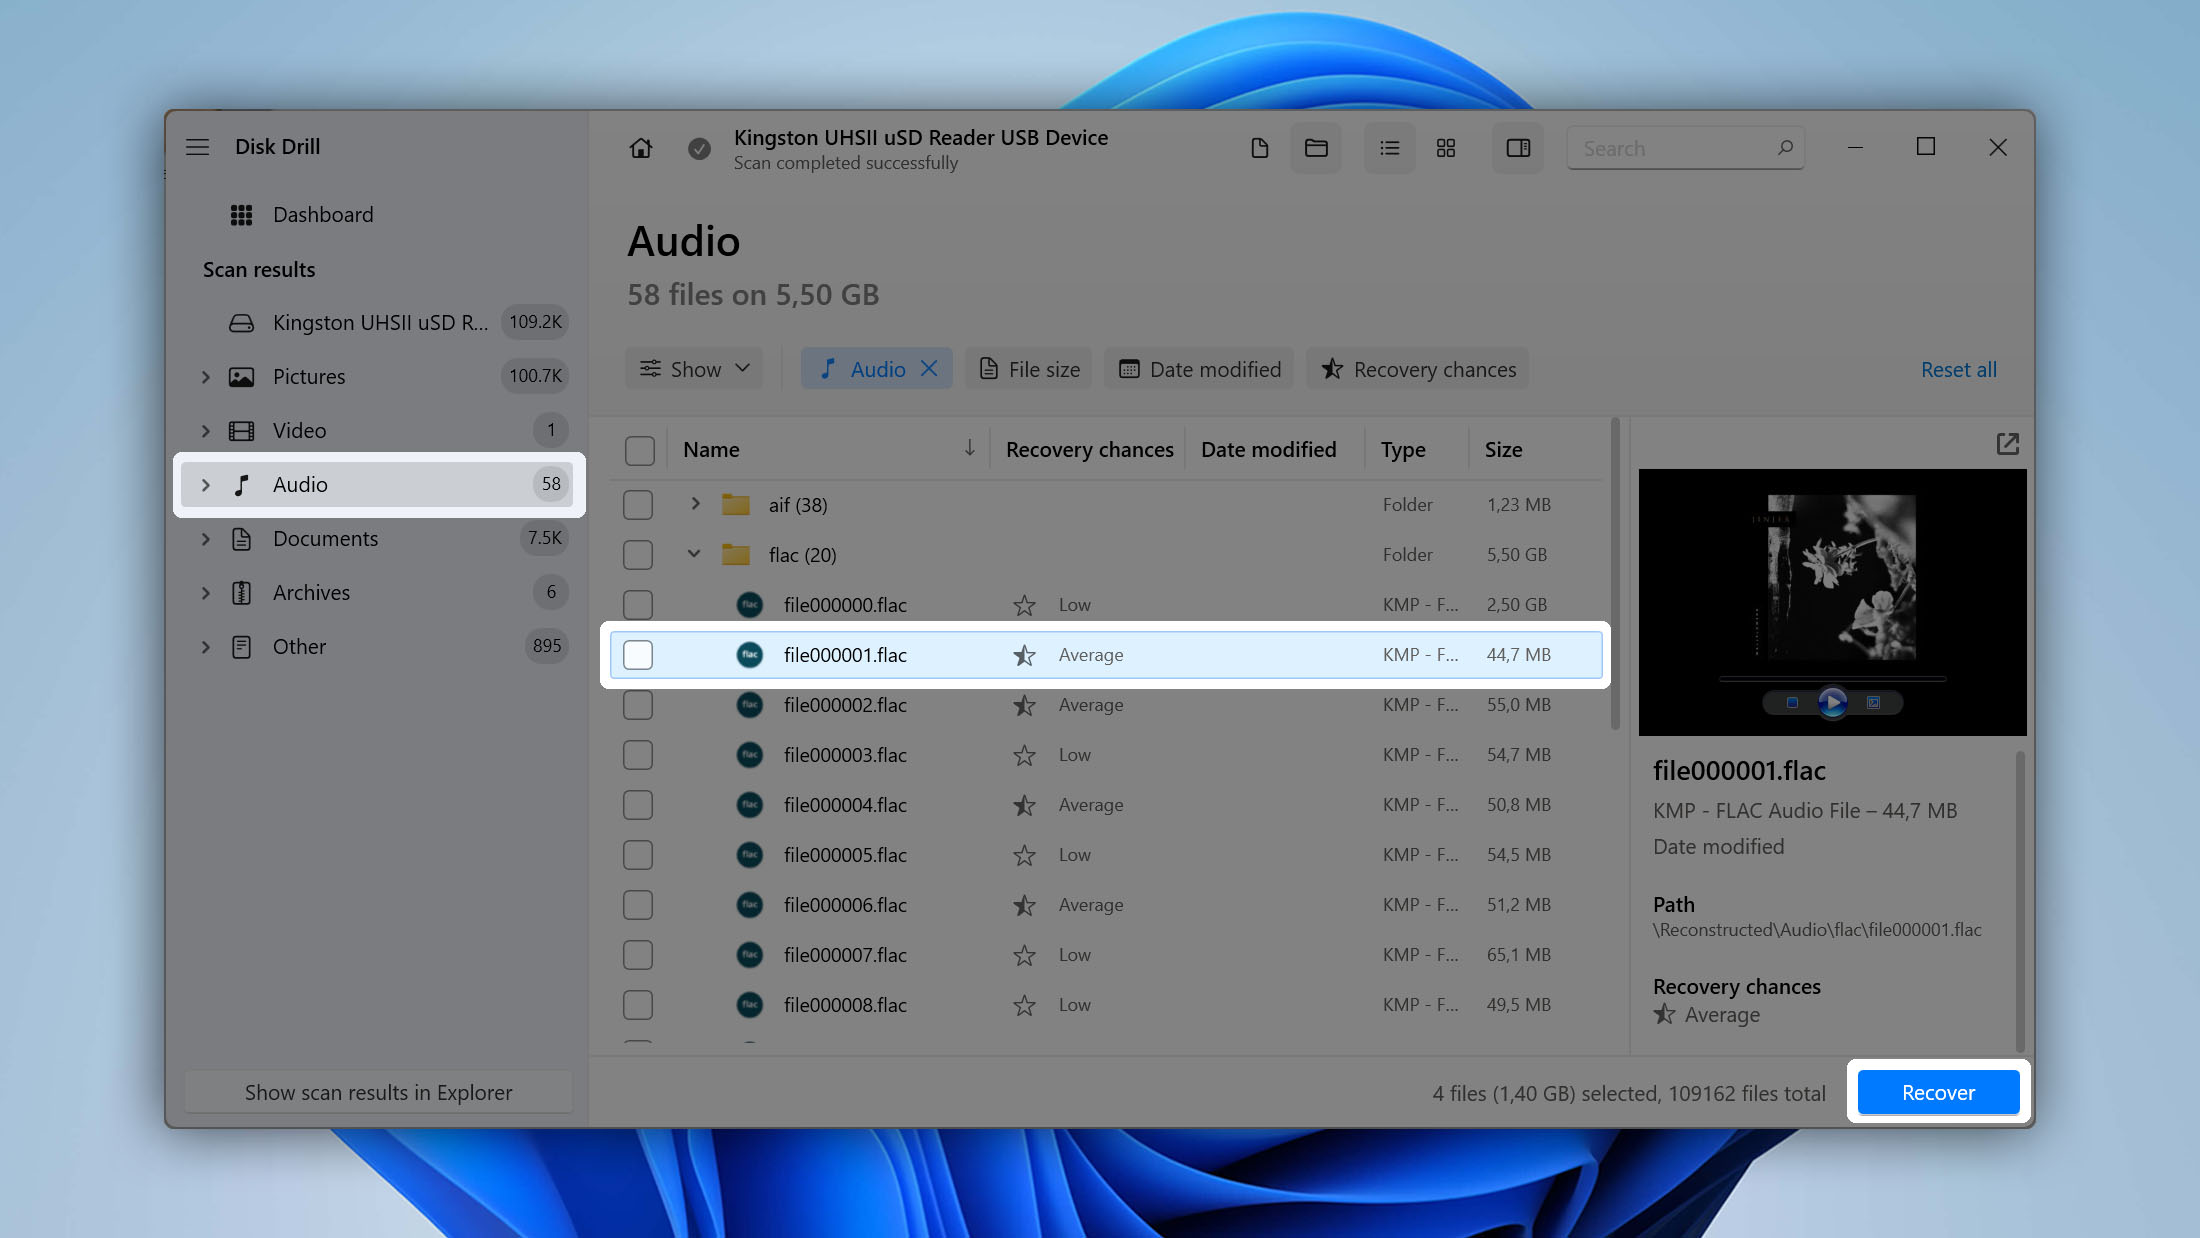
What’s great about Disk Drill as an undelete tool is that you don’t have to wait for the scan to finish to look at the results. Instead, click the Review found items button in the top-right corner and go through the scan results.
You can filter scan results using the filters in the left pane, and you can also search for a specific file using the search bar in the top-right corner. If you can see a preview of a selected file, it means that the file is intact and can be restored.
All you need to do to add a file to your restore queue is click the small checkbox next to it. You can add as many files as you want, but you can also recover only one file—it’s completely up to you.
Step 5: Specify the recovery folder and click OK
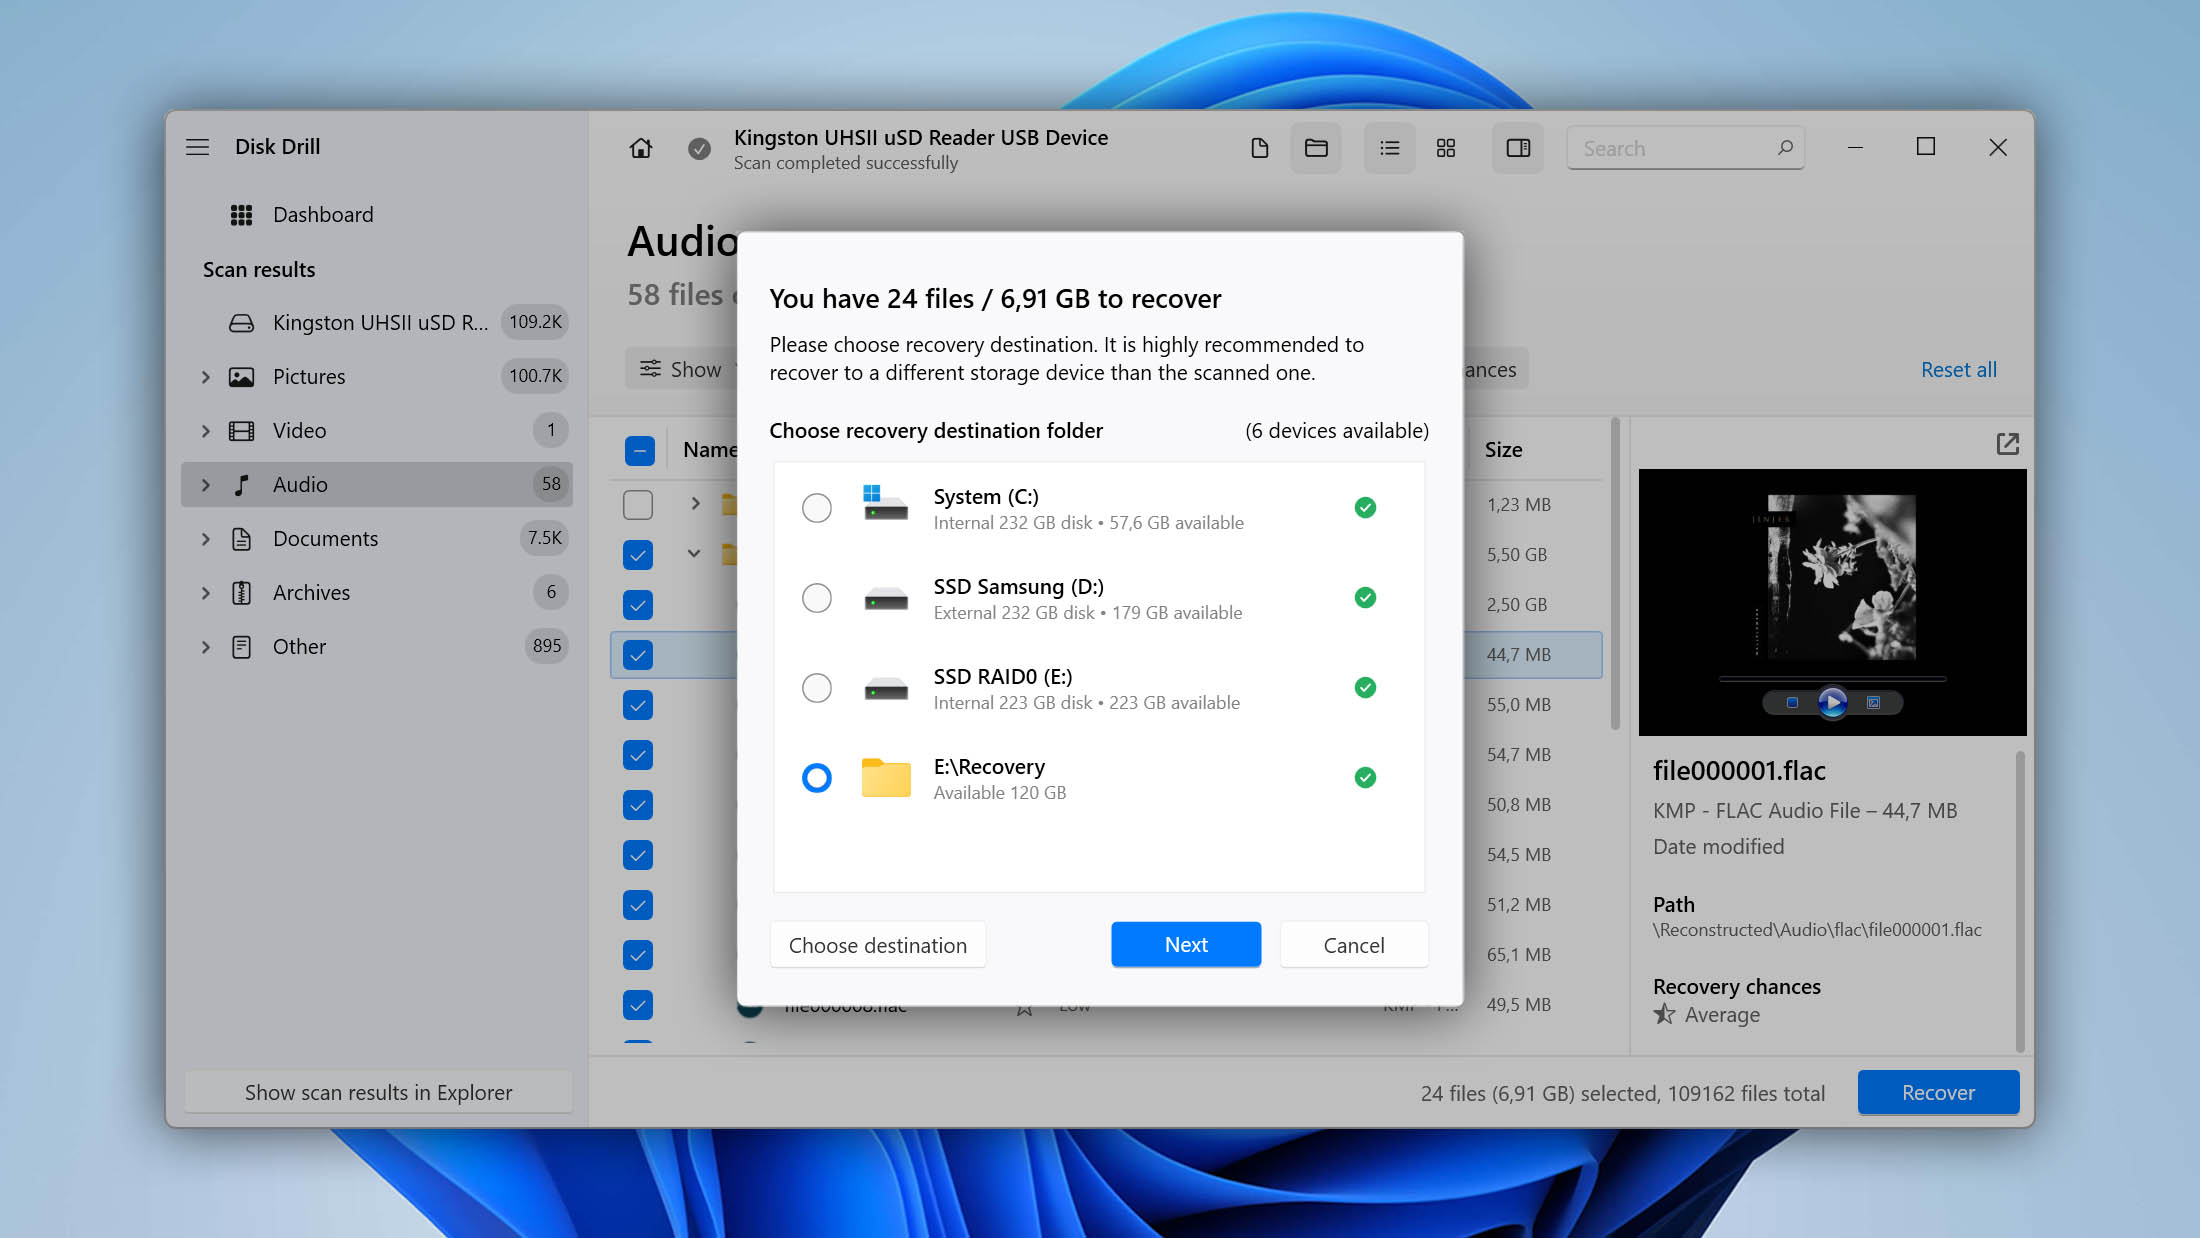
When you have selected all the files you want to undelete, either wait for scanning to stop or click the Stop scanning button to stop it manually. You will then be able to click the blue Recover button at the bottom to get your files back.
Disk Drill for Windows will ask you to specify where you want to restore your files. Make sure the selected destination isn’t on the same hard drive as the files you want to undelete because the newly restored files could potentially overwrite other recoverable data.
Wrapping Up
With the right undelete solution, restoring data from a formatted hard drive on Windows is a matter of a few simple steps that anyone can go through without expert knowledge or special equipment. Let’s recap the whole process to highlight just how nonintimidating it is.
To restore data from a formatted hard drive using Disk Drill for Windows:
- Download and install Disk Drill for Windows.
- Select the formatted hard drive and click Search for lost data.
- Select the files you want to recover.
- Click the Recover button at the bottom.
- Specify the recovery destination and click OK to begin the recovery of your files.
As you can see, Disk Drill makes it easy to recover data from a formatted hard drive both on Mac and Windows computers.
Is It Worth Contacting Data Recovery Service to Restore Data?
As we’ve explained earlier in this article, software applications like Disk Drill make it incredibly easy to restore data from a formatted hard drive on Mac and Windows. Without any expert knowledge, you can get back images, videos, music, documents, file archives, and other data.
Since most people don’t have the necessary equipment and technical skills to repair a physically damaged storage device, a professional data recovery lab is often the only solution.
Whether the services of a professional data recovery lab are worth their price depends mainly on the value of the lost data. If you need to recover important business documents or irreplaceable family pictures and videos, you shouldn’t hesitate to contact a data recovery lab and ask for a price quote.
On the other hand, it’s probably not worth it contacting a data recovery lab just to get back a couple of files that you can easily recreate in an hour or two.
What Is the Purpose of Formatting a Hard Drive?
Not all hard drive formats are accidental. Often, there’s a good reason to format a hard drive, including those listed below.
Removing Your Data
If you have a hard drive that’s jam-packed with useless data, formatting is usually the quickest and most painless way how to remove it, allowing you to get rid of everything with a few simple clicks. On a Mac, you can format a hard drive using the Disk Utility app. Simply select it from the list on the left and click the Erase button. You will still be able to recover data from the erased hard drive because Disk Utility doesn’t overwrite them.
Changing Your Operating System
Recent versions of macOS use Apple File System (APFS), a proprietary file system that’s not compatible with versions of macOS older than High Sierra. APFS is also not compatible with Windows or Linux, so the only way how to install a different operating system on a hard drive with a recent version of macOS is to format it and replace the file system. Most operating systems allow you to do this during installation, but some may require you to format your hard drive beforehand.
Changing Disk Partitions
Besides changing your operating system, you may also need to format your hard drive after changing disk partitions. For example, you can shirk the main partition and create a secondary one to create two distinct logical hard drives that each use part of the actual physical hard drive. You can then use one logical hard drive for one thing and the other one for something completely different. Each logical hard drive can even have a different file system or operating system installed on it.
How to Format a Hard Drive on Mac and Windows?
Many users lose valuable data because they attempt to format a hard drive and make a mistake or because they use an unreliable third-party software application.
To help you avoid losing your data during formatting, let’s take a close look at how to format a hard disk on Mac and Windows.
To format a hard drive on Mac:
- Go to Applications > Utilities and launch Disk Utility.
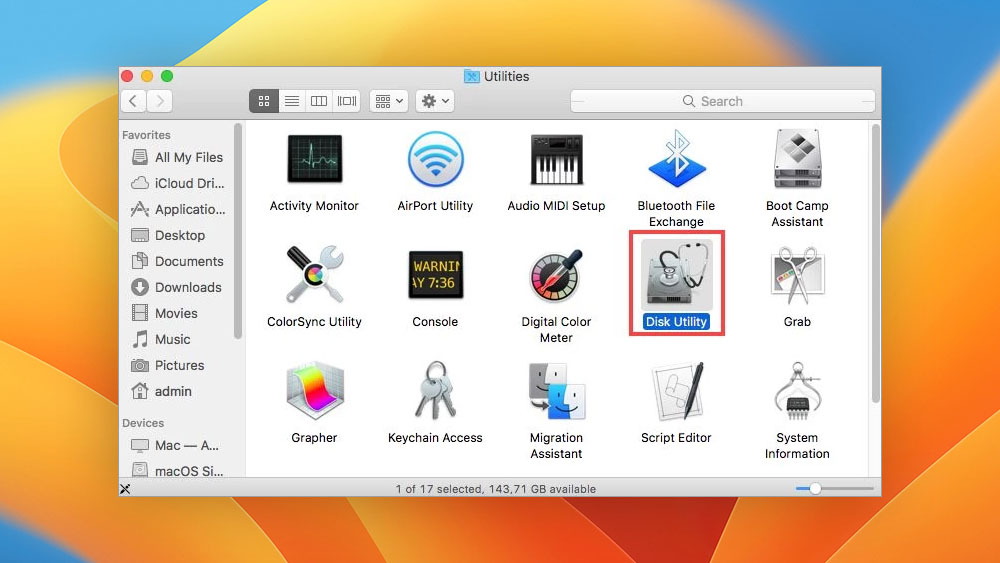
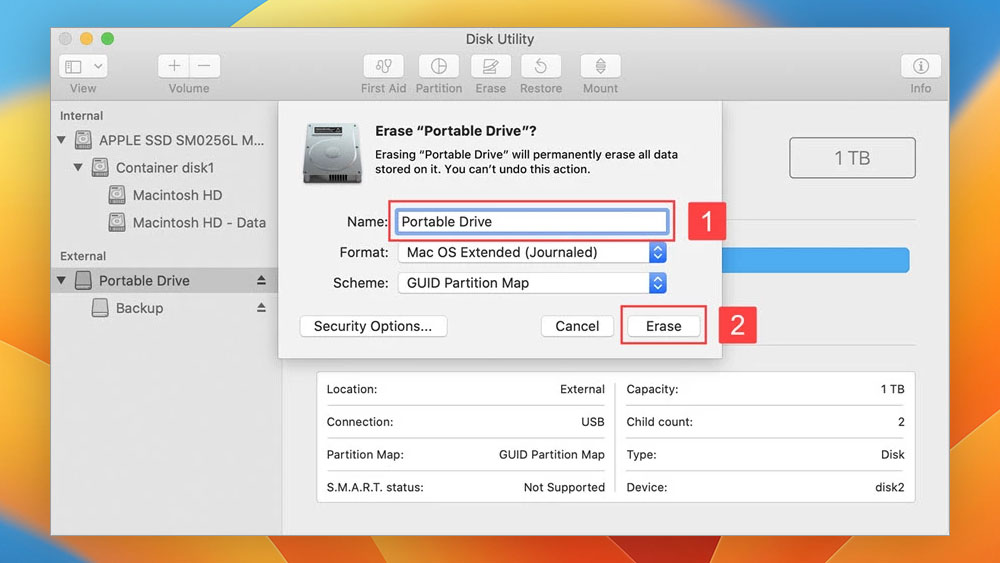
- Select the hard drive you want to format from the list of available drives on the left.
- Click the Erase option in the toolbar.
- Name the hard drive and decide which file system you want to use.
- Click Erase to start the formatting process.
To format a hard drive on Windows:
- Open File Explorer and click This PC from the list of available locations on the left.
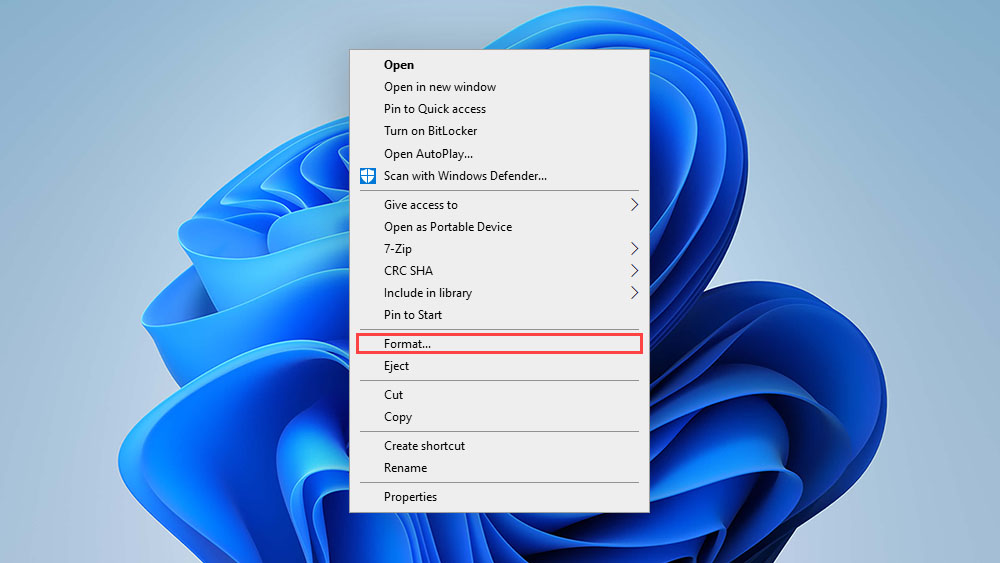
- Right-click on the hard drive you want to format.
- Select “Format…” from the context menu.
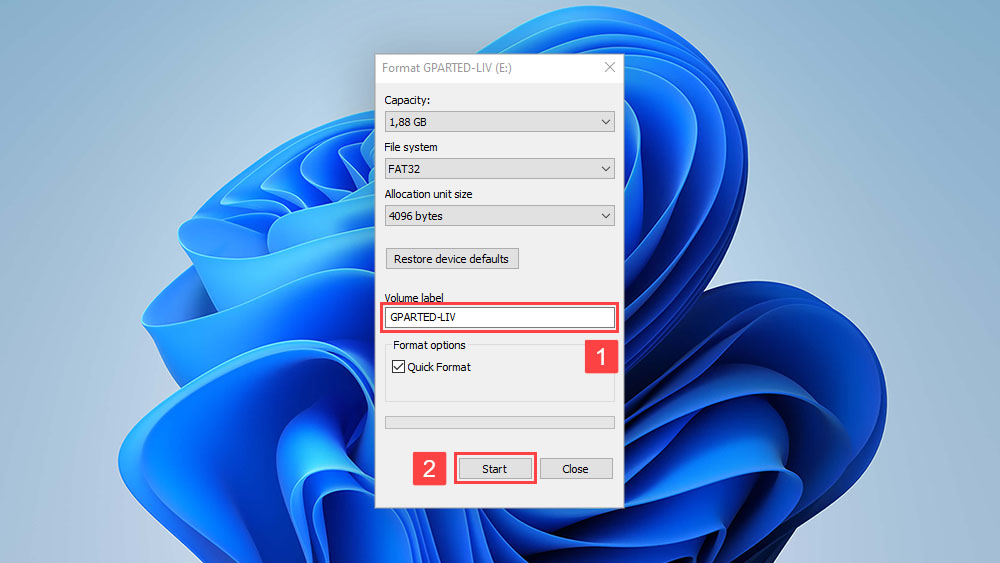
- Name the hard drive and decide which file system you want to use. Feel free to keep the Quick Format option checked.
- Click Start to begin the formatting process.
When formatting a hard drive, you can choose from a number of different file systems. Here are the main file systems you should know about:
- NTFS: As the default file system in Windows, NTFS is widely used across Windows computers, but it’s not natively supported by macOS.
- FAT/FAT32: These two old file systems are still widely used for removable storage devices like SD cards and USB flash drives because they are well supported across all major operating systems. However, they are not suitable for larger storage devices and system hard drives due to their limited support for large files.
- exFAT: Introduced by Microsoft as a modern file system for flash-based storage devices, exFAT has quickly become the best file system for large SD cards and USB flash drives.
- EXT2/EXT3/EXT4: These three file systems are widely used by Linux users, but they are not natively supported by neither Windows nor Mac.
- HFS: This journaling file system was developed by Apple for its operating system, but it shouldn’t be used anymore because Apple no longer supports it.
- APFS: Introduced in 2017 by Apple as a replacement for HFS, this file system is optimized for flash and solid-state drive storage and focuses heavily on encryption and security.
Understanding the Importance of Backups
Although it’s possible to restore lost files from a formatted hard drive, it’s always better to have a backup at hand with all important files. Whereas applications like Disk Drill work only if the lost files are still physically present on the formatted hard drive (and if the hard drive is in good working condition), backups can reliably solve even the most serious cases of data loss.
Types of Backups
Manual Backups
To back up your data, all you need is a suitable storage device and the ability to adhere to at least a somewhat regular backup schedule. Unfortunately, most users are not able to stick to a regular backup schedule for too long, leaving them with outdated backups that don’t contain the most recent versions of their files.
Automatic Backups
Fortunately, both Mac and Windows come with automatic backup tools (called Time Machine and File History, respectively), and you can easily configure them to automatically back up your data for you.
To back up data with Time Machine on Mac:
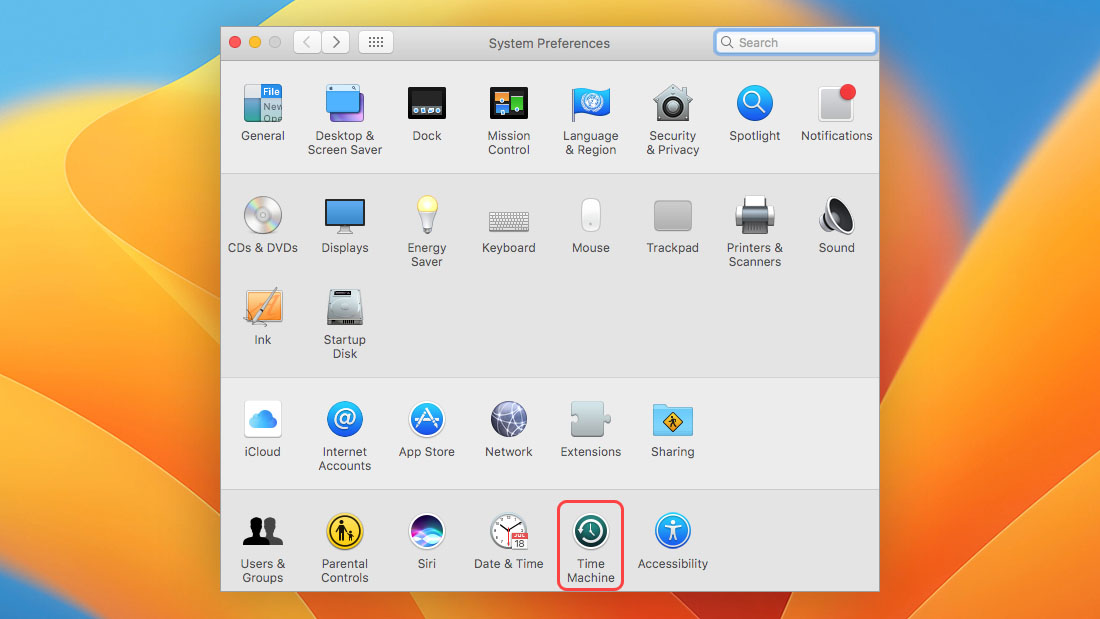
- Open the Apple menu and select System Preferences.
- Choose Time Machine.
- Click Select Backup Disk and add a suitable disk.
- Check the Back Up Automatically box.
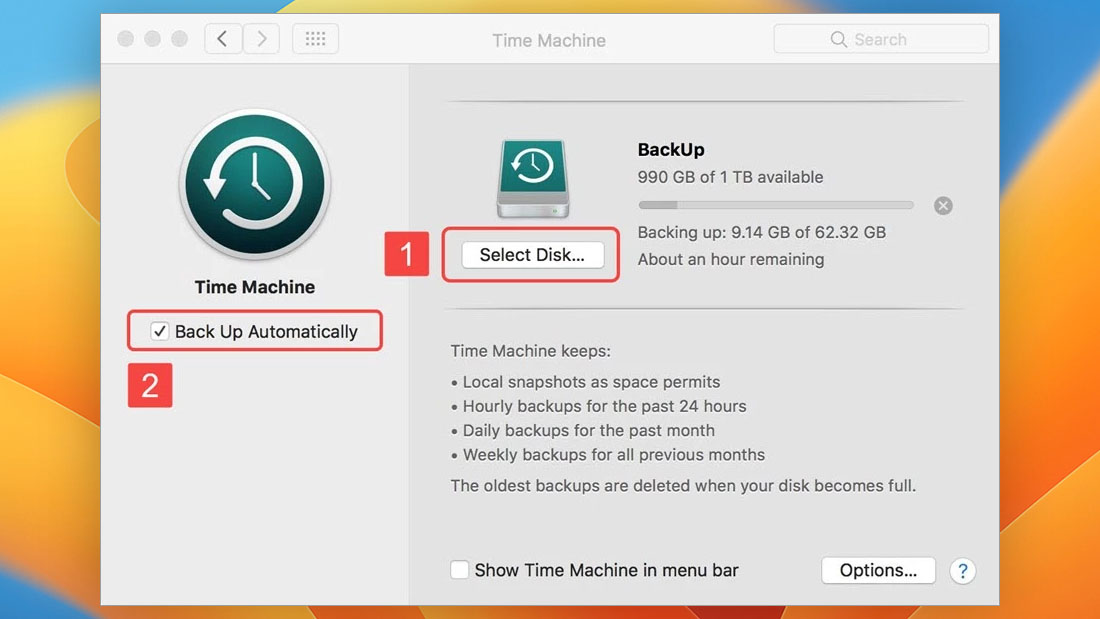
- Close the Time Machine window.
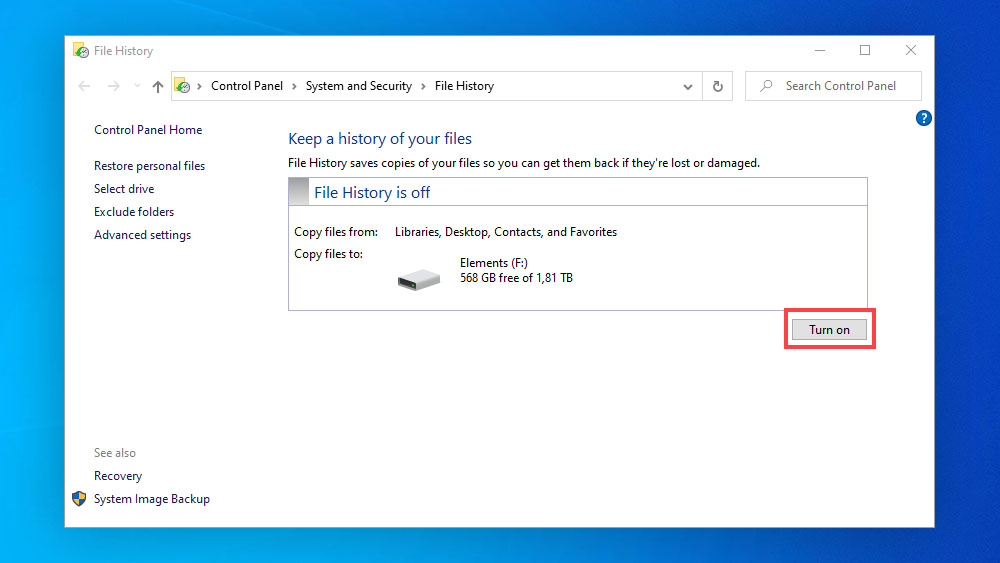
To back up data with File History on Windows:
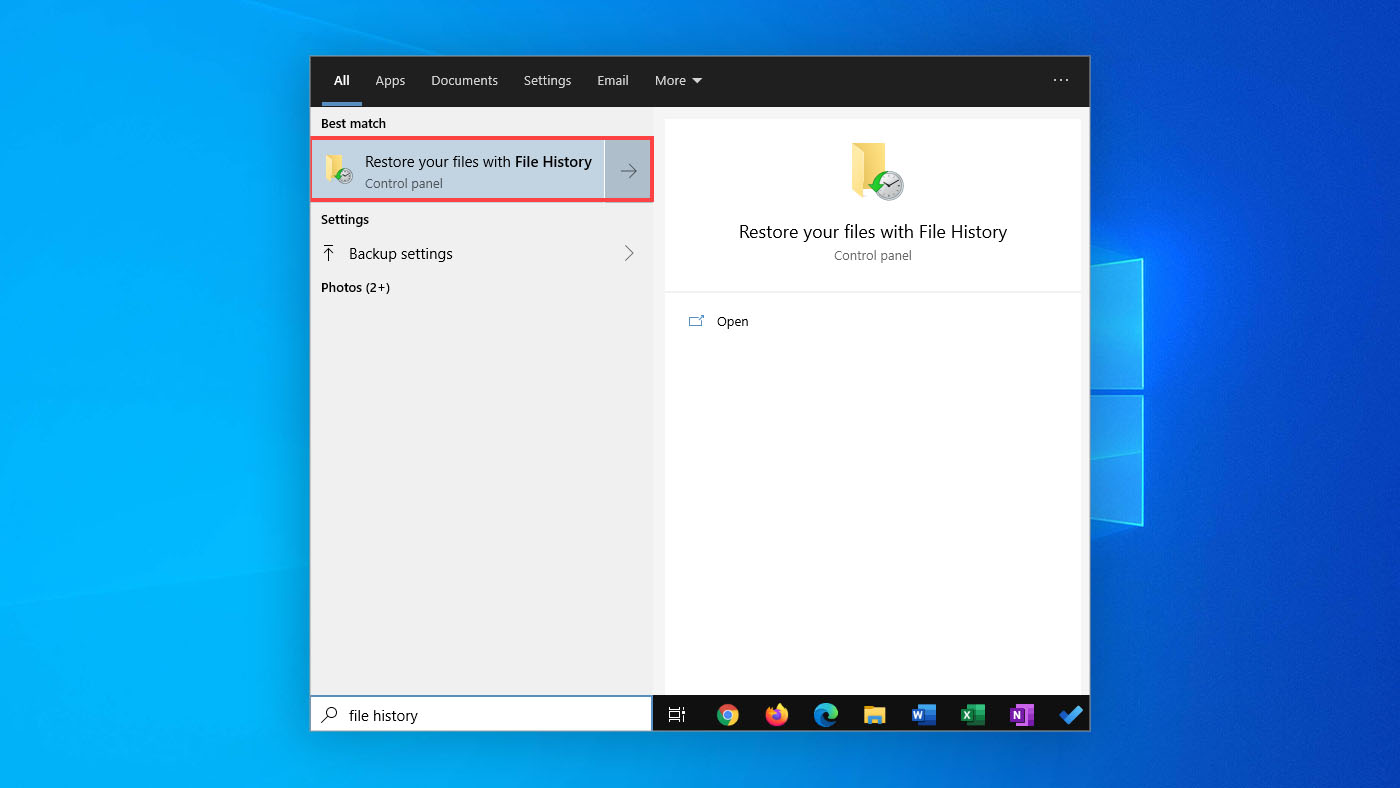
- Open Start menu and type File History.
- Select Restore your files with File History.
- Click Configure File History settings.
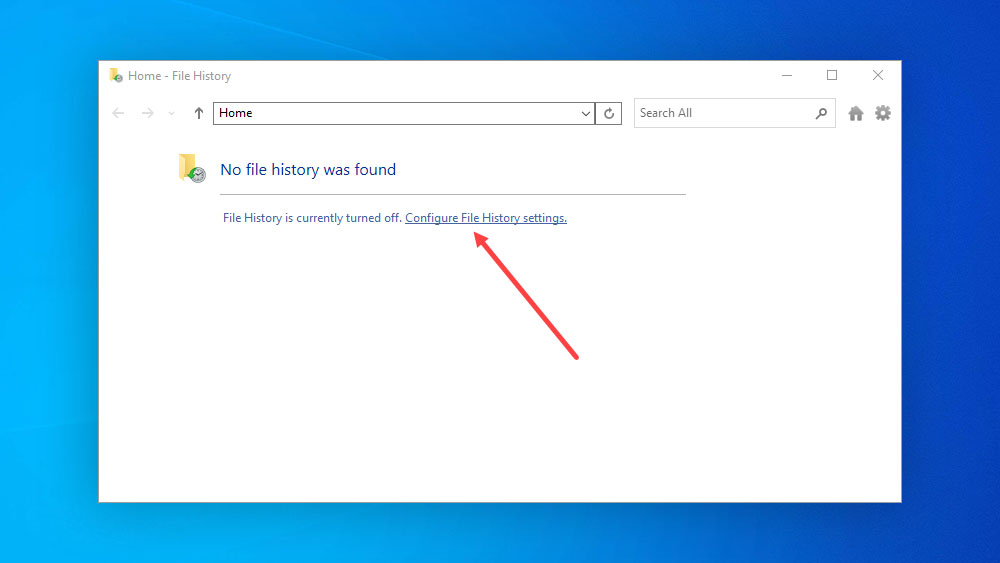
- Click Select a drive and choose the network or external drive you want to use.
- Turn on File History.
Cloud Backups
For extra protection against natural disasters and theft, it’s a good idea to back up important data to another location, and cloud backup services like Google Drive, iCloud, Microsoft OneDrive, Dropbox, and Mega make this easy. Just keep in mind that cloud backup services charge a monthly subscription fee for additional storage space, so budget accordingly.
Frequently Asked Questions
How to recover Mac formatted data from an external hard drive?
By far the most straightforward way how to recover Mac formatted data from an external hard drive is to download and use Disk Drill for Mac, an easy-to-use data recovery software application with support for all popular storage devices, including external hard drives. If you use the steps below to recover your data with Disk Drill, you will have them back in no time:
- Download and install Disk Drill for Mac.
- Connect the external hard drive to your Mac.
- Launch Disk Drill and click the Recover button next to it to scan it.
- Select which files you want Disk Drill to recover with the help of the preview feature.
- Click the Recover button to begin the recovery process when you have all the important files selected.
How to recover data from a formatted hard drive on Mac without software?
Even though a data recovery software application like Disk Drill for Mac provides a convenient way how to recover data from a formatted hard drive on Mac, some users like to avoid installing third-party applications until they’ve exhausted all other options. If you count yourself among them, you can try to recover your data from a Time Machine backup. To do that:
- Connect your Time Machine backup disk and launch Migration Assistant (located in Applications -> Utilities).
- Select the From a Mac, Time Machine backup, or startup disk option and click Continue.
- Select your Time Machine backup and click Continue.
- Select what you want to recover and click Continue to start the transfer.
- Wait for the recovery process to finish.
Is Disk Drill Safe?
Absolutely! The purpose of Disk Drill is to help you recover your lost data, and its developers went to great lengths to ensure that it doesn’t do the opposite. When you download and install Disk Drill, you can rest assured knowing that your data are in the best hands possible.
How do I recover data from a formatted hard drive for free?
With the Windows version of Disk Drill, you can recover up to 500 MB for free. The Mac version can preview all recoverable files, but you need to purchase a license to restore them. Of course, you can also restore your data from a backup if you have one.
Is it possible to recover data from a formatted hard drive after reinstalling OS?
Yes, it’s possible to recover data from a formatted hard drive after reinstalling OS, but there’s a chance that some files won’t be recoverable due to being overwritten by the operating system. If you have a very large hard drive, you don’t have much to worry about since the latest versions of macOS and Windows 10 are only around 20 GB large, so the chance isn’t too high.
Can I recover pictures from a formatted hard drive?
Absolutely. Modern data recovery software applications like Disk Drill can recover all commonly used image file formats, including JPG, PNG, TIFF, GIF, and others.
What does it mean to format a hard drive?
When you format a hard drive, delete the original file system and create a new one, thus making all data that was stored on the hard drive inaccessible. However, the data remains physically present on the formatted hard drive until new data is written in its place, and you can recover it using a data recovery software application.
David Morelo is a professional content writer with a specialization in data recovery. He spends his days helping users from around the world recover from data loss and address the numerous issues associated with it.
When not writing about data recovery techniques and solutions, he enjoys tinkering with new technology, working on personal projects, exploring the world on his bike, and, above all else, spending time with his family.
- Klennet Recovery Review (Formerly Zero Assumption Recovery)
- iBeesoft Data Recovery Review – A Likable Clone With Limited Features
- DMDE Review – A Data Recovery Powerhouse or a Usability Nightmare?
- Cisdem Data Recovery for Mac Review – A Clone in Disguise
- Tenorshare 4DDiG Review – All That Glitters Is Not Gold
- Frisco, Texas, United States
Yevgeniy Tolkunov is Hardware Engineer at ACE Data Recovery. Yevgeniy has a Master's Degree in Physics, Information Technology; 15+ years of experience.
