
Laptop Data Recovery: How to Recover Files from a Hard Drive
Lost some data from your laptop? Perhaps you accidentally deleted it, or maybe it was lost due to drive corruption. Either way, right now, it’s gone. Data loss is a looming threat to all laptop users that can happen at any moment without warning.
There is a way to get that data back, but you must be careful with your next steps. We’ll guide you through several DIY methods to recover deleted files from a laptop hard drive. All of these solutions have gone through real-world testing by recovery experts. You’ll see exactly when these methods are viable and what issues require lab assistance.
Laptop hard drive recovery can be critically important to users who have experienced lost data. It is quite likely that you keep important files on your machine and losing them is not an appealing prospect. Luckily, there are ways to recover data from laptop hard drives if you have accidentally deleted files or formatted a partition. But before we jump into the solution, we must figure out what went wrong.
Check Your Laptop Hard Drive Problem in 60 Seconds
Identifying what’s wrong with your hard drive is important to know which recovery method you should use. We’ve included some common data loss issues relating to laptops, along with some links to the best course of action.
| Problem | Description | Solution | DIY Safe? |
| Laptop doesn’t detect the hard drive | The system BIOS/UEFI is not recognizing the drive due to a hardware failure or loose connection. | Perform diagnostics like checking all physical connections and trying to reseat the drive. If the drive still doesn’t show, connect it to another computer as an external device. | Yes |
| Files were accidentally permanently deleted | Files were permanently deleted via shift-delete or emptied from the Recycle Bin. | Use data recovery software to scan the laptop drive and recover the deleted data before it’s overwritten. | Yes |
| Hard drive is making clicking or grinding noises | A mechanical component is failing, indicating imminent or complete hardware failure. | Disconnect the drive and send it to a professional data recovery service. | No |
| Accidental formatting of a drive or partition | A quick format has been performed and the file system structure has been lost, leading to all data being deleted. | Use data recovery software to scan the drive and recover the formatted data. | Yes |
| Corrupted or inaccessible partitions | The partition table or file system has become corrupted, making the drive unreadable or RAW. | Recover select data with data recovery software. Once the data is restored, format the drive to restore usability. | Yes |
How to Recover Laptop Data
We’re going to take a step-by-step approach to recovering data to make sure even complex data loss scenarios are covered. However, if you just want to know how to recover data from a laptop hard drive, skip ahead to the recovery section.
Step 1: Diagnose the Problem
We must first localize the issue with the hard drive so we don’t waste time troubleshooting something else, like Windows, the battery, or other hardware components. If you’re aware that the files were deleted accidentally, you can move to the next step.
- Laptop boots, but files are missing. Likely accidental deletion or formatting, though the files could also be inaccessible due to a corrupted partition. Either way, data recovery software is needed.
- Laptop doesn’t boot, but the drive sounds normal. The system volume could be corrupted, resulting in the operating system (OS) failing to boot. If logical corruption like this is the cause, data recovery software is the go-to.
- Drive is making clicking or grinding noises. This indicates physical damage. The presence of physical damage complicates data recovery, so DIY recovery software is not recommended. Instead, you should consult a recovery professional.
Step 2: Try Connecting the Hard Drive as an External HDD
Connecting your laptop’s internal hard drive as an external device lets you explore it from another computer. This is essential if you’re running into boot-related issues. If you’d prefer connecting it to a desktop as an internal drive, move to the next step instead.
On most modern laptops, the hard drive is located in a compartment on the underside of the computer. All you need to do is remove some screws and then the drive. The exact steps are different for each type of laptop, so check out this guide if you get stuck. Once removed, connect it using a USB-to-SATA adapter, or if you have a non-SATA SSD, an M.2 or PCIe adapter.
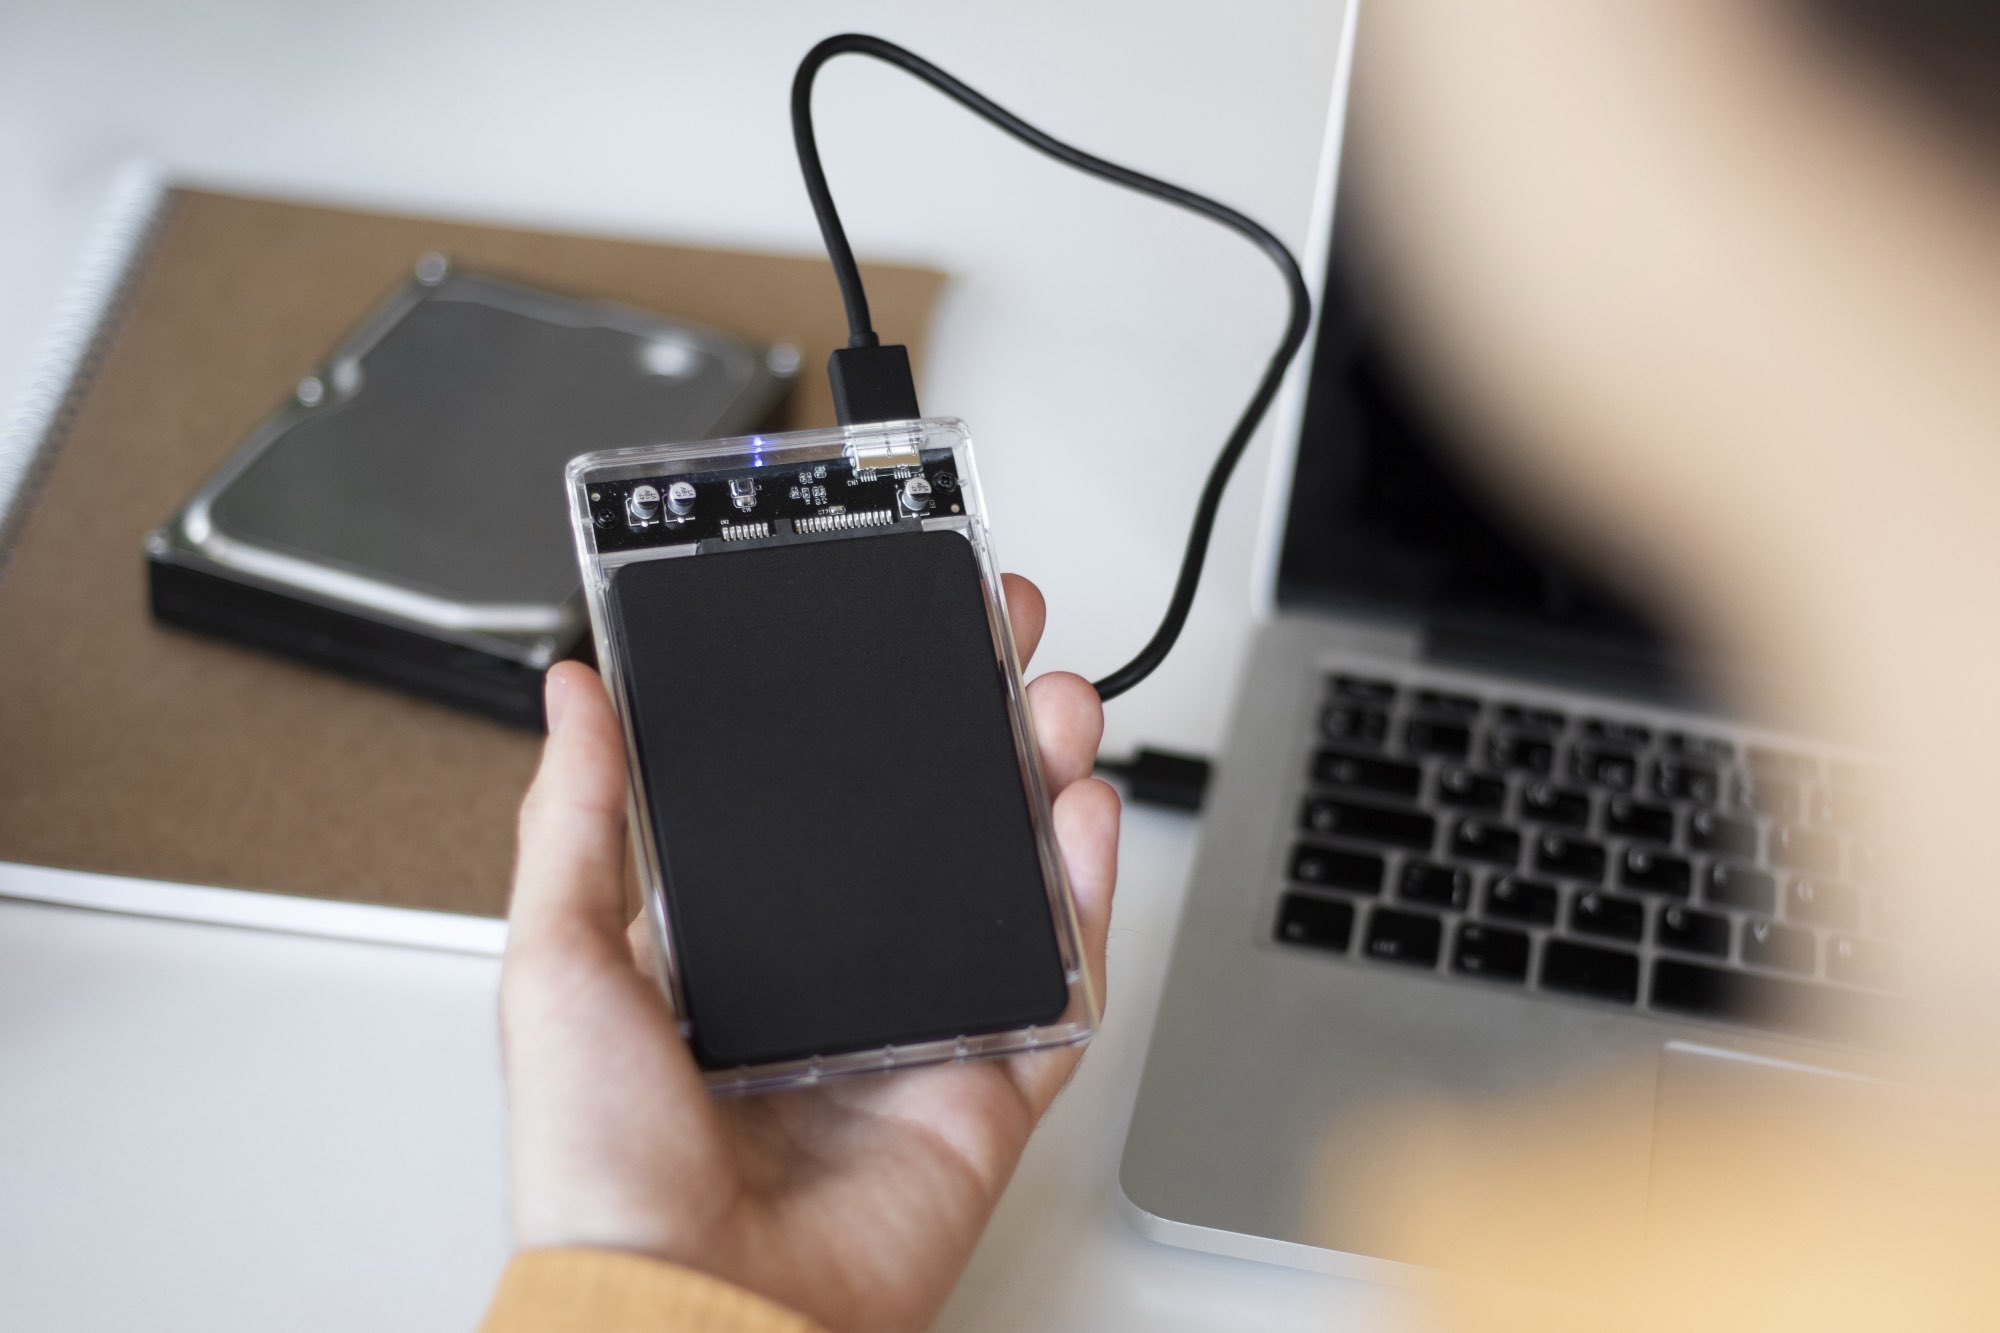
Once the drive is connected, check if it appears in File Explorer (on Windows) or Finder (on macOS).
Step 3: Connect the Laptop Hard Drive to a Desktop PC
If you have a desktop computer, you can choose to connect the laptop’s hard drive as an internal drive to verify it’s being read correctly. SATA HDD/SSDs can connect straight to your motherboard, but M.2/PCIe SSDs will need an adapter card to fit into the desktop’s PCIe slot.
Here’s how you connect the drive internally:
- Remove the drive from your laptop.
- Power down your desktop PC, remove the power cable, and open its case.
- Connect the SATA power and data cables to the drive.
- Boot the PC to BIOS/UEFI and confirm the drive is being detected.
- Boot to the OS and copy the drive’s files to another storage device.
If the drive is not detected, our guide on how to recover data from a hard drive that’s not detecting has some relevant fixes.
Step 4: Try Copying Your Important Files First
Once you get your drive connected and recognized on another system, you should manually copy important files to another storage device now, before you use any recovery software.
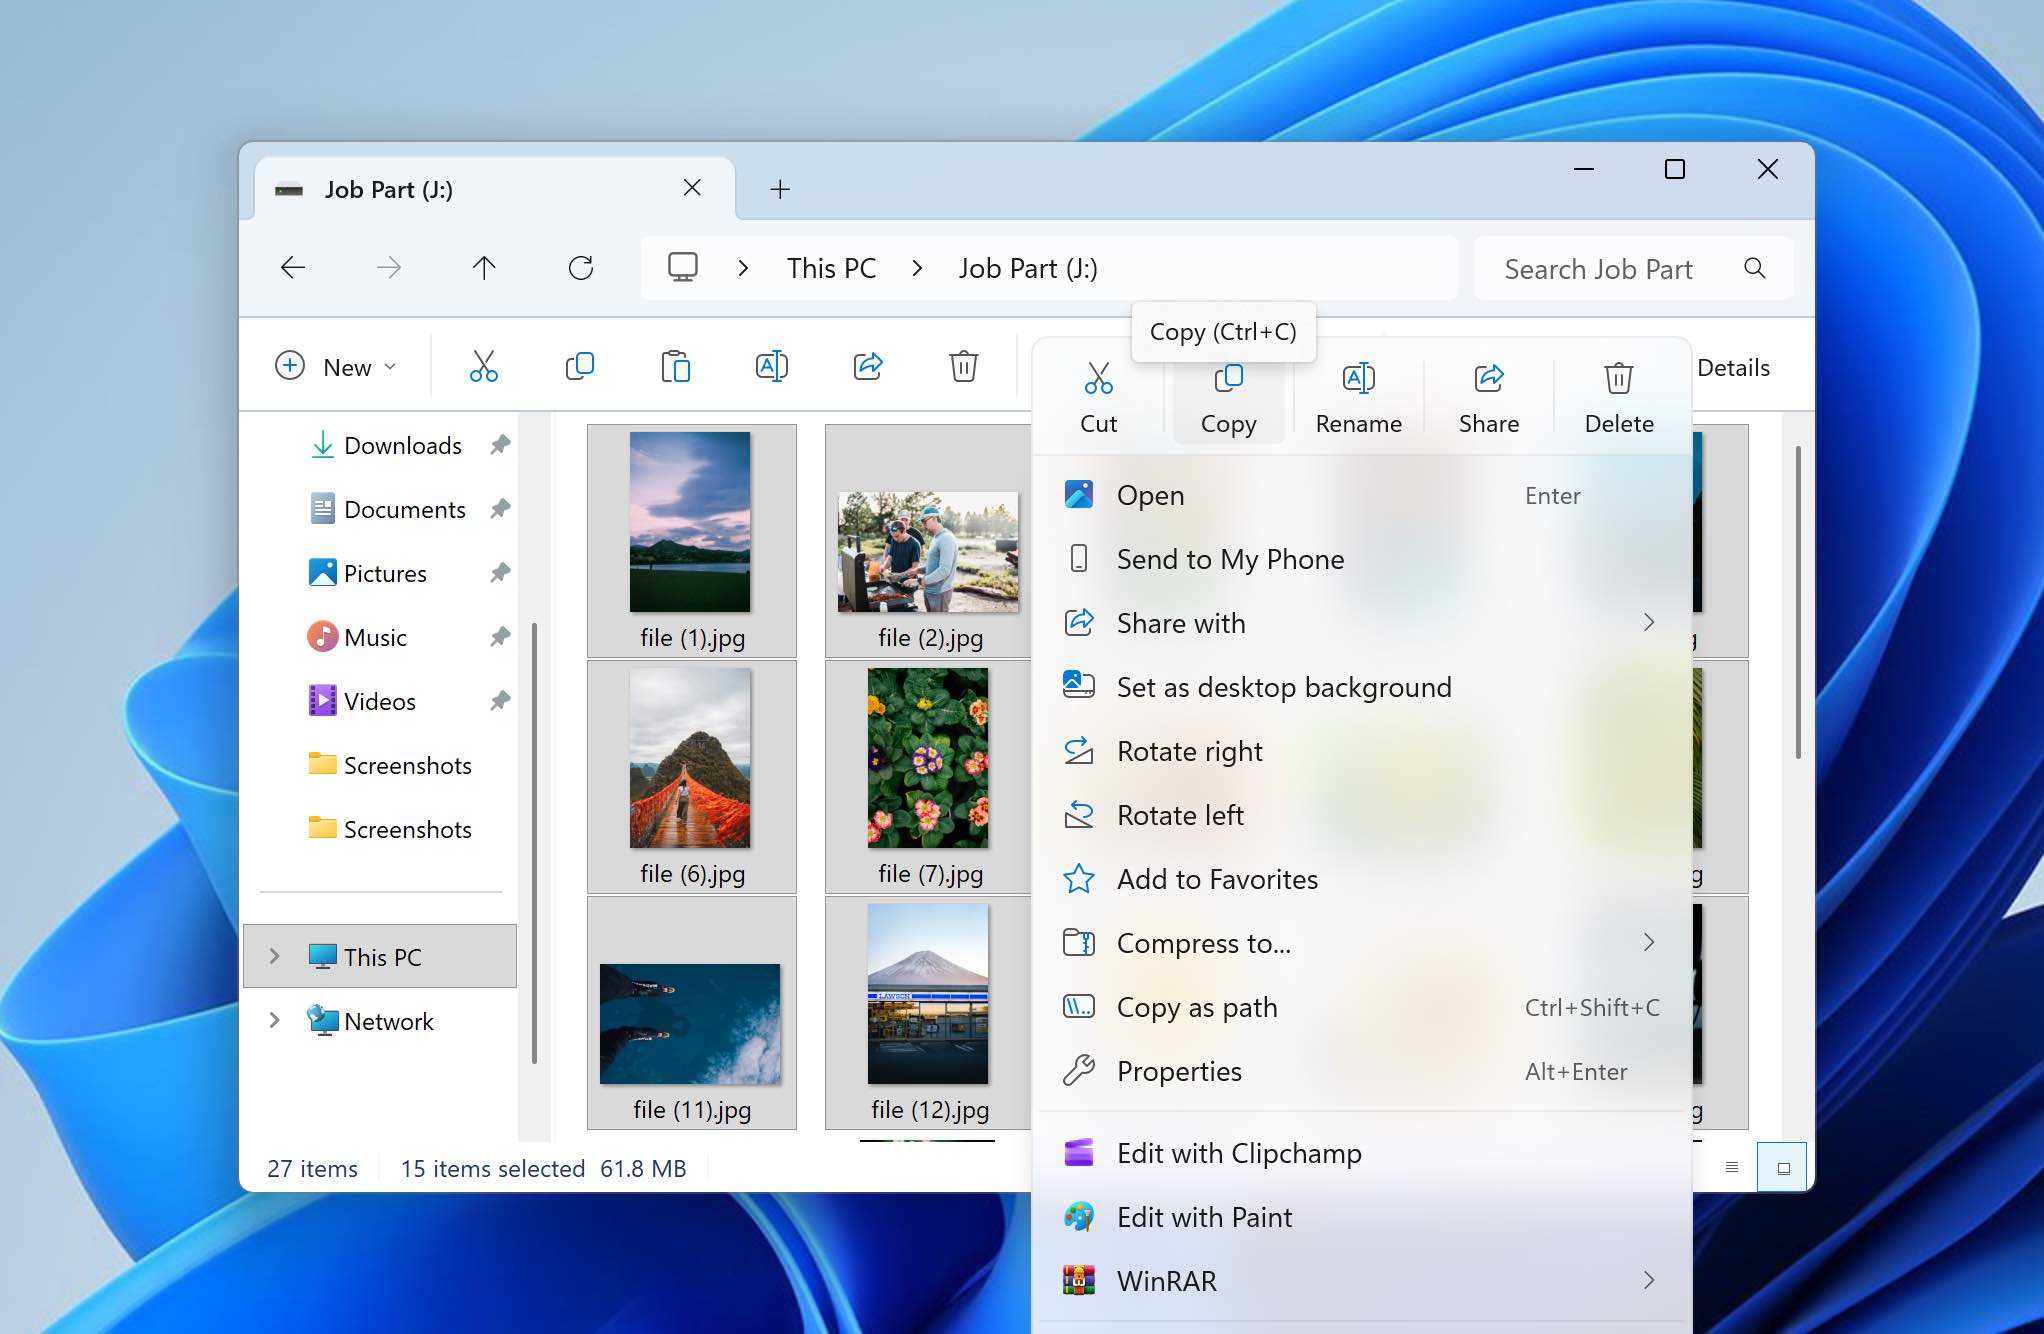
If your drive isn’t visible in File Explorer, shows the message “You need to format this drive”, or has missing files, then you should move to the next step, where we show you how to recover the data using data recovery software.
Step 5: Use Laptop Data Recovery Software
When your files are deleted or inaccessible through traditional means, then data recovery software is the solution. Which data recovery software you choose depends on how you want to recover the data.
On Windows 11/10/7, TRIM is enabled by default for internal SSDs. For external drives, it’s largely limited (but not exclusive) to NVMe via Thunderbolt pass-through.
If files were just deleted, power off the SSD immediately to reduce the risk of further TRIM activity before creating a byte-to-byte backup.
Disk Drill for Data Recovery
Disk Drill is an all-rounder, ideal for recovering data in basically any data loss scenario. It tested well in the range of simulated scenarios we ran it against, and showed excellent support even for more complex recovery cases like when drives were RAW, reading as unallocated, or corrupted. The beginner-friendly and available on both Windows and macOS makes it accessible to anyone.
If your disk is unstable, you should create a byte-to-byte backup of the disk and scan that instead. Scanning the disk itself will cause additional strain, potentially leading to complete failure before recovery can be finished. And keep in mind that there are some instances where it (or any other software) will not work, like recovering data from a BitLocker-encrypted volume without the key.
Follow these steps to recover data from a laptop hard drive using Disk Drill:
- Download and install Disk Drill on a separate, unaffected drive.We strongly advise against performing this task on your laptop’s main disk. A great alternative is to put Disk Drill on a USB or thumb drive. This minimizes the risk of overwritten or corrupted files that negatively impact your chances of a successful recovery.
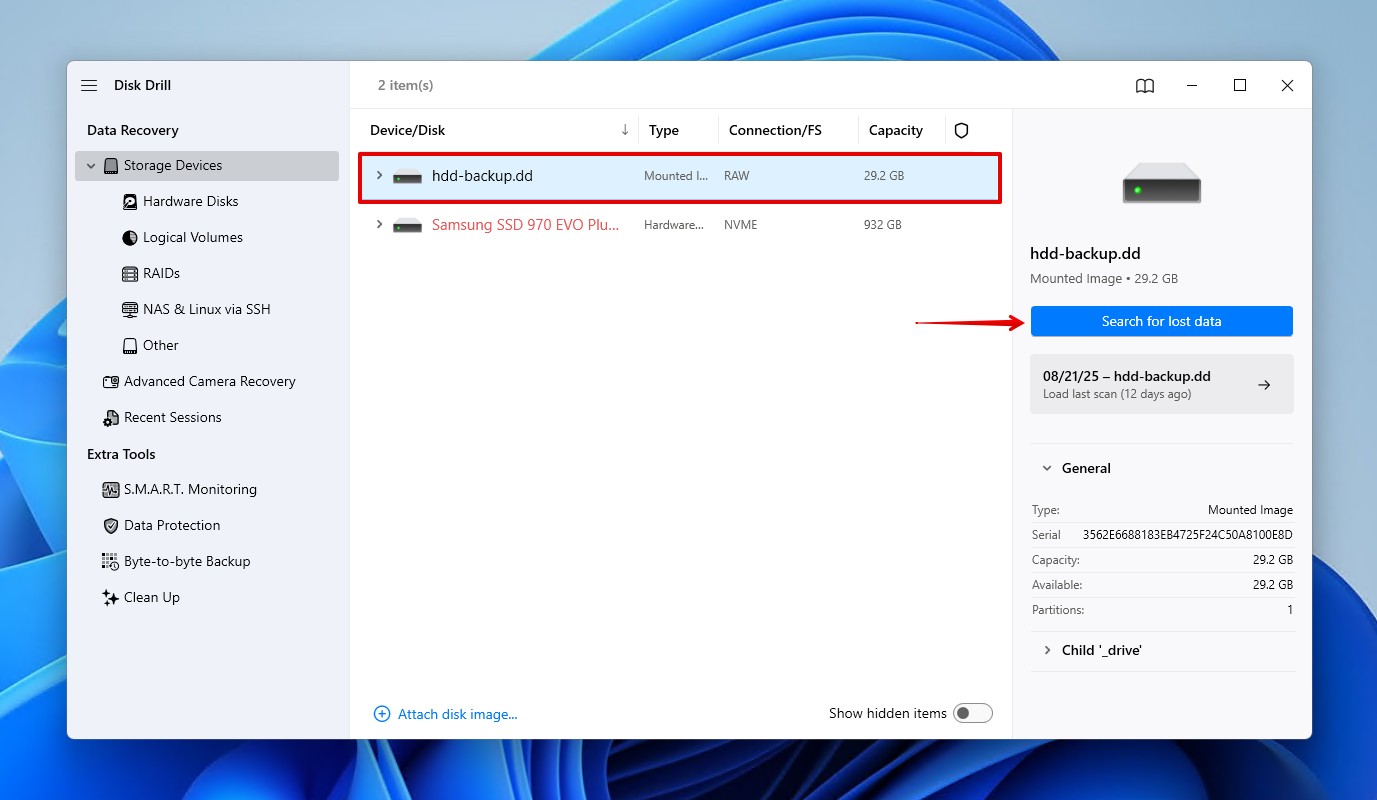
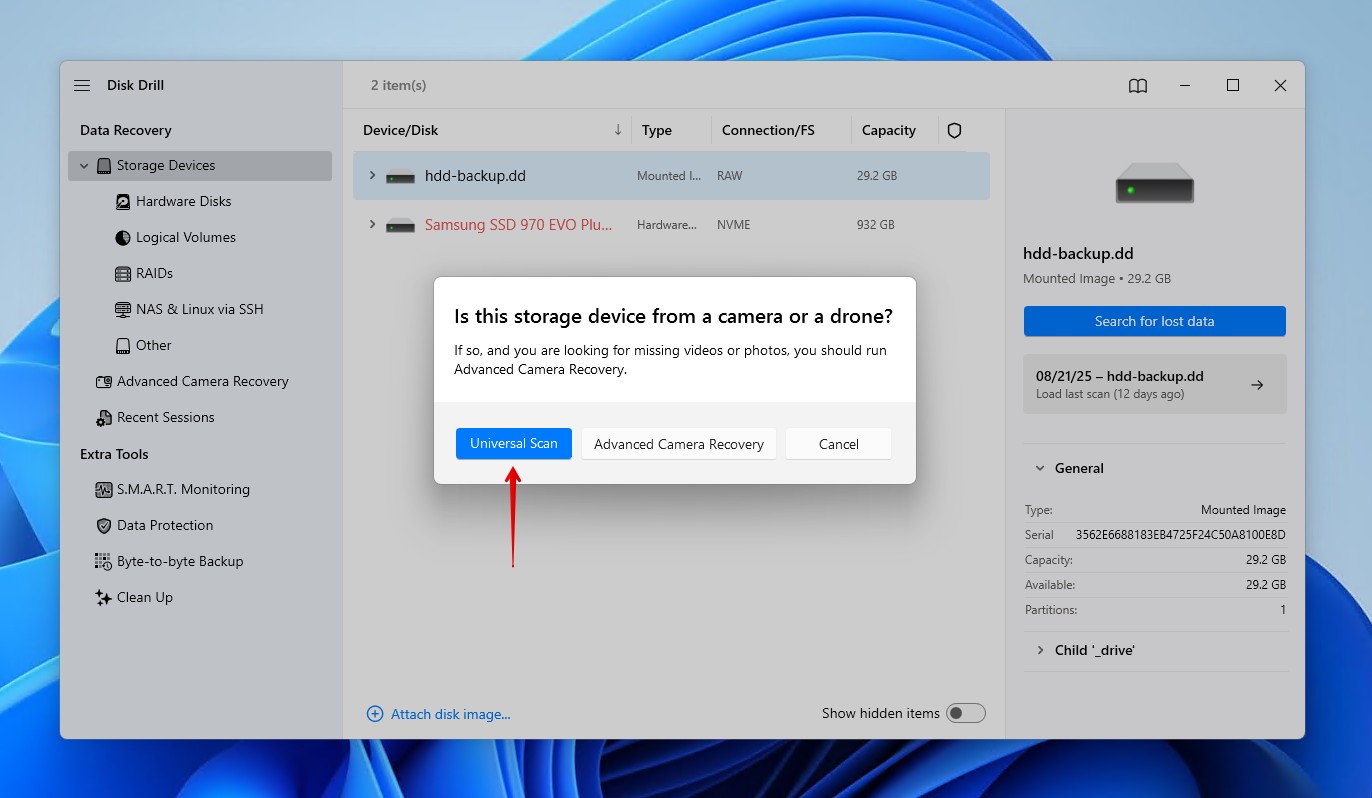
- Select your laptop’s drive from the list of devices and click Search for lost data. If you’re scanning a disk image instead, assign it at the bottom of the window first.
- Choose Universal Scan to begin scanning for all recoverable data.
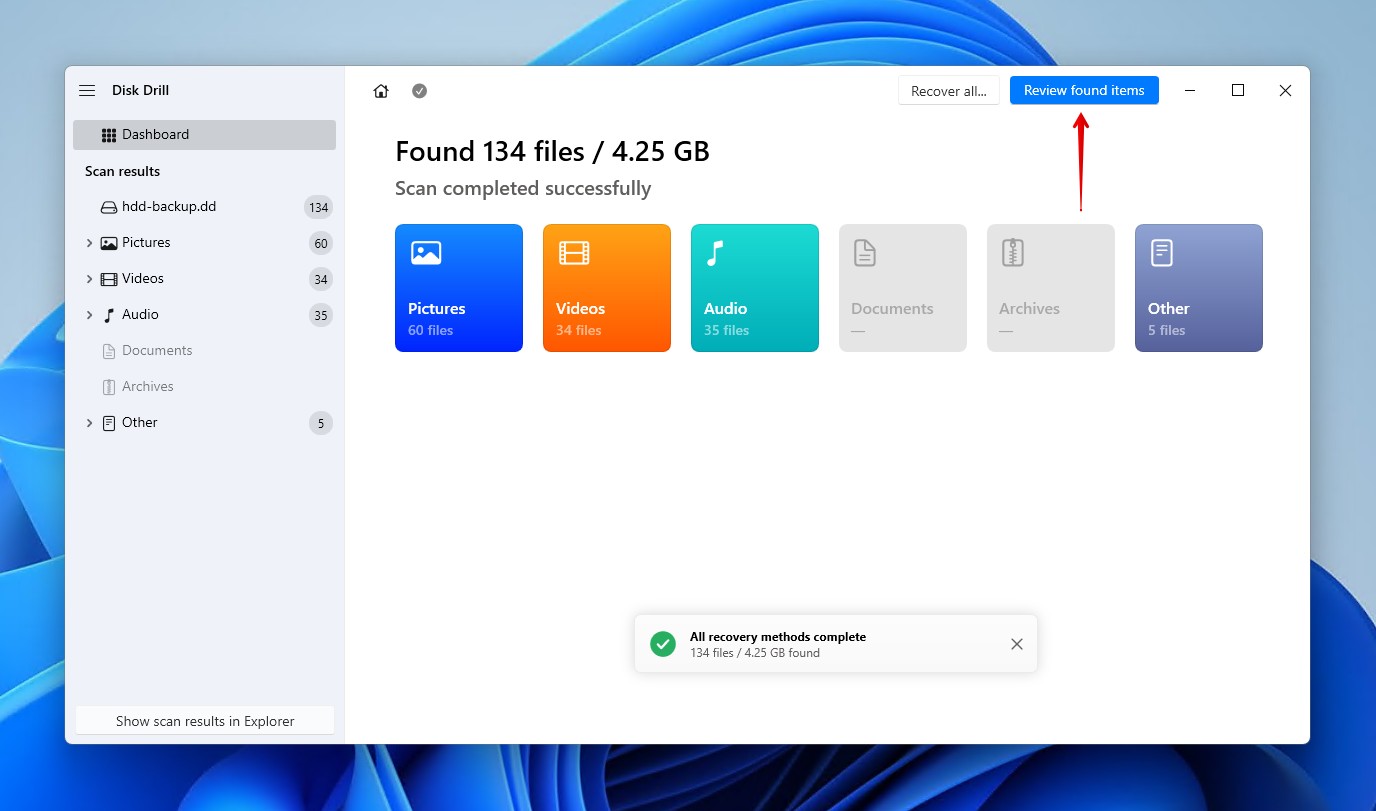
- Click Review found items when you’re ready to explore the search results. If you want to recover everything on the drive instead, click Recover all.
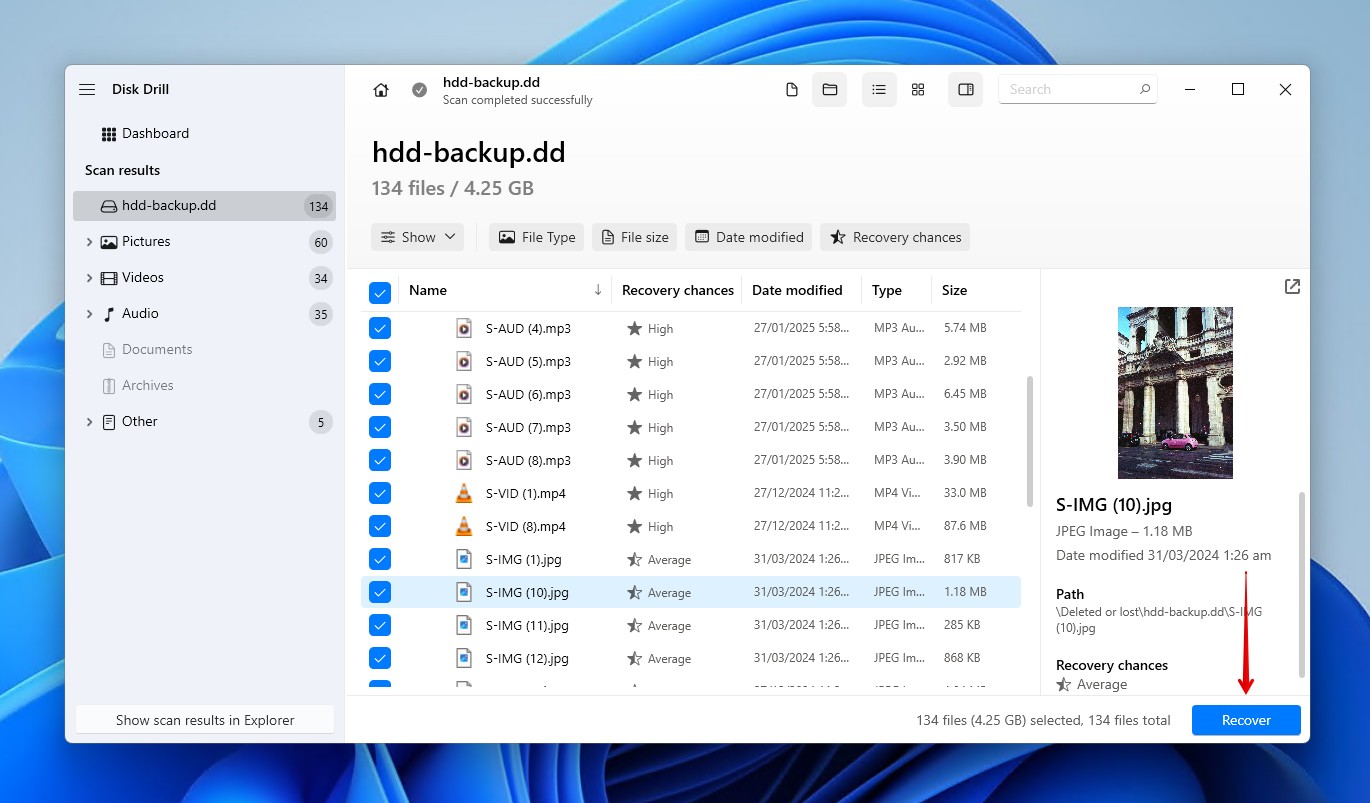
- Preview and select the files you wish to recover. Too many files to sift through? Use the filtering options to refine the results. When ready, click Recover.
- Choose a recovery location and then click Next to complete recovery.
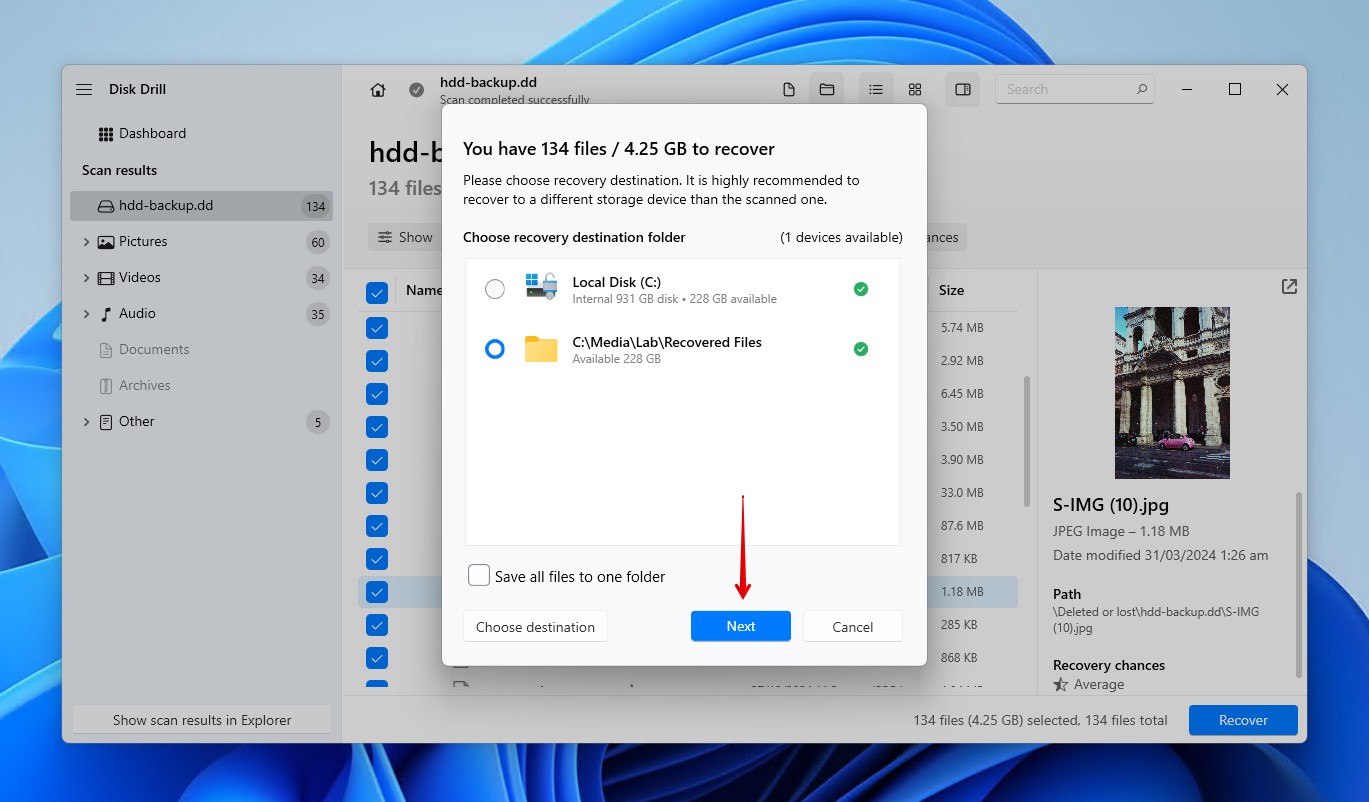 Choose a new storage location for the files. Don’t use their original location as this may lead to corruption during recovery.
TestDisk for Partition Restoration
TestDisk is a free, open-source tool that’s popular for restoring lost partitions and repairing non-bootable drives by fixing the underlying file system-related damage. In doing so, the partition table is fixed, and the original partition will be restored, along with access to all of the data on it.
It can be used on all major operating systems (Windows, macOS, Linux), and its portable nature makes it perfect for running from flash media. TestDisk is present in many bootloaders that can help when the file system on the system disk is damaged, leading to the PC not booting. Whenever you’re facing an issue where your laptop’s hard drive isn’t showing due to a missing partition table or corrupted file system, TestDisk is an excellent option.
This is how you recover data from a laptop with TestDisk:
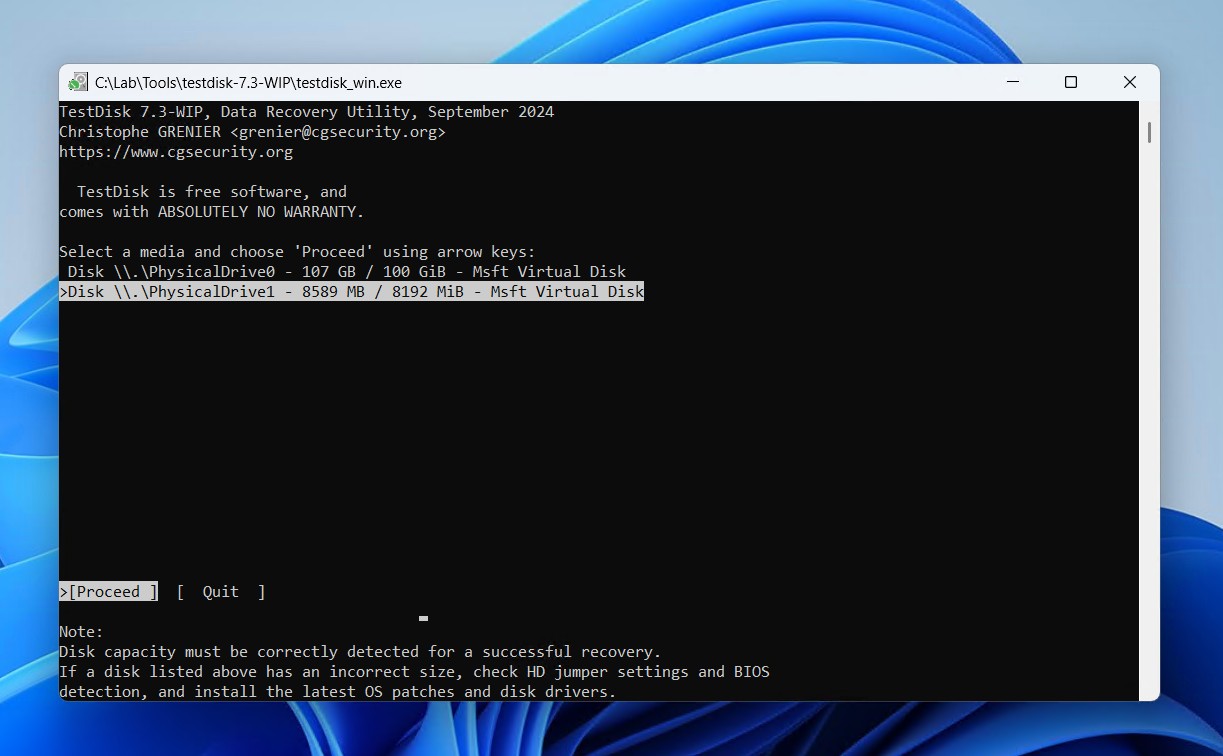
- Download and extract the contents of TestDisk. Open testdisk_win.exe.
- Press Enter to create a new log file.
- Select the laptop hard drive and press Enter.
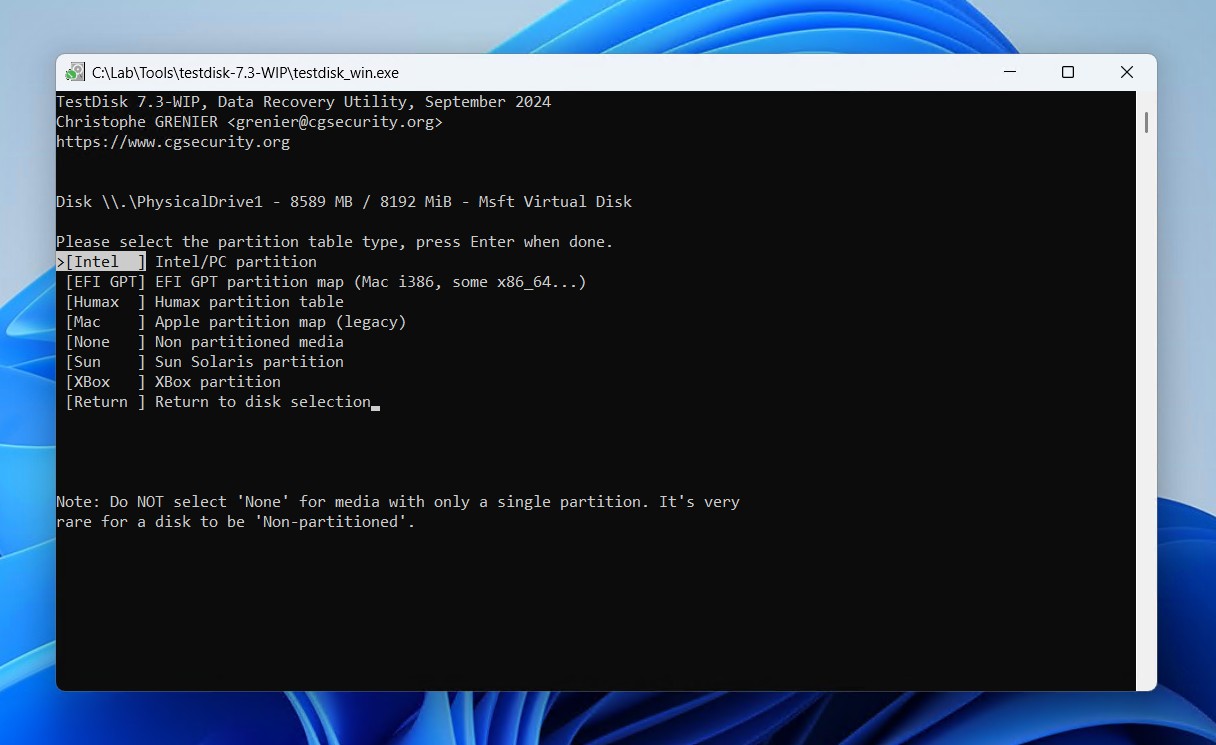
- Choose the partition table type. TestDisk will do its best to automatically detect it. Press Enter.
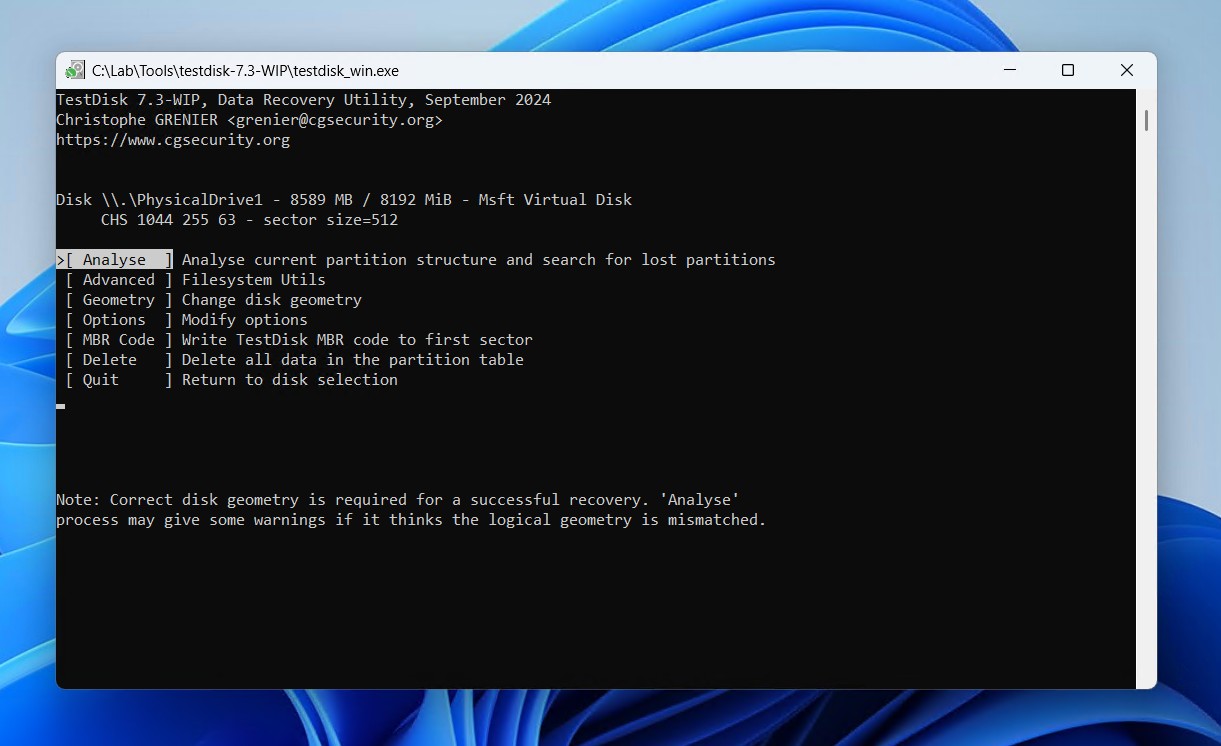
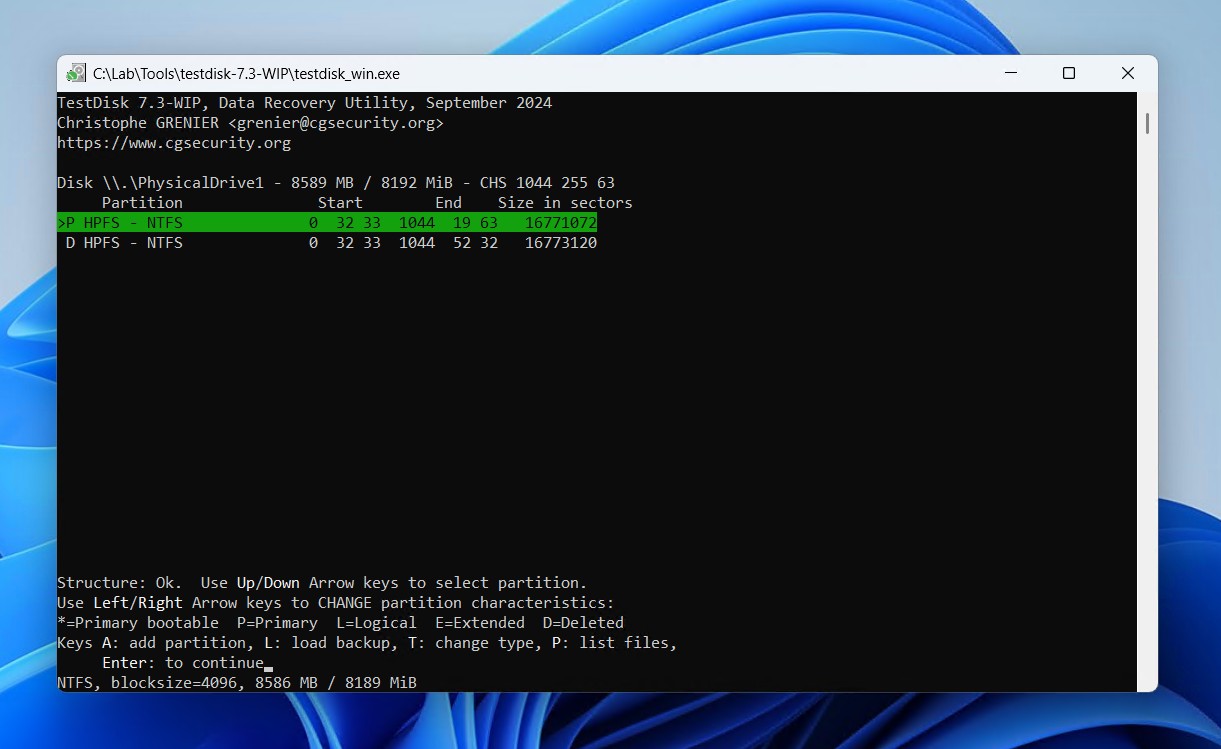
- On the Analyse option, press Enter.
- Press Enter again to begin the quick search.
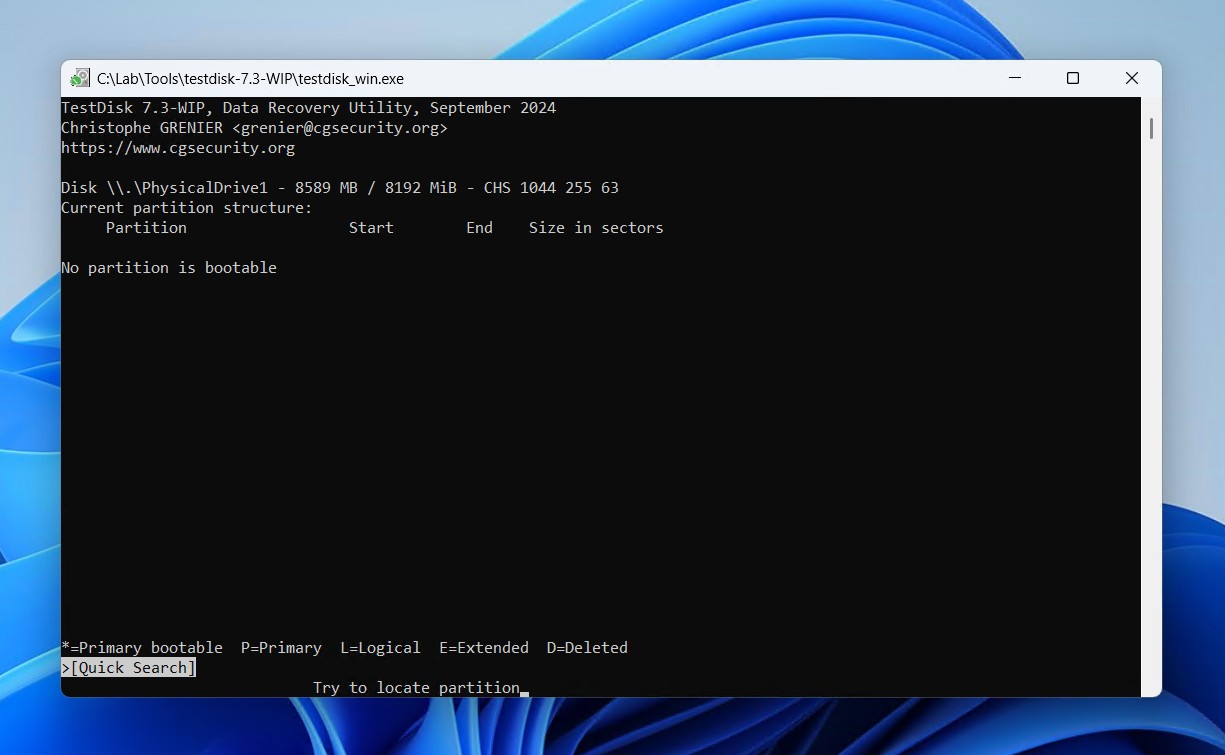
- Select the lost partition and press Enter. If nothing was found, you will need to perform a deeper search.
- Go over to the Write option, then press Enter.
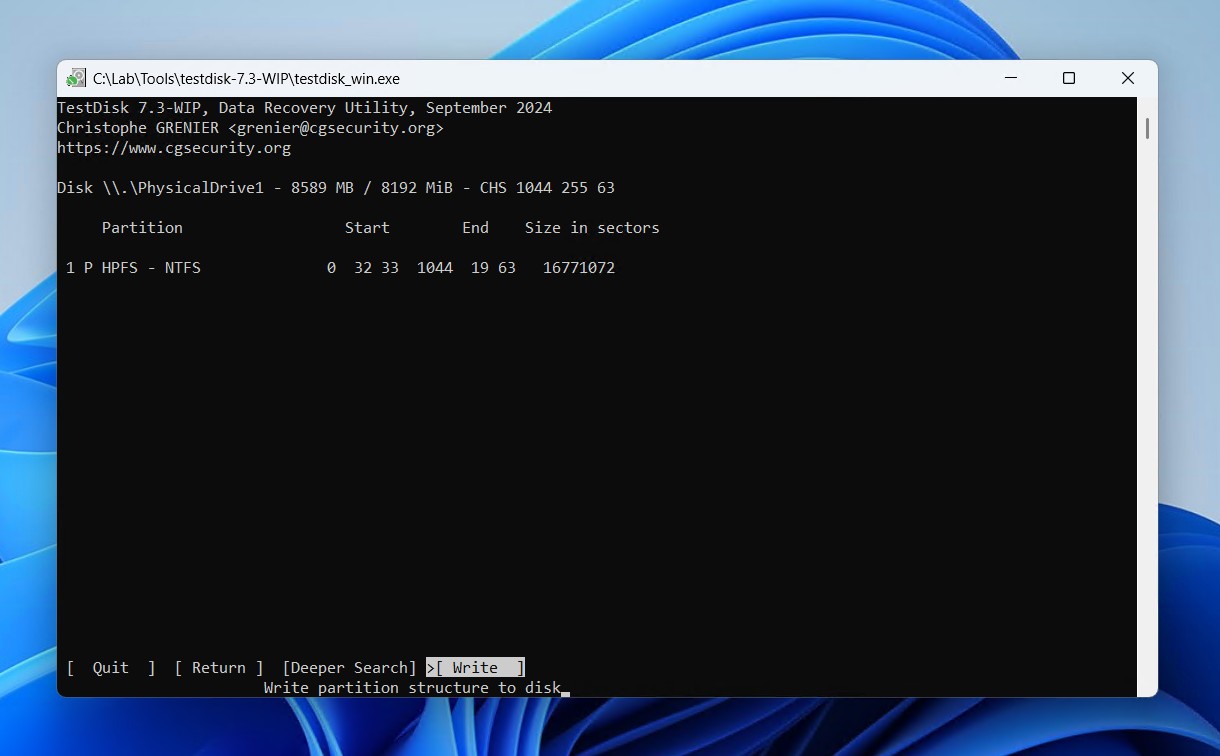
- Press Y to confirm, then reboot your PC.
Step 6: Format the Drive to Make It Usable Again
Once all your important files are recovered, it’s time to get the drive back to working order. To do so, you just need to perform a quick format. A quick format will eliminate any logical corruption to the file system by creating a new one. But why a quick format? Because a full format (1) takes much longer, and (2) is largely unnecessary unless you’re selling or disposing of the drive.
Follow these steps to format your hard drive:
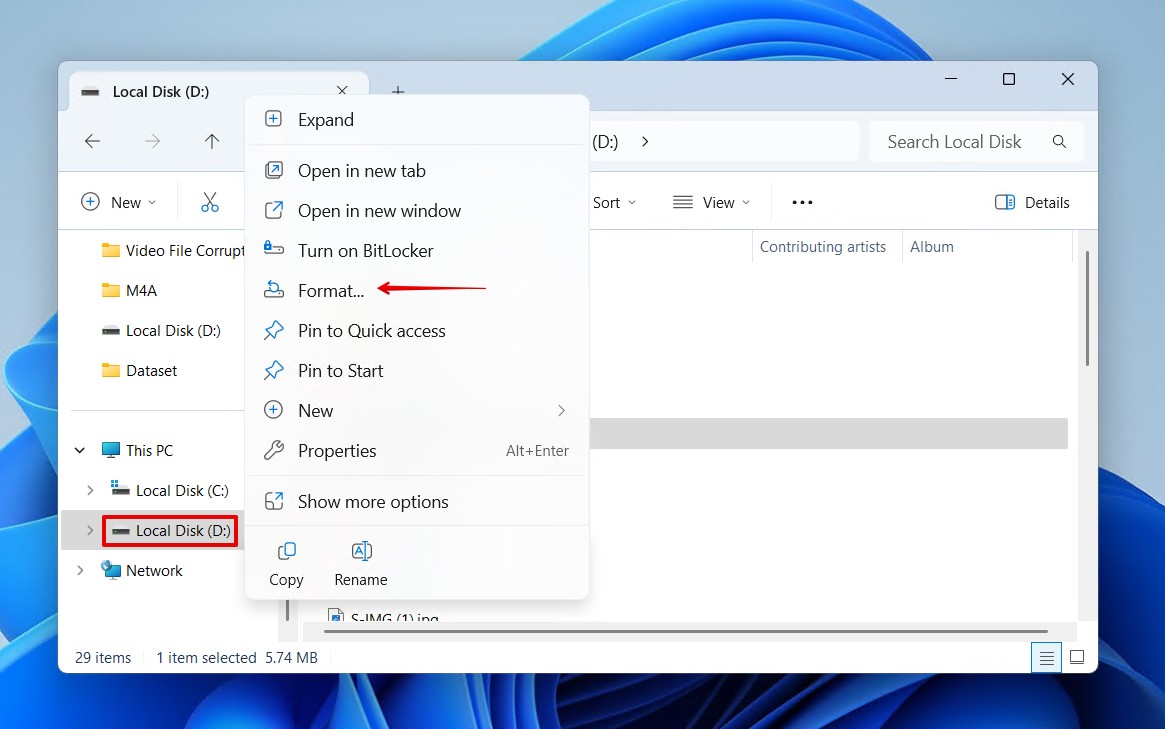
- Open File Explorer.
- Right-click on the laptop’s drive, then click Format.
- Choose a file system and give the volume a label. Make sure Quick Format is ticked, then click Start.
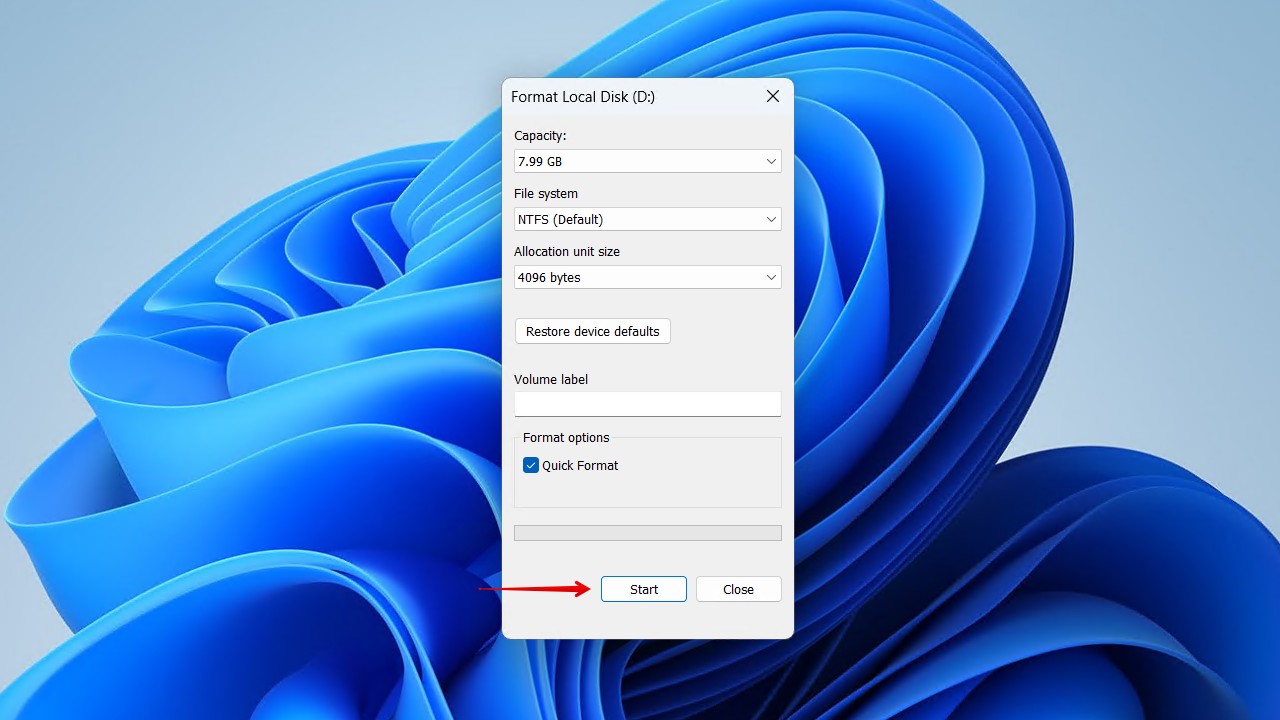
- Click OK when prompted to confirm the format.
When to Contact Professional Laptop Hard Drive Repair Services?
DIY recovery software can only get you so far, and there are times when professional help is required. In the case of any physical damage where the drive is making clicking or grinding noises, undetected in the BIOS, or impossible to connect due to damaged connectors, employing the help of a data recovery service is your only option.
This involves packing the drive up and sending it to recovery experts equipped with the know-how and equipment to perform high-level recovery. This offers the highest chance of success, but it’s also the costliest. Therefore, if you want every chance of getting the data back and you have the budget to match, a data recovery service is the best choice.
Mistakes to Avoid During Laptop Hard Drive Recovery
After data loss, any action you perform on the laptop’s drive will directly affect your chances of recovering the data. Here are a few common mistakes that people make when recovering data for the first time:
- Installing recovery software on the same drive. Writing anything to the affected drive, which includes installing a recovery app, has a high risk of overwriting the data that you’re trying to recover.
- Continuing to use the failing drive. When a drive shows signs of failure, your first response should be to back up the data and move it to a healthy drive. Continued use will expedite failure.
- Performing multiple scans on an unstable drive. Every scan puts more and more pressure on a drive. Therefore, you don’t want to scan it more than once. Instead, you should create a byte-level backup and scan that instead.
When recovering your data, always restore it to a different storage device, and avoid any risky DIY fixes if the drive shows physical damage – replace it instead.
Frequently Asked Questions
What is the best data recovery software for laptops?
Based on extensive real-world testing, Disk Drill currently ranks as the best overall recovery solution for laptops. The app supports file systems on Windows, macOS, and Linux, and demonstrates excellent recovery performance in every data loss scenario where DIY recovery software is a viable option. With Disk Drill, you can scan the drive, preview your files, and recover the data with little to no effort. However, other options include Windows File Recovery, Microsoft’s own command-line recovery tool, or TestDisk, for recovering entire partitions that have become lost or deleted.
Is there any way of recovering data from my laptops' dead hard disk?
This depends on how ‘dead’ your laptop’s hard drive is. For drives that are at least visible in Disk Management and reading the correct capacity, you can recover the data using data recovery software. However, if the drive isn’t showing anywhere, even in the BIOS, then your only option is to have a data recovery professional get the data back.
Is it possible to recover data from a hard disk without opening the laptop?
Yes. When you’re recovering data from a non-system drive, it is possible to scan it and recover data without removing it from the laptop. When dealing with system drives, you’ll need to create a bootable USB and use this live environment to run a recovery tool.
How much does it cost to recover information from a crashed hard drive on my laptop?
You can recover data from a crashed laptop hard drive for free. But then the question becomes “how much data can I recover with a free tool?”. Cheaper recovery solutions often produce less-than-desirable results. Instead, investing in a professional recovery tool is better. Or, if you want the best chance, consider a data recovery service. Just remember that hiring a professional is by far the costliest option.

- 32 publishings
- Atlanta, GA
Jeff Cochin is a data management and recovery professional, who has been with Pandora Data Recovery Mentor for nine years and has always been an essential part of the team. Jeff also works as a technical writer at Macgasm, being a first hand in testing, trying and writing about big and small tech software.
- Frisco, Texas, United States
Yevgeniy Tolkunov is Hardware Engineer at ACE Data Recovery. Yevgeniy has a Master's Degree in Physics, Information Technology; 15+ years of experience.