
How to Recover Data From Old Hard Drive
Wondering if the data from an old hard drive you found is still recoverable? Yes, in most cases, you can restore your old photos, documents, and projects, as long as you have the right equipment, software, and knowledge.
Our guide will help you with all three. Learn how to identify your drive, compare the adapters or enclosures you might need, download the powerful (and free) software tools required, troubleshoot errors, and recover your data from both working and ‘non-working’ drives.
Each step has been thoroughly tested by our team to give you the best chance of recovering as many of your old files as possible!
Can’t Boot the Original PC? Here’s How to Access the Old Hard Drive
If the computer that your older hard drive is connected to no longer works, the best way to access its data is to connect it to a new computer. We’ll guide you step by step through the entire process, from identifying your drive to retrieving your files (including troubleshooting steps in case your new system struggles to read your old drive).
Step 1: Identify the Type and Interface of Your Old Drive
Before connecting your old drive to the new system, identify what type of drive it is and what interface it uses. Newer systems may not support your drive out of the box, and correctly identifying your drive will help you furnish the appropriate adapter (which we cover in Step 2).
You can typically recognize your drive type by the shape of its connector. Here’s a quick breakdown of each type, along with brief descriptions of what their connectors look like:
- SAS or SCSI (Serial Attached SCSI): SCSI was the predominant connector type for servers, workstations, and high-end PCs in the 1980s and 1990s (until it evolved to SAS). Its defining feature was the ability to connect multiple peripherals to a CPU, including hard drives. It uses a male connector with two compact rows of 50, 68, or 80 pins (total). It’s typically shaped like an elongated letter D.
- PATA (Parallel ATA) or IDE (Integrated Drive Electronics): PATA (or IDE) was developed in the same time period as SCSI, as a low-cost and simpler interface for everyday users. It uses a male connector with 3 enclosed slots: the power slot with 4 pins, the jumper slot with 2 rows of 4 pins (8 total), and the data slot with 2 long rows of 20 pins (40 total).
- SATA (Serial ATA): SATA has been the most commonly used interface for hard drives since it was introduced in 2003, replacing PATA as the standard for home users. It uses a male connector that has two thin slots beside each other (one longer than the other), where you’ll find a single row of embedded gold-plated pins.
Step 2: Choose a Compatible Adapter or External Enclosure
Once you’ve identified your hard drive and its interface, determine the appropriate adapter or enclosure for your new system. Each hard drive type has several options to choose from, and we prepared brief descriptions for all of them in the sections below (along with links to visual examples).
SATA
- Option 1: USB-to-SATA adapters – Adapters are cables with a female SATA connector on one head and a standard USB 3.0 (or even Type-C) connector on the other head, like this example. They are cheap and straightforward, but less robust than enclosures. They’re perfect for one-time use cases, like data recovery, testing, or off-site repair.
- Option 2: Enclosures – Enclosures are a special “case” for SATA drives with built-in adapters that enable the use of USB cables. They’re sturdier and better suited for constant usage—such as using your drive as portable storage. There are 2.5” and 3.5” HDD enclosures for laptop drives and desktop drives respectively..
PATA/IDE
- Option 1: USB-to-PATA adapters – PATA adapters are known as “adapter kits” or “converter kits.” They’re sold as universal hard drive readers for SATA, PATA/IDE, and USB/Type-C interfaces. USB-to-PATA adapters are more commonly used than enclosures (and are more affordable), because fewer people are using PATA drives for internal storage. See this video about Unitek’s SATA/IDE to USB adapter for a visual example and demonstration.
- Option 2: PATA or IDE enclosures – Similar to adapters, many IDE enclosures you can buy are typically sold as “universal” devices that can also accommodate SATA drives—this YouTube video by GuruBrew demonstrates a product by StarTech. Others are IDE-only, like this product covered by GizmoJoe. IDE enclosures are typically 3.5” in size and come with an AC power adapter, along with a USB 2.0 cable (make sure you check package inclusions carefully).
SCSI
- PCIe SCSI cards – The easiest way to connect a hard drive with an SCSI interface is to install it directly in your desktop via a controller card. See Adaptec’s SCSI Card as an example—but note that you’ll need to buy a card with the exact same type of connector found on your hard drive (e.g., 50-pin, 68-pin, etc.), as well as a matching internal cable.
- USB-to-SCSI converter cables – If you can get your hands on older tech, you might find a USB-to-SCSI converter cable like the one found in this YouTube video. However, note that it needs to match the connector on your drive exactly.
- SCSI Enclosures – Older SCSI enclosures exist from brands like Kingston and Sun Microsystems, but they’ve largely been discontinued by their manufacturers.
Step 3: Connect the Old Drive to a New PC or Laptop
After identifying your hard drive and finding the best adapter or enclosure for the job, the next step is to connect your drive to the new system. We prepared some short instructions on the basics of connecting each type of peripheral, but you may still want to consult their product manuals for more in-depth guidance.
When using an adapter:
- Connect the appropriate end of the cable to your hard drive (e.g., connect the female SATA head to the male connector on your hard drive).
- On the same cable, connect the USB or Type-C head to the port on your computer.
When using an enclosure:
- Open the enclosure.
- Attach the male connector pins on your hard drive to the female connector inside the enclosure, securing your drive inside the case.
- Close the enclosure and locate the USB or eSATA port. Then, connect the enclosure (along with your drive) to your computer via the included cable.
- Power on your enclosure.
When using a controller:
The proper installation of a controller card depends on your motherboard, physical slot compatibility (PCI or PCIe), PSU, and more. We recommend checking the original manual of each affected component for a proper step-by-step guide.
Step 4: Power On and Let the OS Recognize It
Now that your drive is connected to your computer, power it on. Your operating system should automatically mount the drive and assign it a letter (e.g., My Drive (D:)), which you can view in both Disk Management and File Explorer. At this point, you can move on to Step 5: Browse and Transfer Your Files.
However, if you can’t find your drive, you may need to troubleshoot. Here’s what to do:
- Connect your drive to a different port on your computer. It’s possible that the device you’re trying to use is worn out and can’t sustain the connection. If you’re using a desktop PC, try connecting the USB cable to the back of your tower instead of the front.
- Check the power connection. Make sure you pressed the correct power button, then monitor your drive for signs of life. You should at least hear the low hum of the drive disk spinning.
- View your drive in Disk Management (Windows) or Disk Utility (Mac). In some cases, Windows or macOS may have failed to assign a letter to your drive, preventing it from showing up in File Explorer or Finder. You can use Drive Management or Disk Utility to assign a letter to your drive and mount it manually.
- Make sure your accessories are working. If none of the other troubleshooting tips work, test your cables and enclosure or adapter with a working drive (if available). You may have gotten a faulty product that should be replaceable for a limited period of time.
Step 5: Browse and Transfer Files
If your drive shows up on your computer, you can attempt to view and copy your files. We prepared two guides for this section; one covers recovery from healthy drives with visible data, while the other covers drives that do show up on your OS but appear empty.
Option 1: If the Drive is Healthy and Data is Visible
If you can see and access your drive on your computer without any issues, the recovery process is straightforward. All you have to do is copy your files from your drive to a folder on your computer or on a separate drive.
Before you proceed, we have prepared a few tips to help ensure a safe transfer of data. While basic, they can help you avoid interruptions, prevent overwriting, and sidestep potential disasters:
- Tip #1: Do not allow your computer to run out of power while your drive is connected.
- Tip #2: Avoid moving or touching your drive while transferring files.
- Tip #3: DO NOT save files back on the old drive again.
- Tip #4: Start with your most important folders.
- Tip #5: Instead of cut-and-paste, use copy-and-paste.
- Tip #6: Verify the copied data on the new storage device to ensure no files are corrupted or incomplete.
Option 2: If the Drive Appears Empty or Unreadable
Even if your hard drive shows up on your operating system, it may appear empty, unformatted, or uninitialized. This is a sign of logical damage. Or maybe your drive is being detected, but it’s using a file system format your PC doesn’t support (making it inaccessible). As long as it shows up in Disk Management with the correct size, you can retrieve your data with the right software.
Most importantly, it’s capable of extracting data from problematic drives—such as drives with a damaged file system, drives that ask to be formatted, uninitialized drives, and even RAW disks.
Here’s a quick guide to using Disk Drill to recover data from your old hard drive:
- Download and install Disk Drill to the drive you are NOT attempting to recover (to avoid overwriting your files’ data fragments).
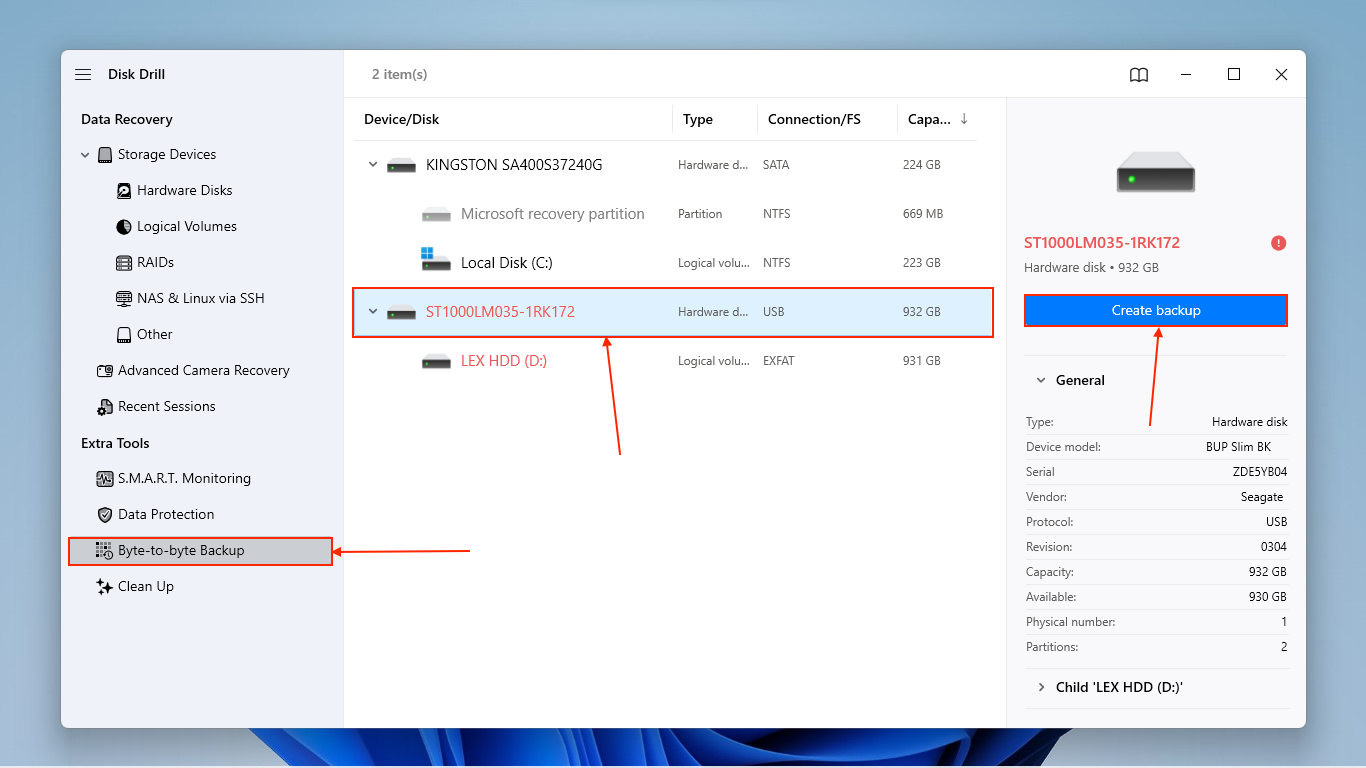
- Open Disk Drill and securely connect your drive to your computer. For problematic drives, we recommend using Disk Drill’s Byte-to-byte Backup tool (sidebar > Extra Tools > Byte-to-byte backup) to generate a disk image you can scan instead. This is optional; if you don’t want to create a backup, jump to step 4. Select your drive from the list and click Create backup.
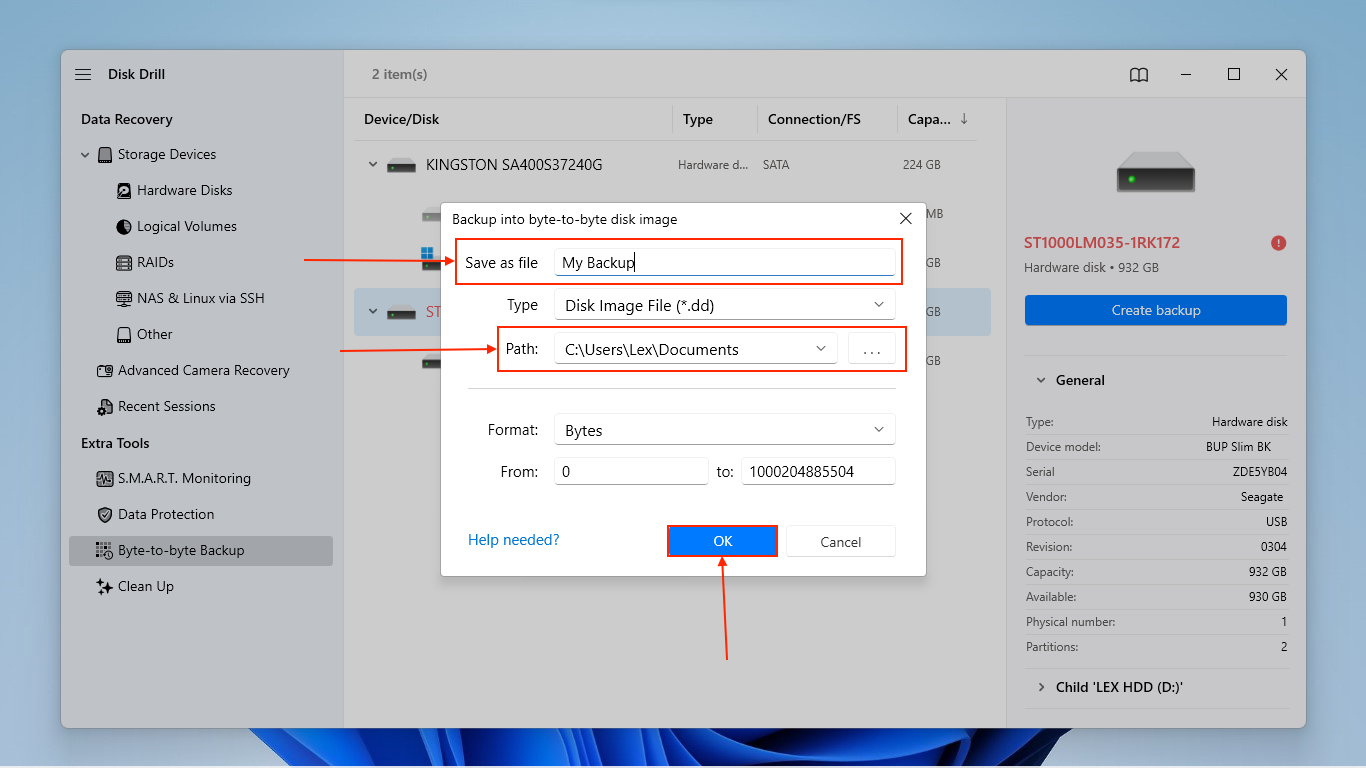
- In the dialogue menu that appears, choose a name and location for the backup file. Then, click OK. Once backup is created, click the Home button to return to the main menu.
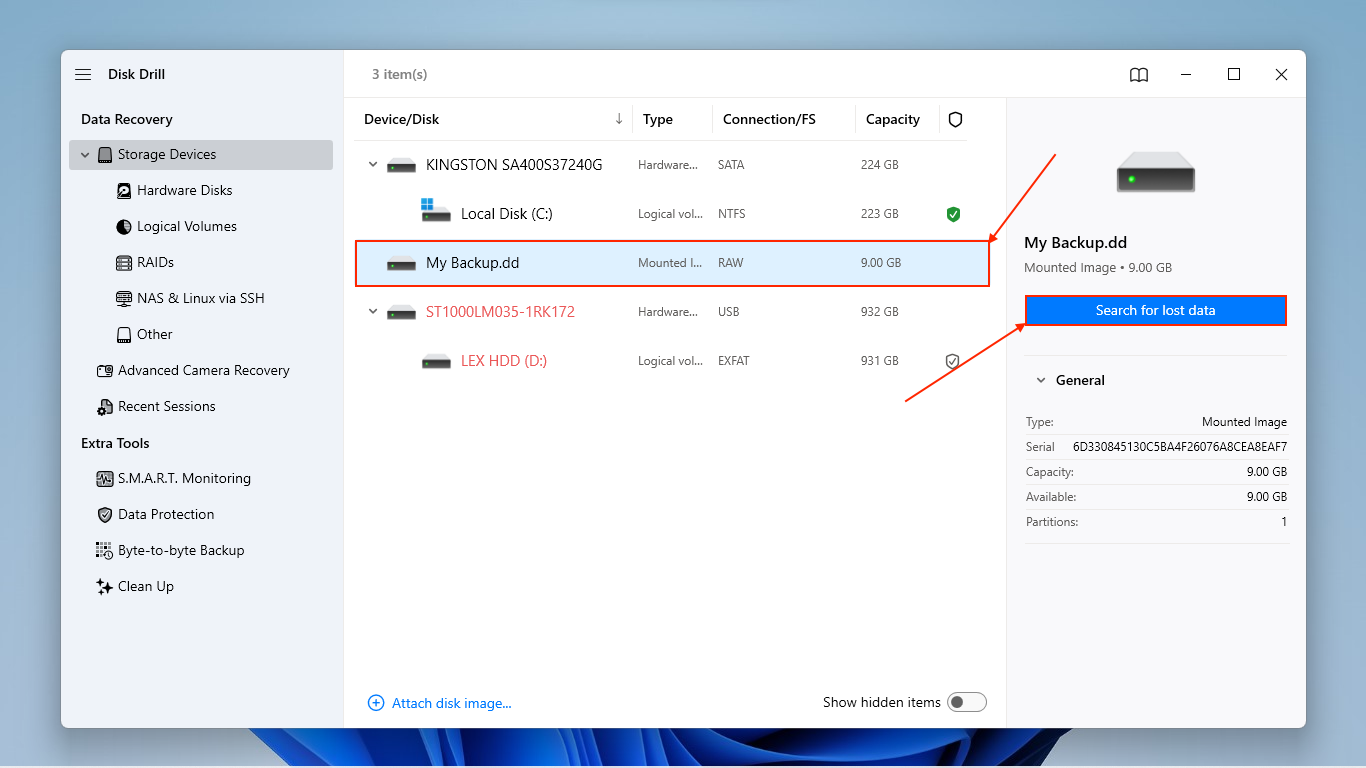
- On the left sidebar, click Storage Devices. Then, if you created a backup, use the Attach disk image button to add the backup file you created in steps 2-3. If you didn’t create a backup, move on to step 5.
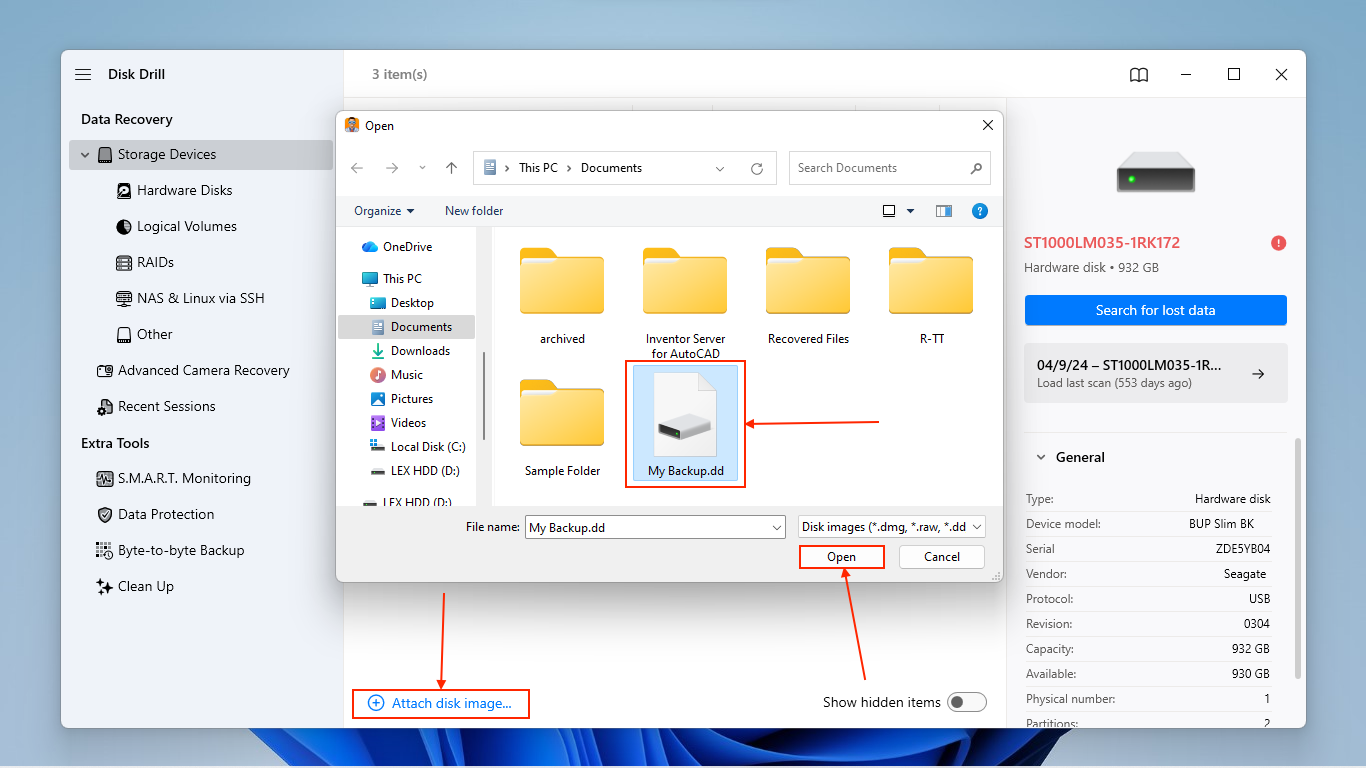
- Select the attached backup (if you created one) OR your old hard drive and click Search for lost data.
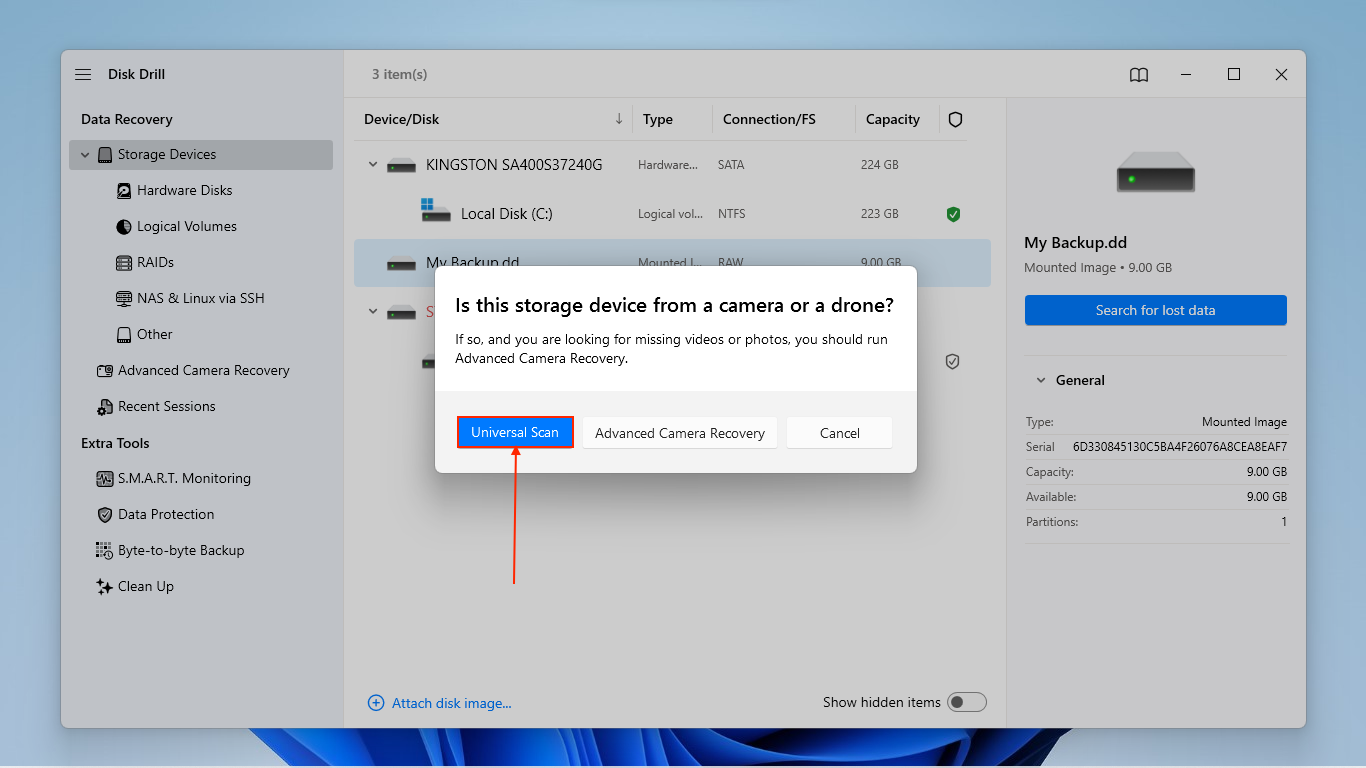
- In the pop-up that appears, choose Universal Scan.
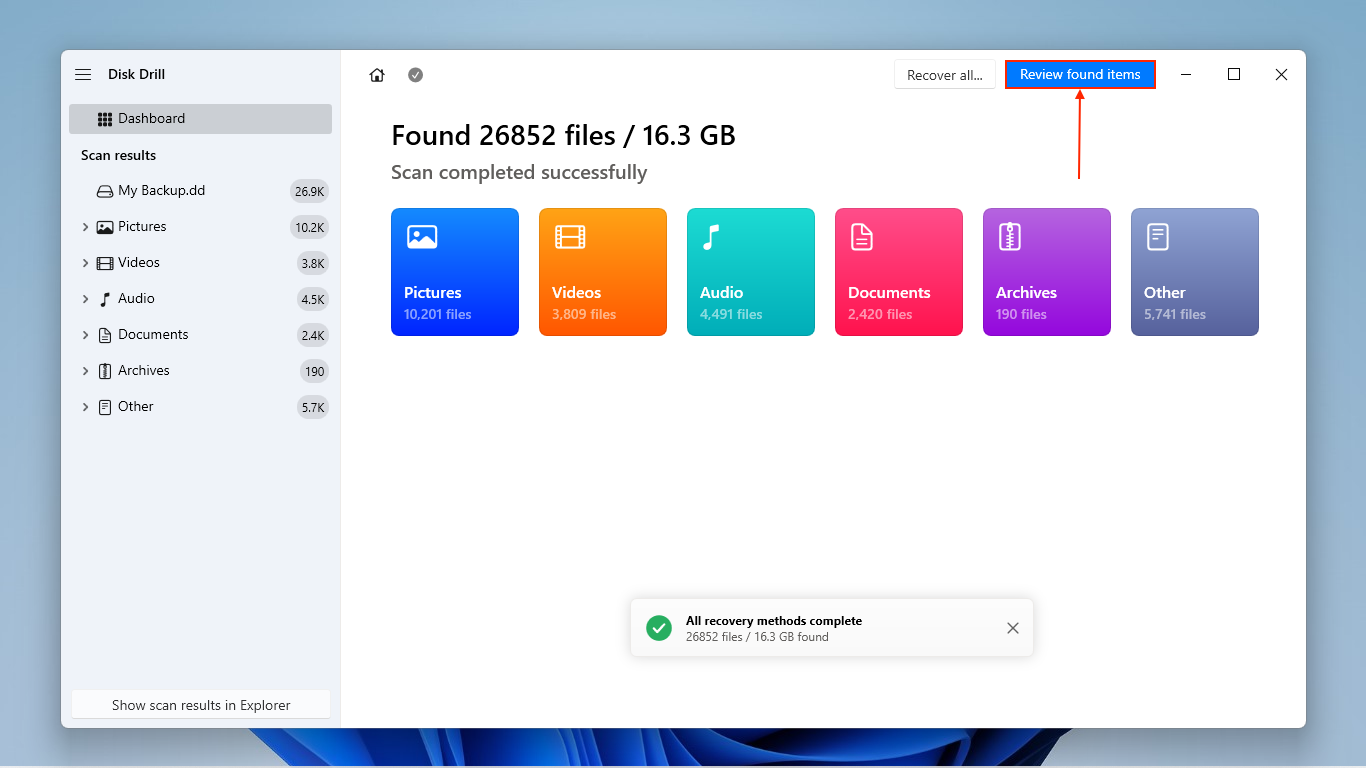
- Once Disk Drill is done scanning your drive, click Review found items.
- Open the “Existing” tab to browse the current files on your hard drive (typically for drives that are intact but inaccessible). If some of the files you need to restore are missing from this category, check “Deleted or Lost”—you’ll find deleted and formatted data here. “Reconstructed” groups files that are damaged or partially overwritten, which Disk Drill reconstructed based on known file signatures.
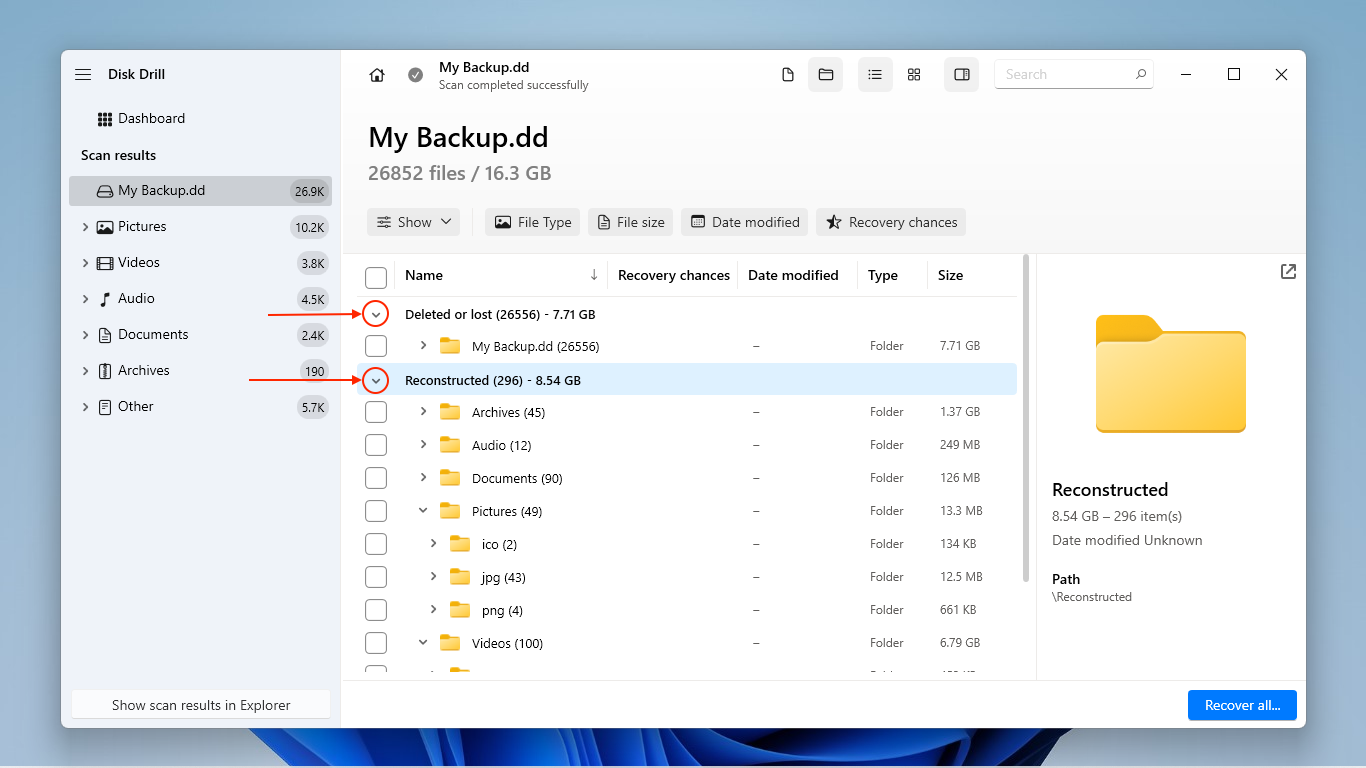
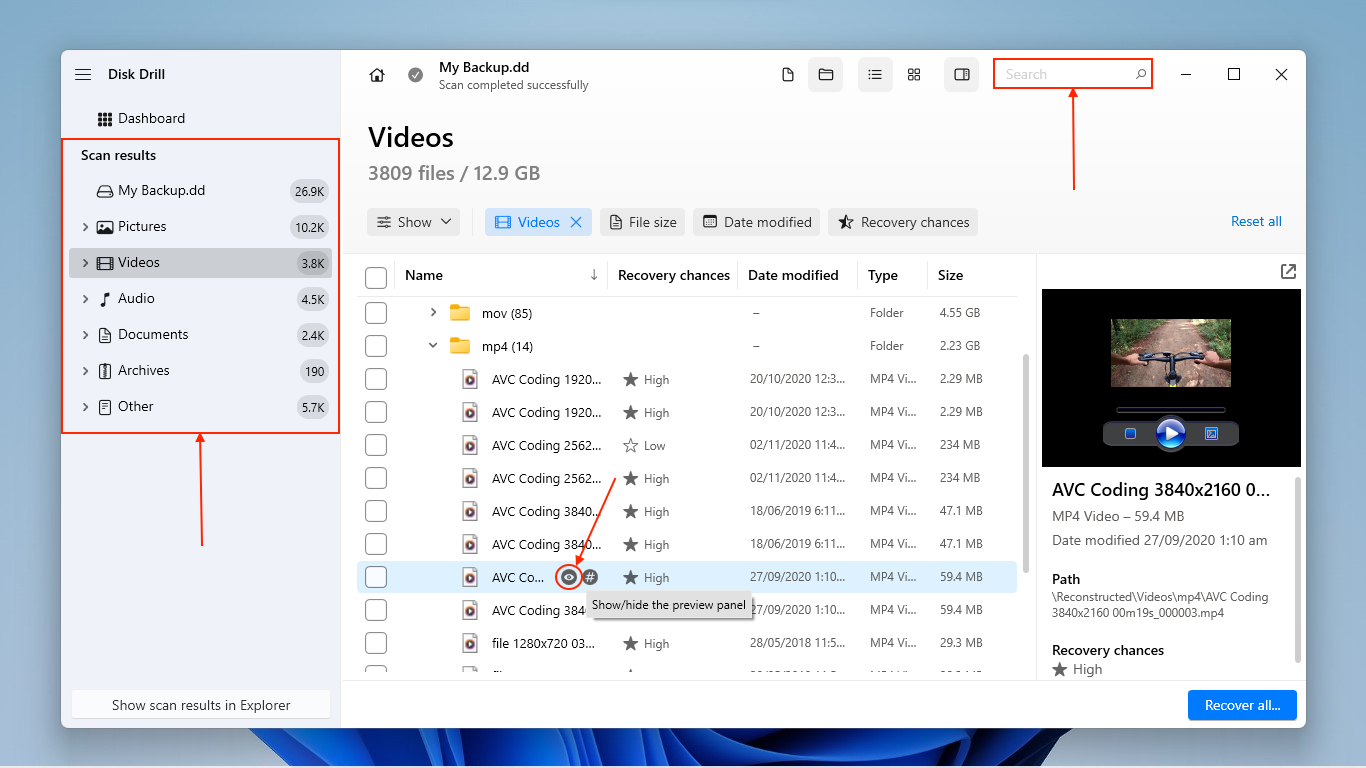
- As you browse your files, make sure to check their previews in the right sidebar (toggleable via the eye button). Disk Drill can display the contents of most file types, including full videos—this allows you to confirm that your file is even recoverable. Use the search tool and the filters in the sidebar to review specific files.
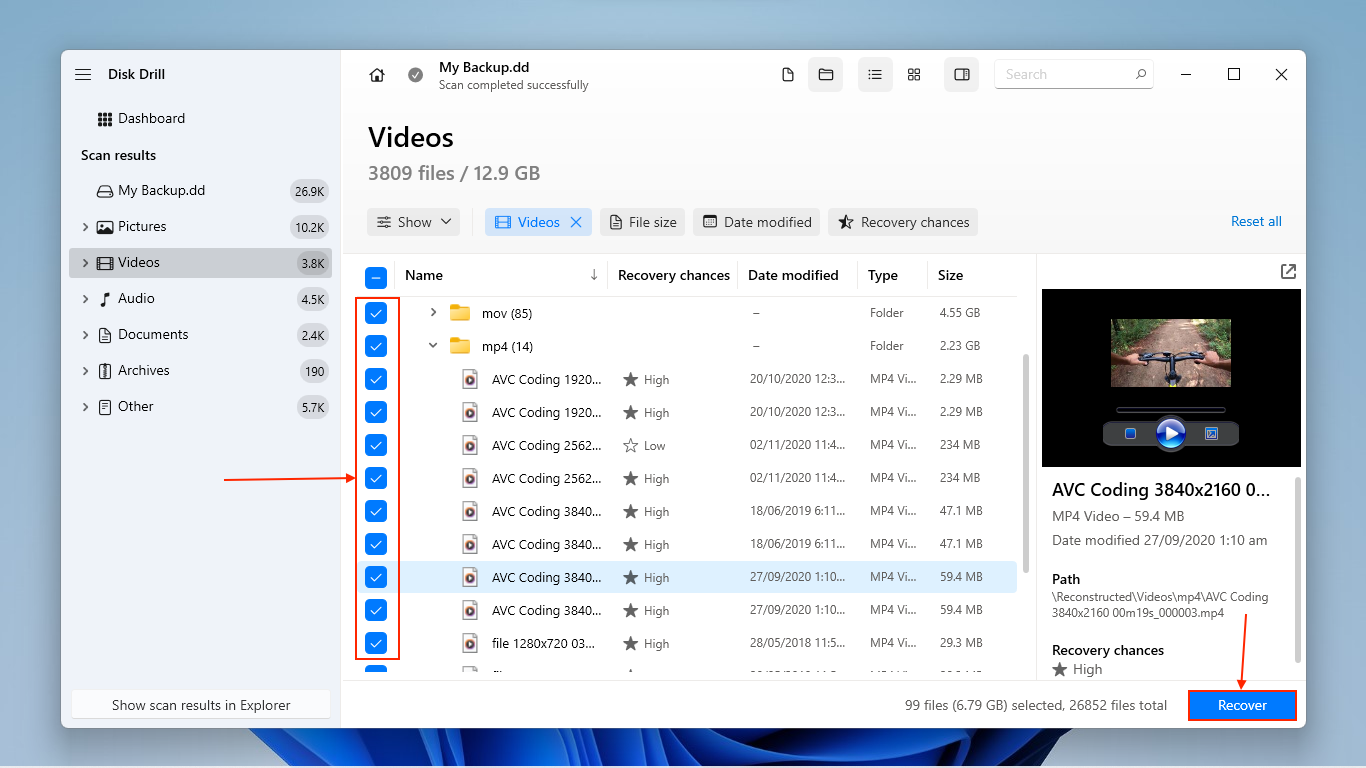
- Once you’ve found and reviewed the files you want to restore, mark them for recovery using the boxes in the left-most column. Then, click the “Recover” button. Alternatively, if you want to restore all the files Disk Drill found, leave all the boxes blank and click “Recover All.”
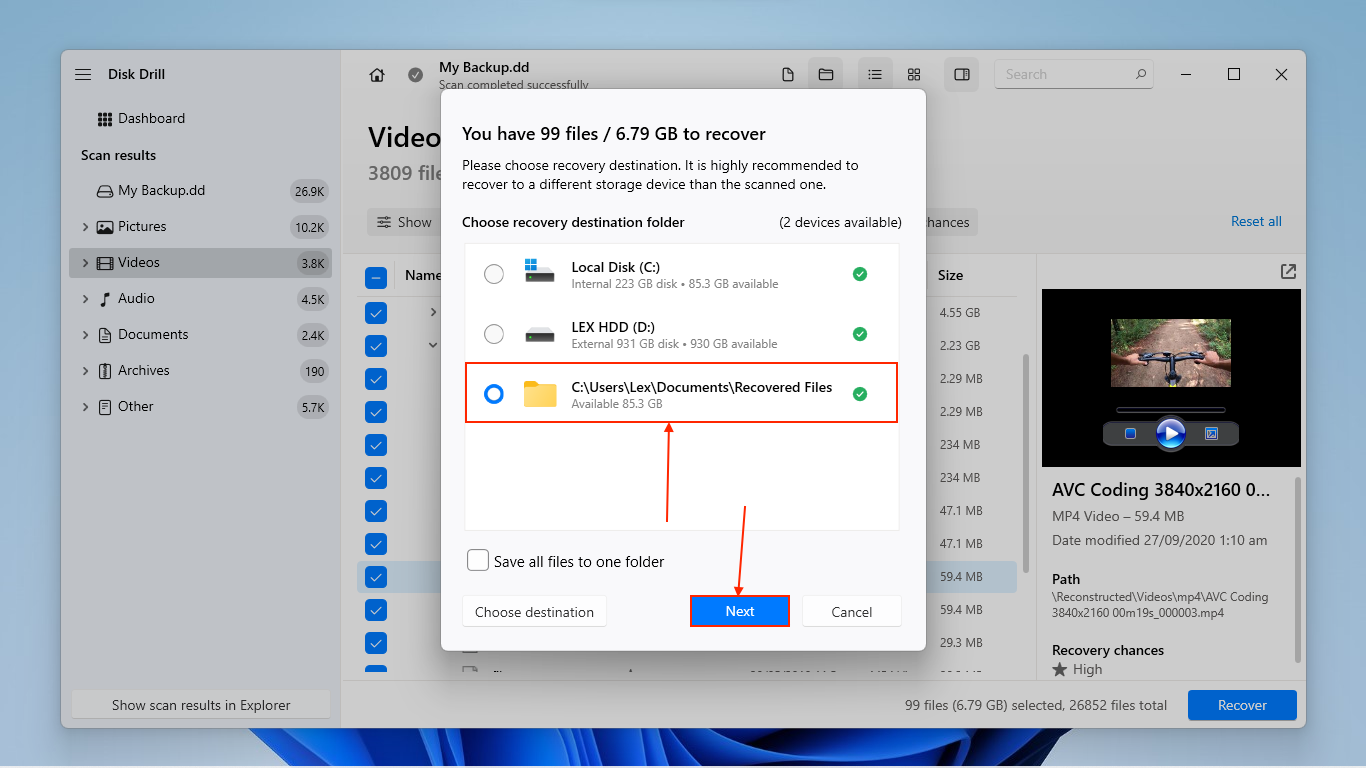
- Choose a location on your computer (not the old drive) where you want Disk Drill to save the restored files. Finally, click Next.
If you want to know more about Disk Drill before installing it on your own machine, we strongly recommend that you check out our Disk Drill review. As part of our research for that article, we performed our own extensive tests on the app’s ability to restore data from all sorts of storage devices in different conditions–especially old hard drives, which it’s commonly used for.
For example, the Byte-to-byte backup module we mentioned in the guide steps performs multiple passes of your drive, initially skipping problematic sectors to guarantee a recoverable image and going back to them later. This can immediately improve your data recoverability if your drive is in bad condition. Disk Drill’s session management also greatly helps with this; it automatically pauses and resumes the scan whenever a problematic drive disconnects itself (with other apps, you would have to restart the entire scan, manually).
Aside from its features, we compared how well Disk Drill recovered different types of data (documents, videos, and RAW photos), as well as its performance when working with different file system formats. Our review also answers common questions about the app, like is Disk Drill safe? How does it compare to other popular data recovery software? What do other users have to say about it?
How to Extract Data From an Old Hard Drive Still Inside a Working Old Computer
If the old computer that your drive is connected to still works, there are several ways to copy your data directly to the new system.
Option 1: Use a Direct Connection Over Network or USB
If you have them available, you can use a crossover cable or a USB transfer cable (via Windows Easy Transfer). Alternatively, you can share files between your computers over a local network. This also allows you to access the files from different systems. Here’s a brief guide for setting it up:
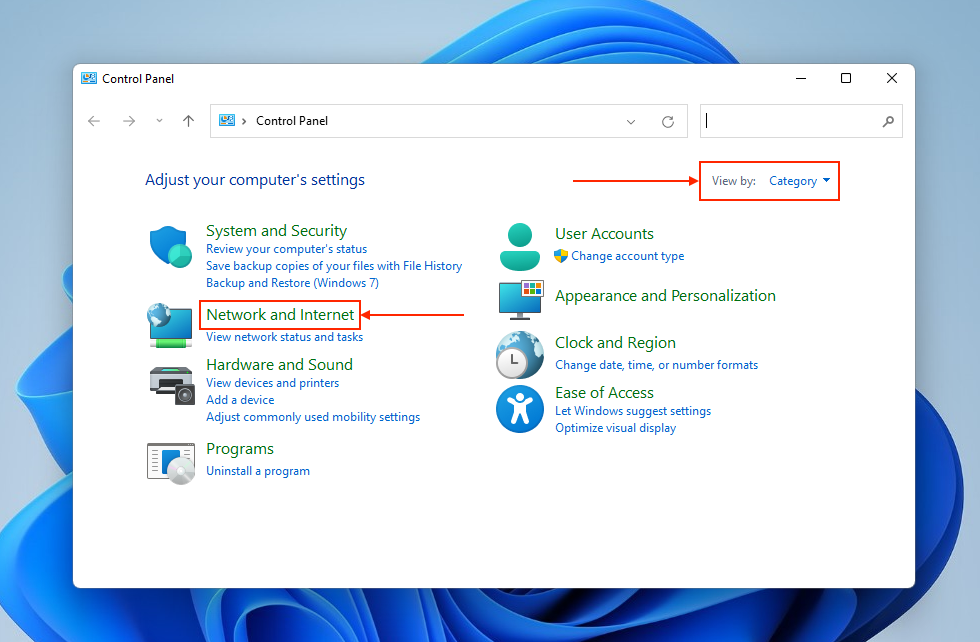
- On your old computer, open Control Panel.
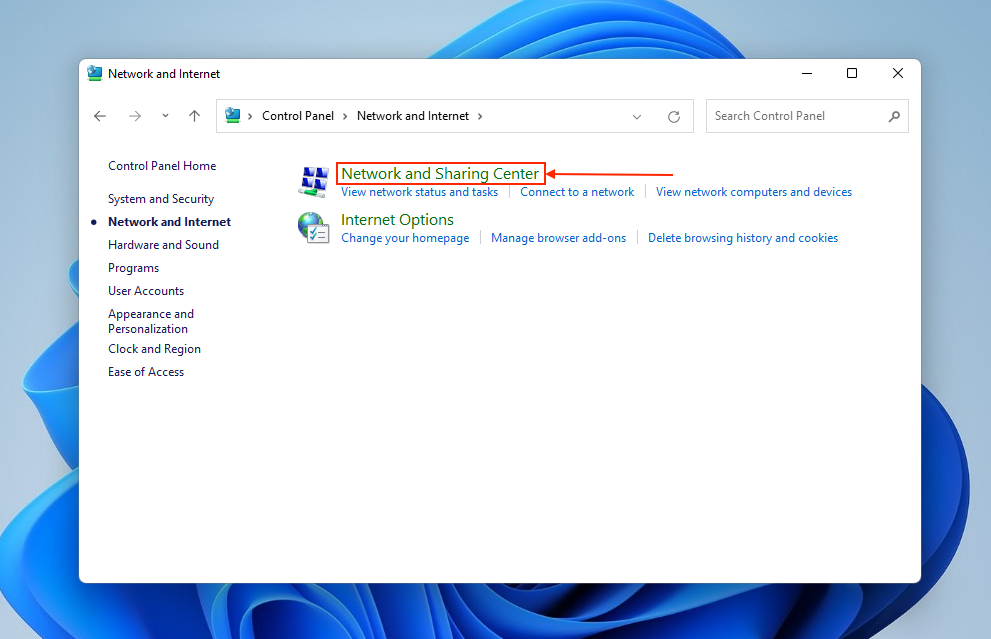
- Make sure you’ve set View by to Category. Then, click the Network and Internet link.
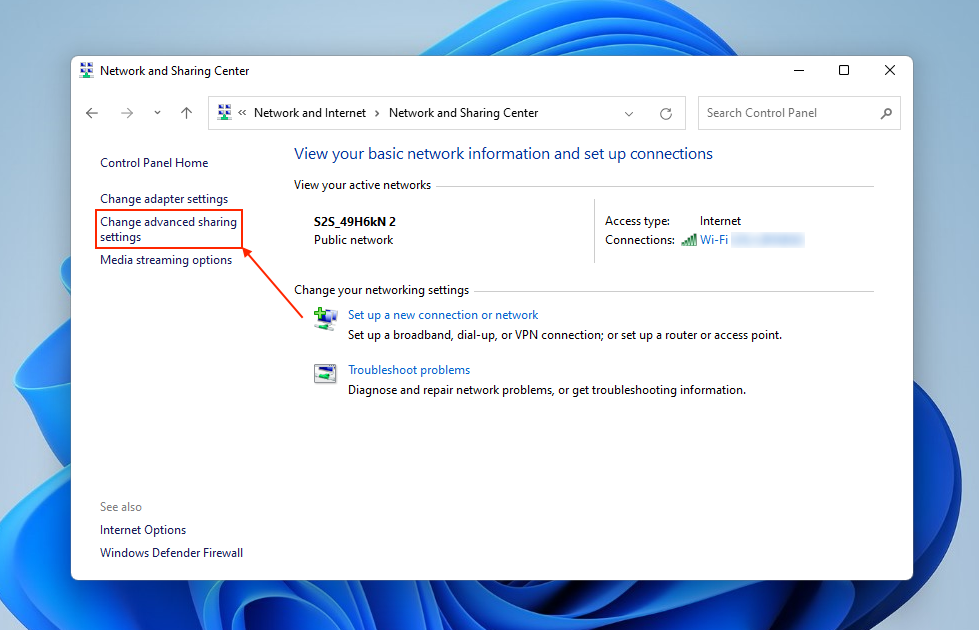
- In the new window, select Network and Sharing Center.
- In the left sidebar, click Change advanced sharing settings.
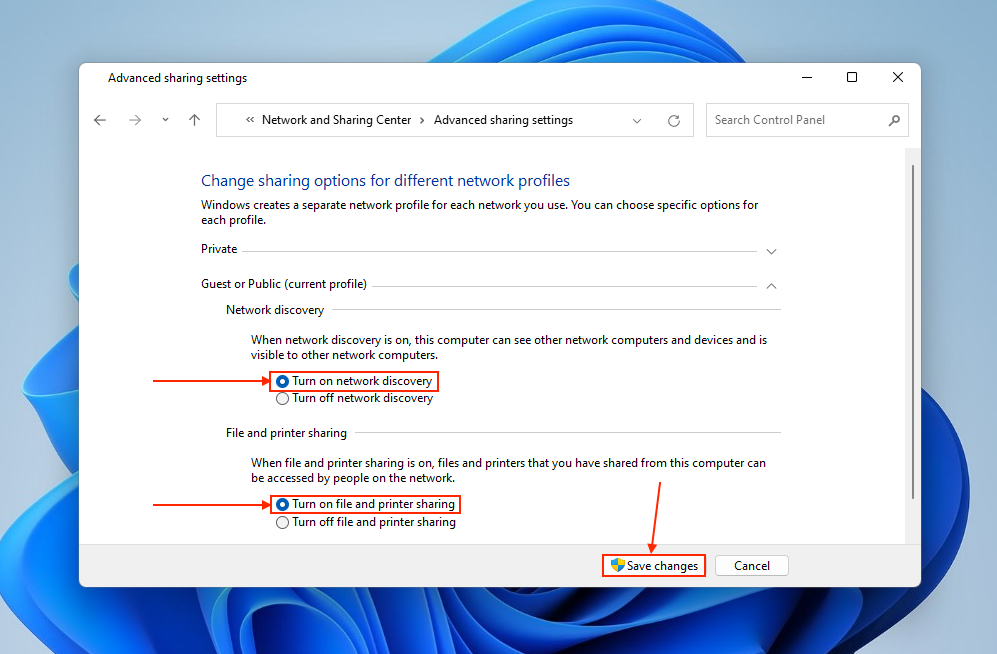
- Enable Network discovery and File and printer sharing for your network profile (whichever says “current profile”). Then, click Save changes.
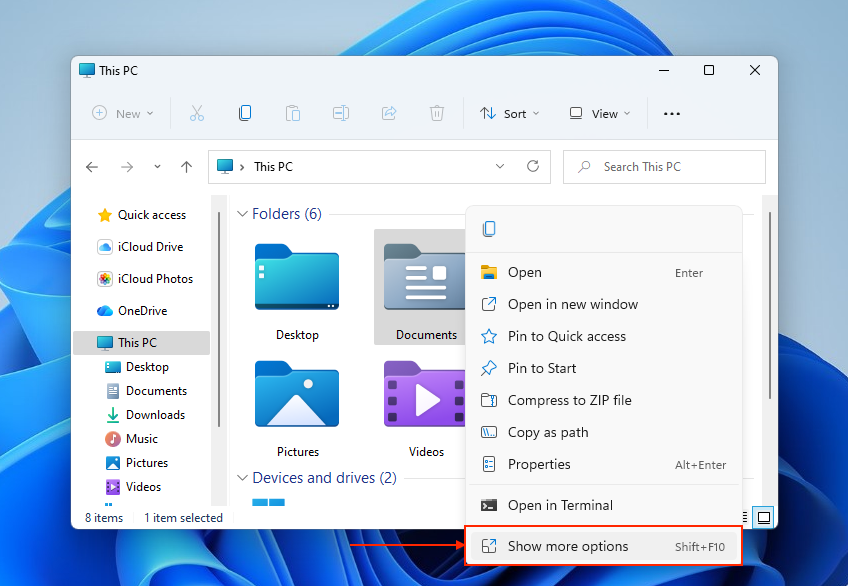
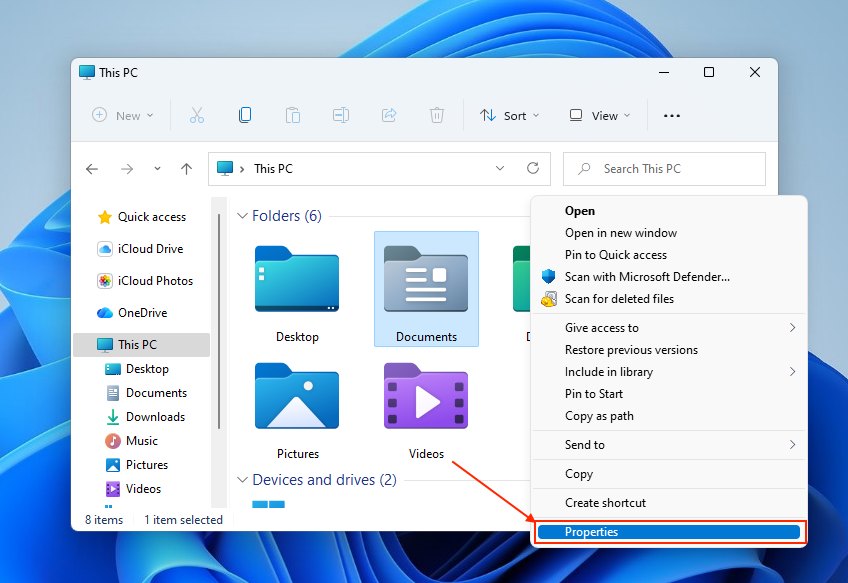
- Open File Explorer and navigate to the folder you want to share. Then, right-click your folder > Show more options.
- In the context menu that appears, select Properties.
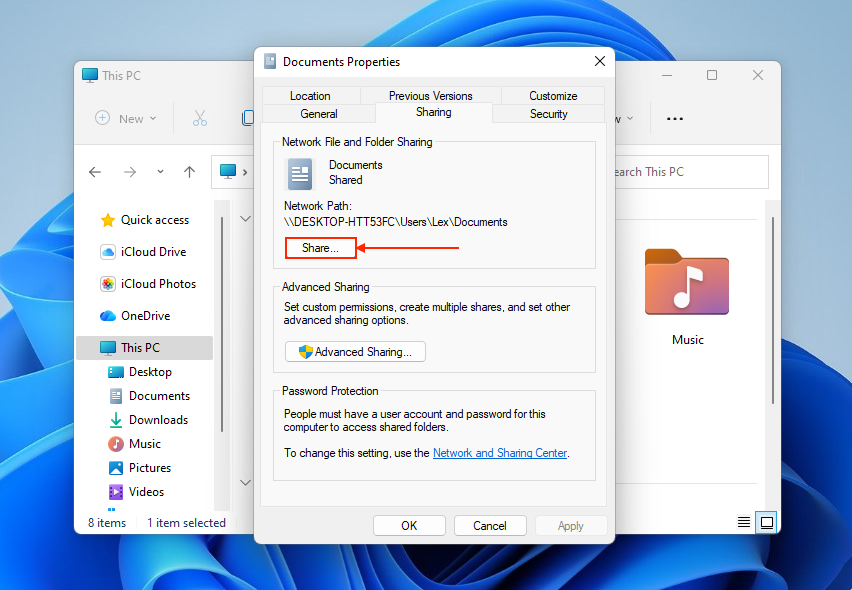
- Navigate to the Sharing tab. Then, click the Share button.
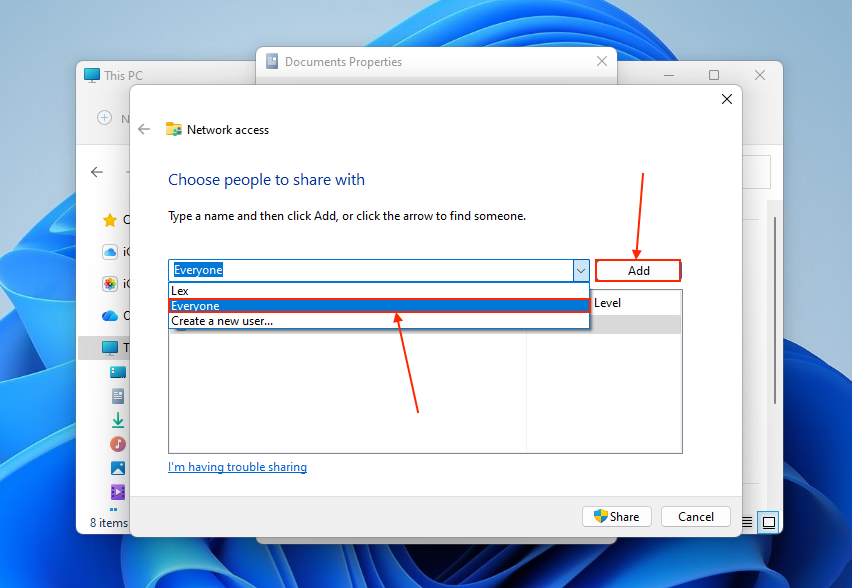
- In the drop-down menu, select Everyone and click Add.
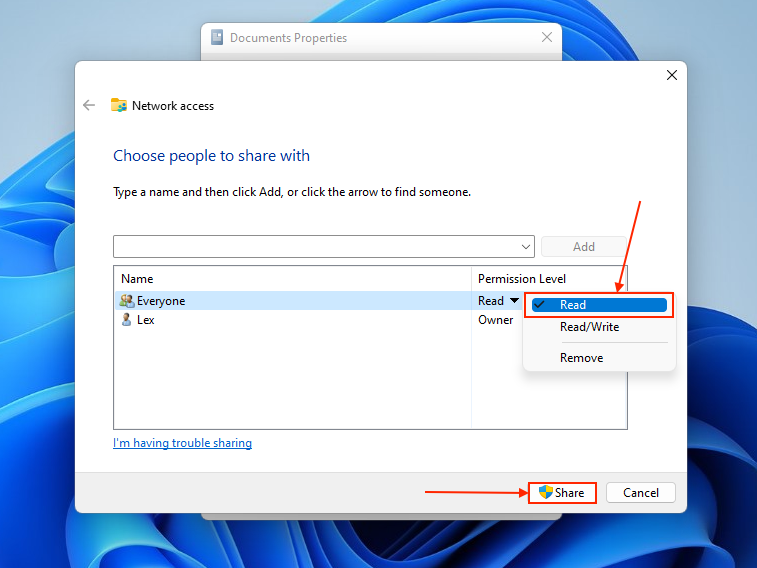
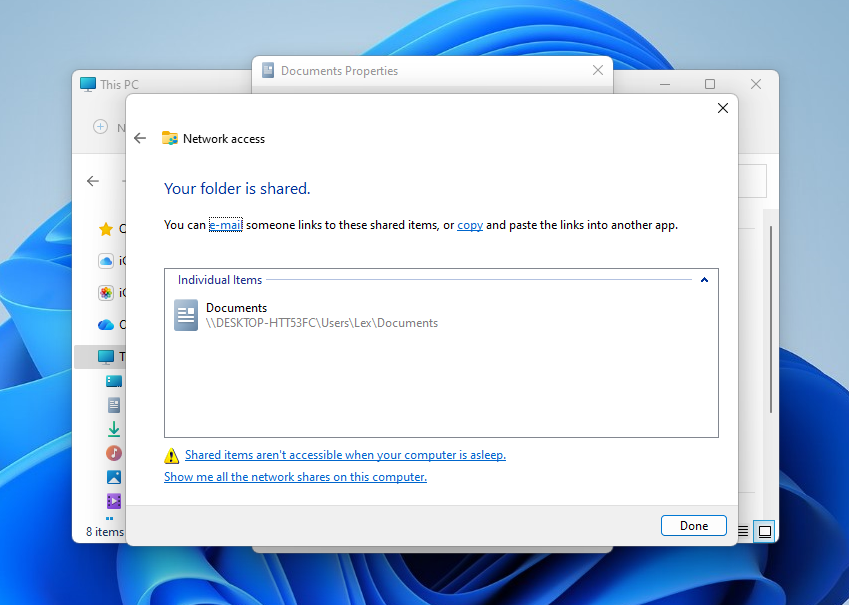
- Select Everyone from the list, and click the Permission Level beside it. We recommend just choosing the Read option, which allows you to view and copy files without modifying them (which may cause further errors). Finally, click Share.
- The wizard will let you know once your folder has been successfully shared and can be accessed over the network.
We strongly recommend copying the shared files to a local folder on your other computer—ASAP! Since the old computer serves as the shared folder’s host, you can permanently lose access if the computer just stops booting one day.
Option 2: Boot Using a Live USB or Rescue Environment
If you can’t reliably boot into the overeating system, you can try booting into a “live USB”, which is a USB or external storage device with its own operating system. We’ll show you how to do this using WinPE, which you can download and deploy from Microsoft for free. This should allow you to access the drive through the boot environment and copy your data.
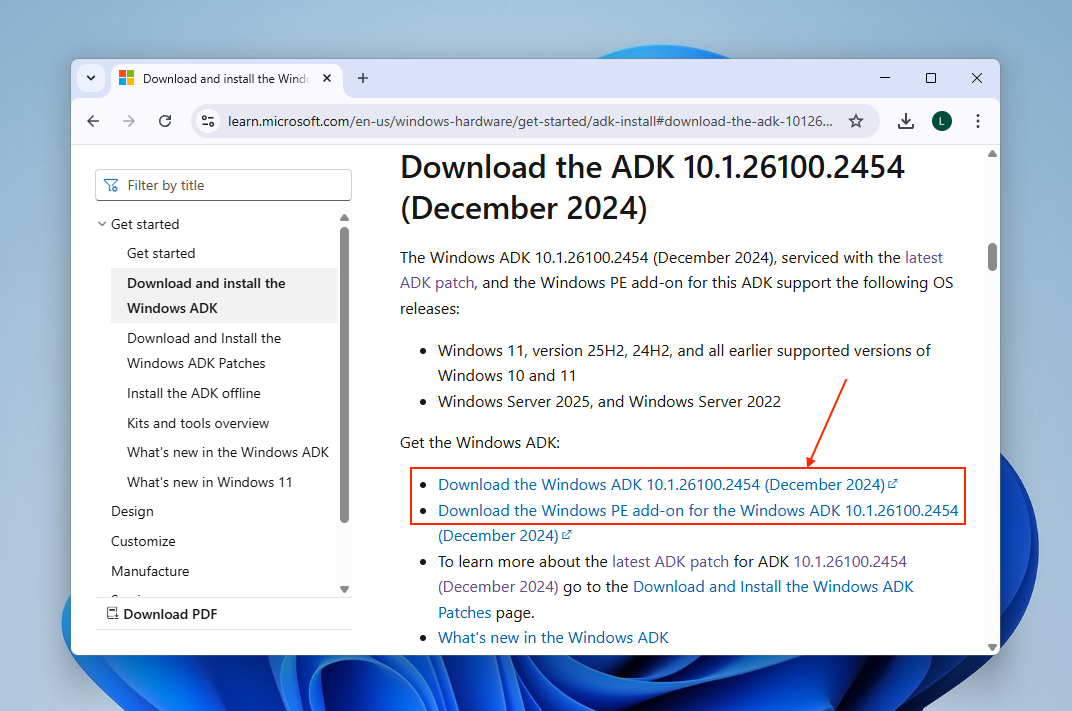
- Navigate to Microsoft’s latest ADK download page and download Windows ADK and the Windows PE Add-on.
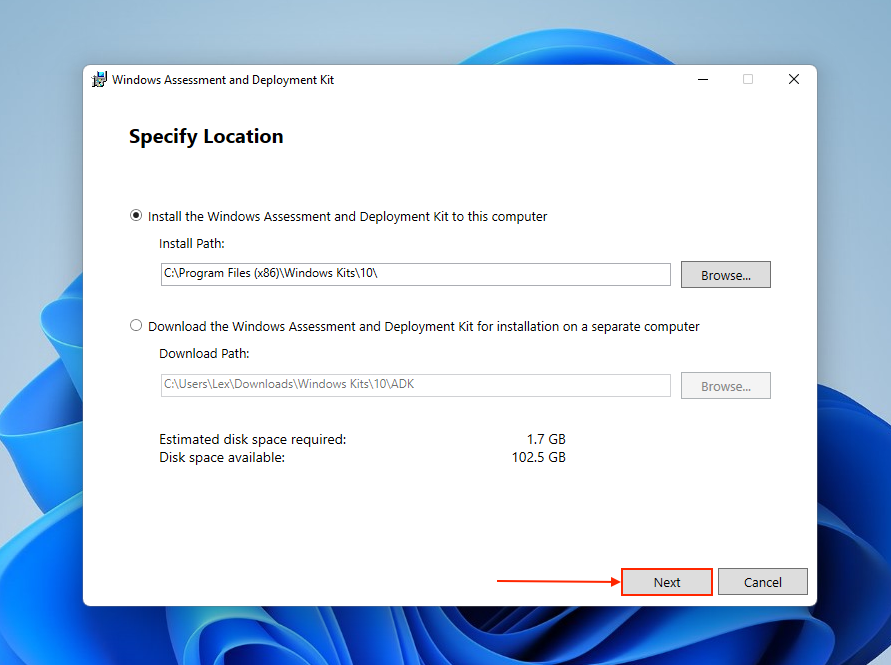
- The ADK download link will result in a file called adksetup.exe in your Downloads folder. Open it to launch the ADK installation wizard. You’ll need to click through several dialog boxes (License Agreement, etc.) to complete the installation process.
- Next, the Windows PE add-on link will result in a file called adkwinpesetup.exe. Open it to launch the Windows PE add-on installation wizard. Like step 2, click through the menus until the add-on is installed.

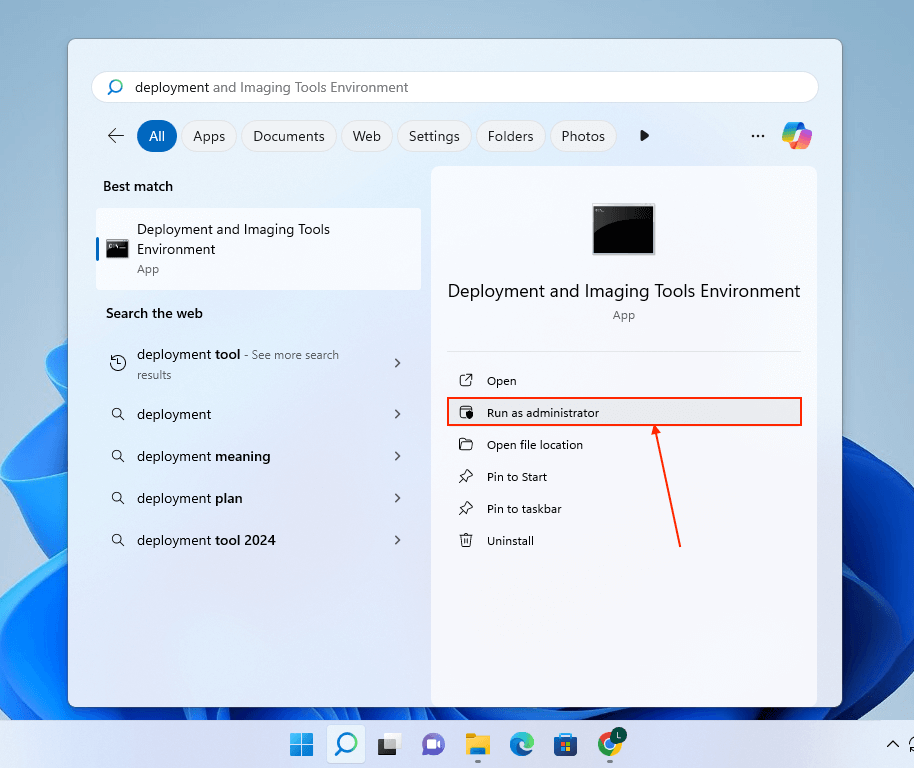
- Once Windows ADK and Windows PE are installed, connect a USB flash drive to your PC. Then, open the Deployment and Imaging Tools Environment app as administrator.
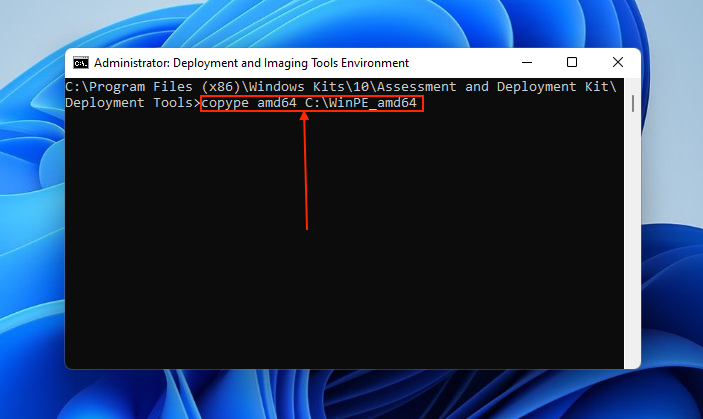
- The first command you will execute creates the files required to build the WinPE bootable USB. Paste the following command in the terminal and hit Enter:
copype amd64 C:\WinPE_amd64
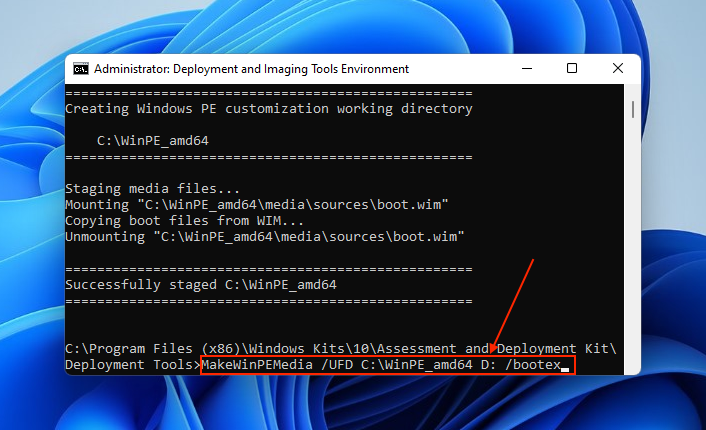
- The next and final command builds the bootable USB. Make sure to use the appropriate drive letter.
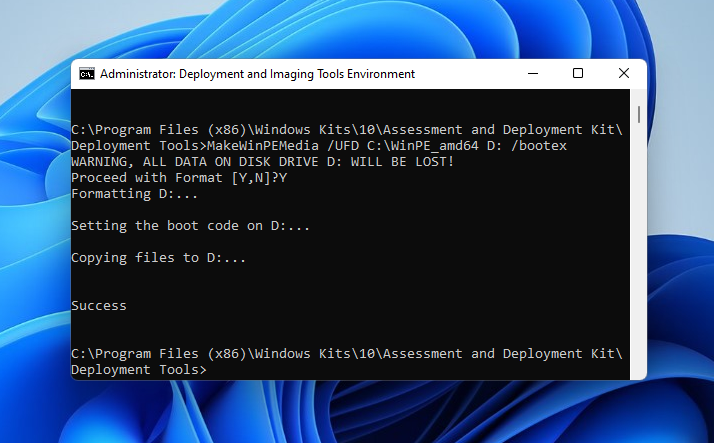
- The terminal will let you know once the installation is successful. You can close the application and safely eject the USB flash drive.
You can now boot into Windows PE on your old PC using your flash drive (the appropriate boot menu key depends on your machine’s exact model). A terminal will appear, similar to Command Prompt. Use the notepad.exe command to open the Notepad application, which then gives you access to the File menu. Click File > Open to interact with the PC drive’s directories.
Option 3: Physically Remove the Drive and Mount It Elsewhere
If the old computer is struggling to boot into the operating system, the most efficient solution may be to simply disconnect the drive and mount it to a different computer. This makes more sense than spending time and effort repairing a computer that is no longer suitable for regular use.
See the first section of this guide, which covers accessing a hard drive from a broken computer.
Weird Noises or Drive Not Showing Up? Here’s What It Means
It’s important to understand which noises or error messages indicate logical damage (software-related) versus physical damage (mechanical damage). You should not attempt to recover data from a physically damaged drive yourself–instead, send it to a professional data recovery service (ideally, find one with a “no data – no cost” guarantee).
Attempting to recover data yourself from a physically damaged drive may cause permanent data loss. With that in mind, here’s a breakdown of common symptoms you might face:
- Clicking noises: Clicks are literally the sound of internal parts hitting each other in some way. It’s a sign of severe physical damage. Immediately safely eject your drive and power it down. Continuing to use it will make it worse.
- Beeping noises: Similar to clicking noises, beeps directly come from the drive’s mechanical parts breaking down. It’s also a sign of severe physical damage, and likely points to the drive’s read and write heads getting stuck to the platter (a phenomenon known as “stiction”). Safely eject your drive and power it down ASAP.
- Disk not spinning: If your drive disk doesn’t spin up at all, it may not be receiving the power it needs to run. This could potentially mean physical damage if the motor or circuit board malfunctions. However, you can try connecting it to another computer to see if it works.
- Drive not showing up: If your drive doesn’t show up in Disk Management or it shows up with an incorrect size, physical damage to any number of the drive’s mechanical parts is the likely culprit.
- Very slow access time: Is it taking too long to access your files? That may be another sign of physical damage, as your drive attempts over and over to read bad sectors or damaged surface areas. If you’re unable to immediately copy your files, stop using the drive, as further attempts may cause more damage.
- Disappearing files and folders: Missing data can be a sign of logical damage, such as file system corruption or malware. We also have a guide for that. But it can also be an underlying symptom of physical damage if it shows any of the other signs included in this list.
Where Should You Store Recovered Data from an Old Hard Drive
Once you’ve successfully recovered your data, immediately save it somewhere secure. Here are some suggestions:
- ✅ Modern External Drives: Modern drives are more resistant to failure, especially if you use a solid-state drive (due to the lack of a spinning disk). Even modern hard drives have better mechanical engineering that does more to prevent damage to their internal parts.
- ☁️ Cloud Storage Options: Services like iCloud, Google Drive, Dropbox, etc., allow you to save files online or in “cloud storage.” The benefit of cloud storage is the ability to access that data online from any device. Most services offer a free plan with limited storage space, which can be upgraded with a subscription.
- 🖥️ Internal SSD (If Available): You can also save your files directly on your boot drive or in another internal drive if your computer has one. Note that your boot drive is not the safest location, due to its increased degradation from constant use (running your operating system).
- 📀 Avoid using the old drive again: Even if you successfully repair them, drives with a history of damage will always be more prone to subsequent failure. Its mechanical parts are already compromised.
- 🔄 Backup Strategy: If you have the resources, we recommend the famous 3-2-1 Backup Rule. Have 3 copies of your most important data. 2 copies should be stored in 2 separate storage devices (e.g., 2 external drives), while 1 copy should be stored off-site (e.g., cloud storage).
Frequently Asked Questions
Can I recover data from a hard drive that hasn’t been used in years?
Yes! As long as your hard drive isn’t physically damaged and you have a means of connecting it to your computer, you can recover its data. If you detect physical damage, you can still retrieve your data through a professional data recovery service.
What’s the best free software for recovering data from an old hard drive?
There are several free recovery software (and repair tools) for old hard drives. For data recovery, we recommend Disk Drill—you can recover up to 100 MB worth of files for free, and you can also preview as much data as you want for no cost. This is extremely helpful for discovering which files are even recoverable (especially on a failing drive).
Can I recover data from an old Mac hard drive on a Windows PC?
Yes, you can use a Windows PC to recover data from an old Mac hard drive as long as it appears in Disk Management with the correct size. Even if it’s using a Mac-based file system format that Windows doesn’t natively support, data recovery software will just treat it as a RAW drive and scan it for file signatures. Just make sure that the data recovery software you use supports whatever format the drive is using.
Can I connect a very old IDE or SCSI hard drive to a modern computer?
Yes, you can connect old IDE or SCSI drives to a modern PC if you have the correct equipment. IDE drives require an IDE-to-USB adapter, while SCSI drives need a PCIe SCSI card, along with the appropriate cable.

- 23 publishings
Alejandro is a veteran writer with a rich background in technology. He worked part-time in his uncle’s repair and recovery shop as a young boy, and now uses his experience and writing skills to produce content for multiple tech websites – specifically on the topic of data recovery. As an author for Pandora Data Recovery Mentor, he is constantly testing and experimenting with new tools and technology to help his readers find the best software for their needs.
- Frisco, Texas, United States
Yevgeniy Tolkunov is Hardware Engineer at ACE Data Recovery. Yevgeniy has a Master's Degree in Physics, Information Technology; 15+ years of experience.