
How to Fix an External Hard Drive Not Mounting on Mac

An external hard drive (HDD) that won’t mount or show up on your Mac can leave you without access to your files. These are two closely related but different problems. In some cases, your Mac detects the drive, but the volume won’t mount. In others, the drive doesn’t appear in Finder, on the Desktop, or even in Disk Utility at all. The cause can be anything from a faulty cable, adapter, or insufficient power supply to an unsupported or corrupted file system and the right fix depends on what’s causing the problem, so this guide covers the solutions for each scenario.
Identify the Problem
First of all, you have to figure out whether your Mac detects the drive but can’t mount it, or doesn’t detect it at all. These two situations can look similar, but they usually have different causes.
- If you don’t see your external hard drive in Finder or on the Desktop, open Disk Utility from the Applications folder in Finder.
- Click View, then Show All Devices.
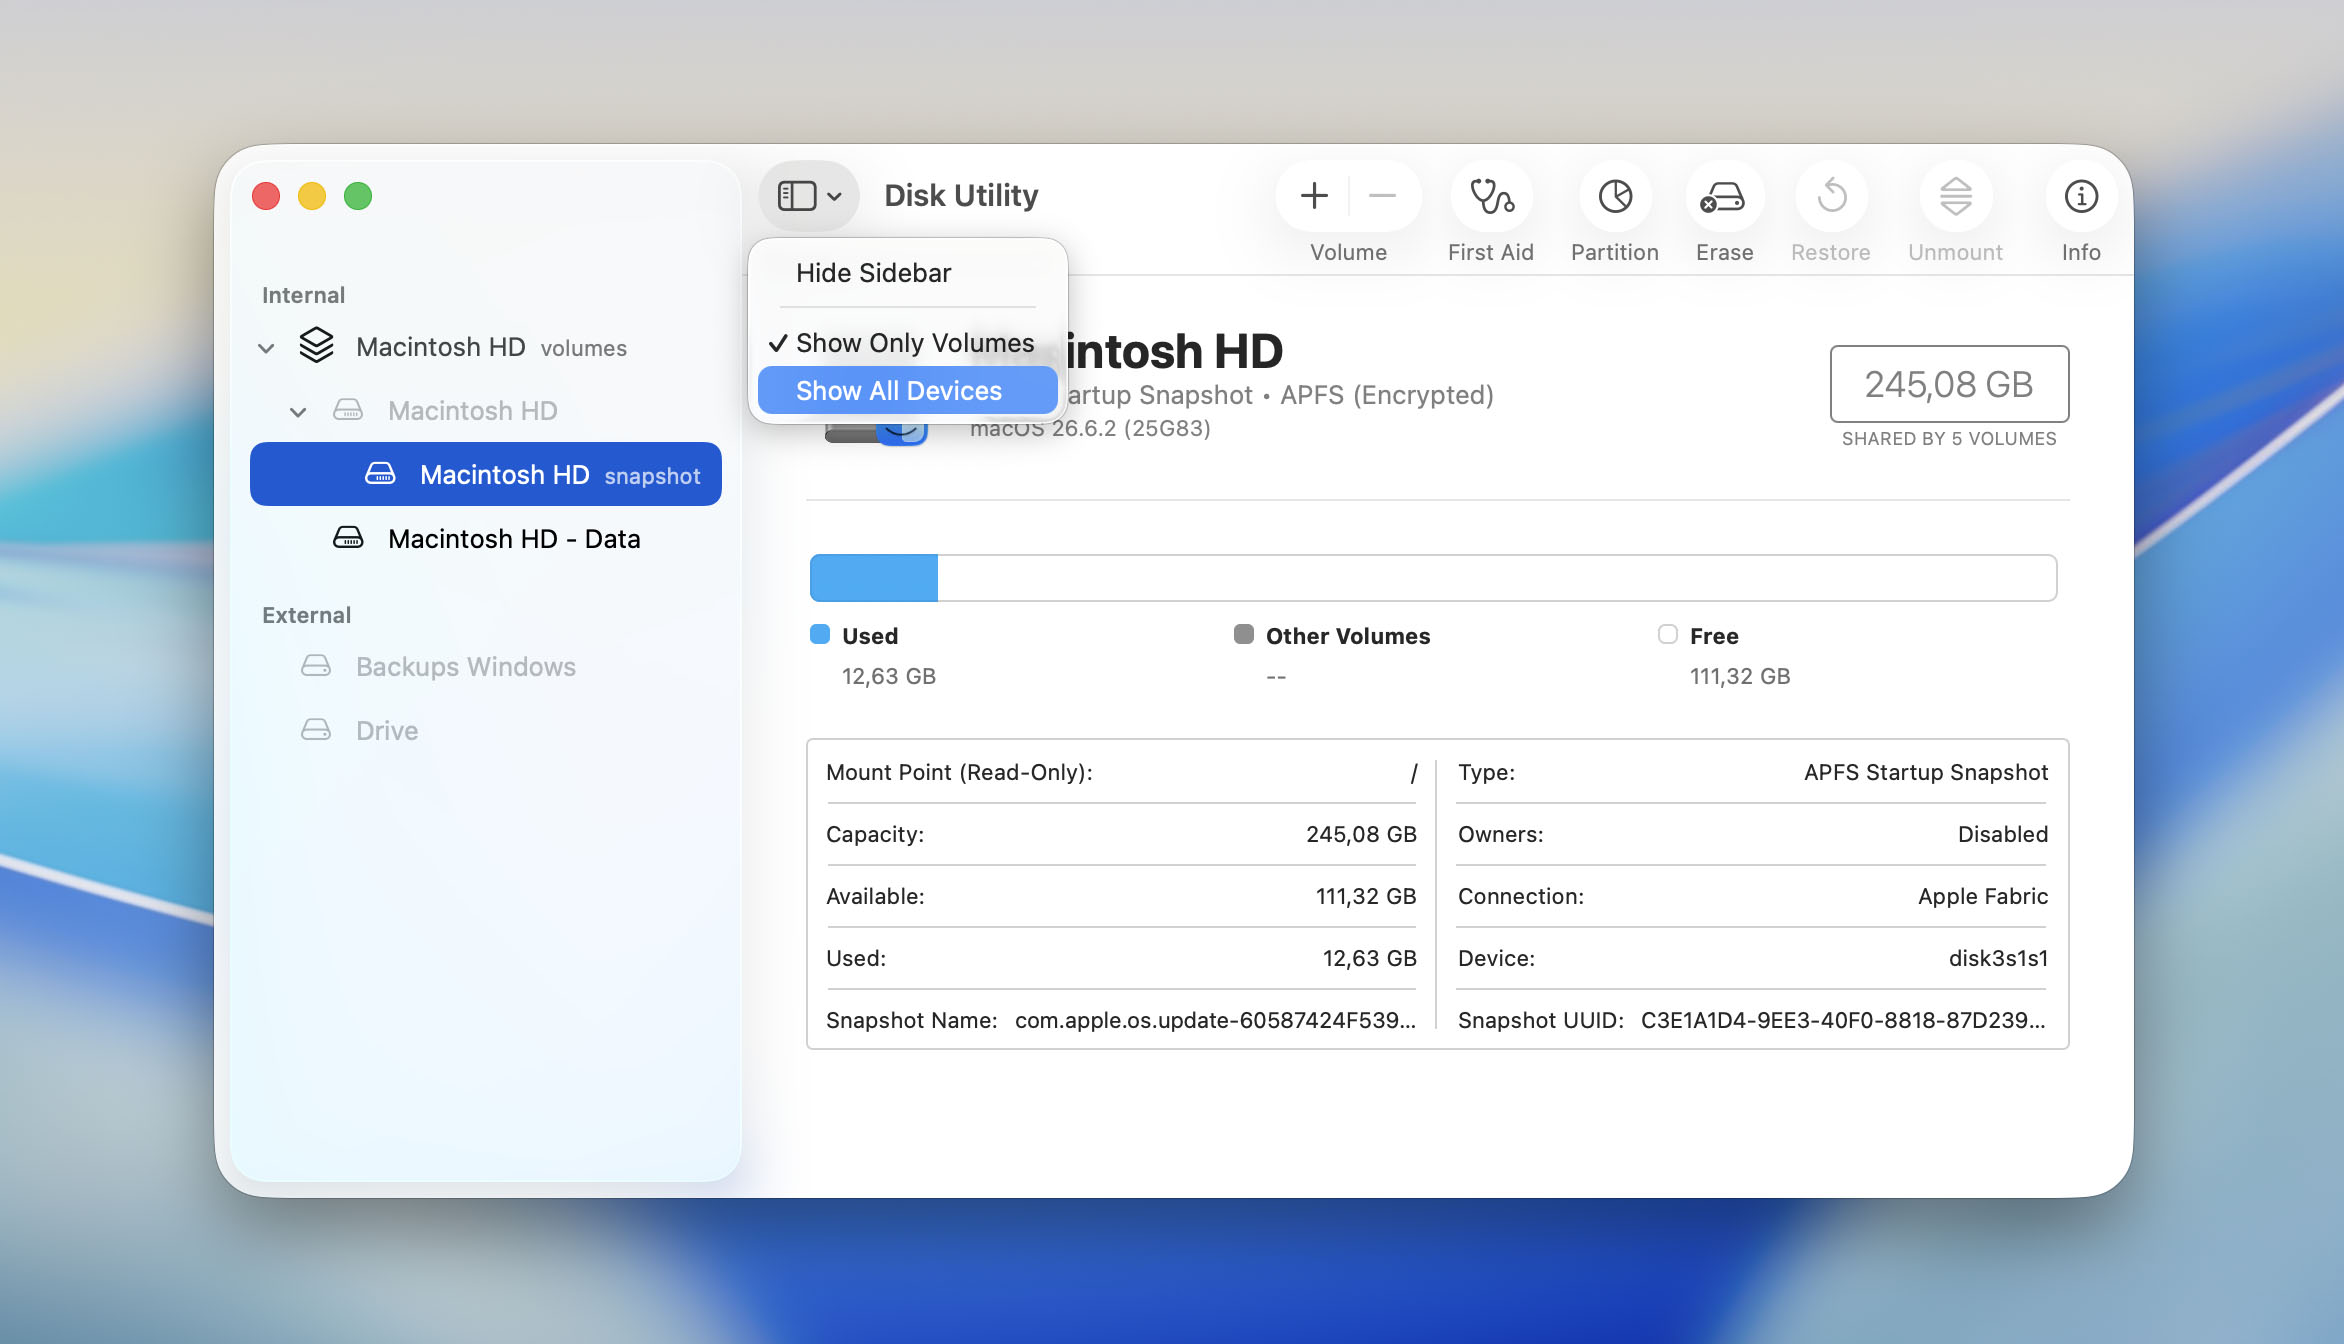
- Check whether the physical drive, its container, and its volume appear in the sidebar.
- If your drive appears in Disk Utility, select its volume and check the button at the top of the window:
- If you see Mount, the volume is currently unmounted. Click it to see if macOS can mount the drive.
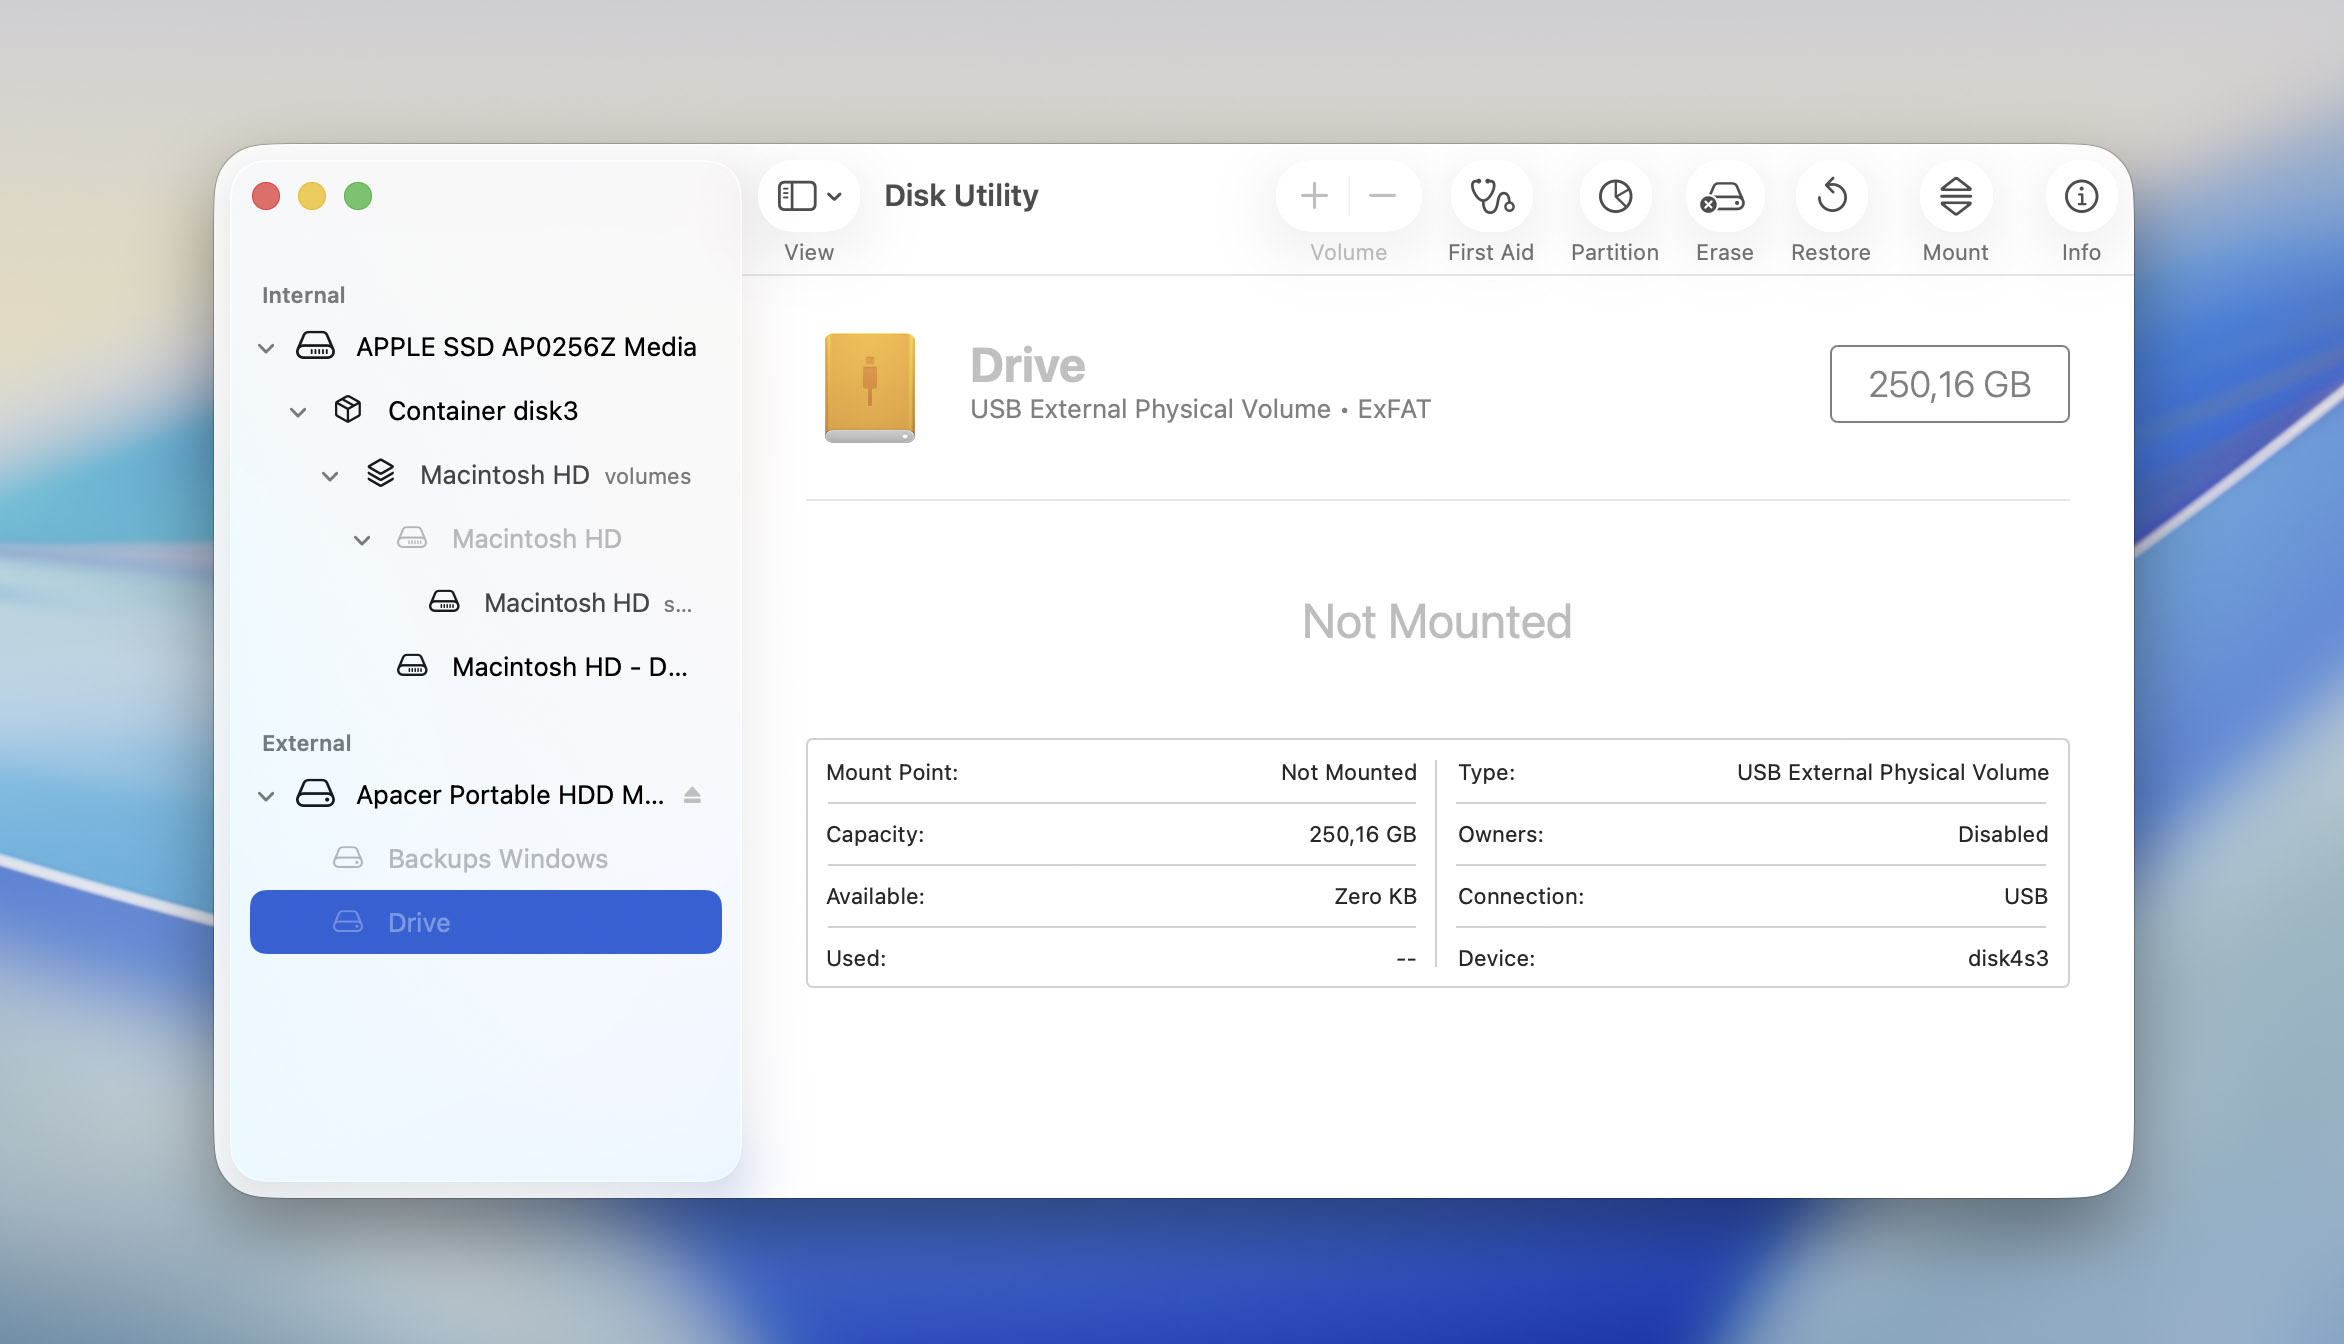
- Mount button available – the volume is detected but currently unmounted. Click Mount to see if macOS can attach it.
- Unmount button available – the volume is already mounted. If you still can’t find it in Finder or on the Desktop, the problem isn’t related to mounting.
- Physical drive is listed, but no volume appears underneath it – the partition map or container structure may be missing or damaged. In this case, avoid formatting the drive before recovering any important data.
- The volume is listed, but clicking Mount fails – the file system may be corrupted, the drive could be encrypted, or there may be a partition or driver-related issue preventing macOS from mounting it.
- If you see Mount, the volume is currently unmounted. Click it to see if macOS can mount the drive.
If the drive doesn’t appear in Disk Utility, you’re dealing with a different problem. Continue to the How to Fix an External Hard Drive Not Showing Up on a Mac section, where we explain how to troubleshoot drives that aren’t detected by macOS.
Once you know which of these situations matches yours, it becomes much easier to choose the right solution.
Reasons Why an External Hard Drive Won’t Mount on a Mac
We’ve created the table below outlining the common reasons an external hard drive won’t mount on a Mac:
| Problem | Reason | Description | Recovery Chances | Best Solution |
| External hard drive not showing up | Physical connection issues | The cable connecting the hard drive to your Mac might be faulty or broken. | Very high | Check the cable, USB port, adapter, or enclosure. If the drive still isn’t detected, test it on another computer. |
| External hard drive not showing up | Power supply issues | Insufficient power supply from your Mac’s USB ports. | Very high | Connect the drive directly to your Mac, use its external power adapter if available, or try a powered USB hub. |
| External hard drive not showing up | Incorrect disk display settings | Your Mac might be configured not to display external hard disks on the Desktop or in Finder even when they’re recognized. | Very high | Enable external disks in Finder settings and verify the drive in Disk Utility. |
| External hard drive not mounting | Hard drive corruption | Hard disk files may be altered from their original state, preventing your Mac from reading them. | Low | Recover important files with Disk Drill before attempting repairs or formatting the drive. |
| External hard drive not mounting | Unsupported file system | Your macOS version might not support your drive’s file system. | High | Use software that supports the file system or connect the drive to a compatible operating system before copying your data. |
Stay with us as we delve deeper into each step of the solution process. Before you know it, you’ll be back to capturing those priceless moments!
How to Recover Data from an External Hard Drive that Won’t Mount on a Mac
You need specialized software to recover data from external hard drives that won’t mount on your Mac. We have tested different data recovery software for Macs and provided recommendations based on specific situations. After narrowing down your options, you can use our comparison tool to analyze different recovery apps and check their advantages and disadvantages. Then, you can use our software picker to choose the best option based on a survey.
Characteristics of effective data recovery software include:
- 📄 Support for different file formats: The software should be able to scan and recover different types of files. Whether it’s a text file stored in PDF or DOC format, a video stored in MP4 or MKV, or audio stored in MP3 or WAV, your software should be able to recover them from a hard drive.
- ⚙️ Support for your macOS version: The data recovery software should be compatible with your Mac’s current macOS version and processor architecture. Check the developer’s system requirements before installing it, especially if you use a recent macOS release or an older Intel-based Mac.
- 🤗 User-friendly interface: The software should be easy to understand and navigate. A data recovery tool with an overly complex interface is frustrating and can cause mistakes, e.g., deleting files instead of restoring them.
- 🔎 Multiple scan modes: There are multiple ways to scan hard drives to recover deleted data. Your data recovery tool should support as many as possible to increase the chances of recovering your files. It must be able to recover data from problematic drives, be they corrupted or inaccessible for other reasons.
Disk Drill is the best overall recovery software we reviewed, with excellent features and a stellar user interface. It works with virtually all types of external hard disks, including Seagate, LaCie, SanDisk, WD My Passport, etc. The chances of file recovery depend on whether the hard drive appears in your Mac’s Disk Utility tool.
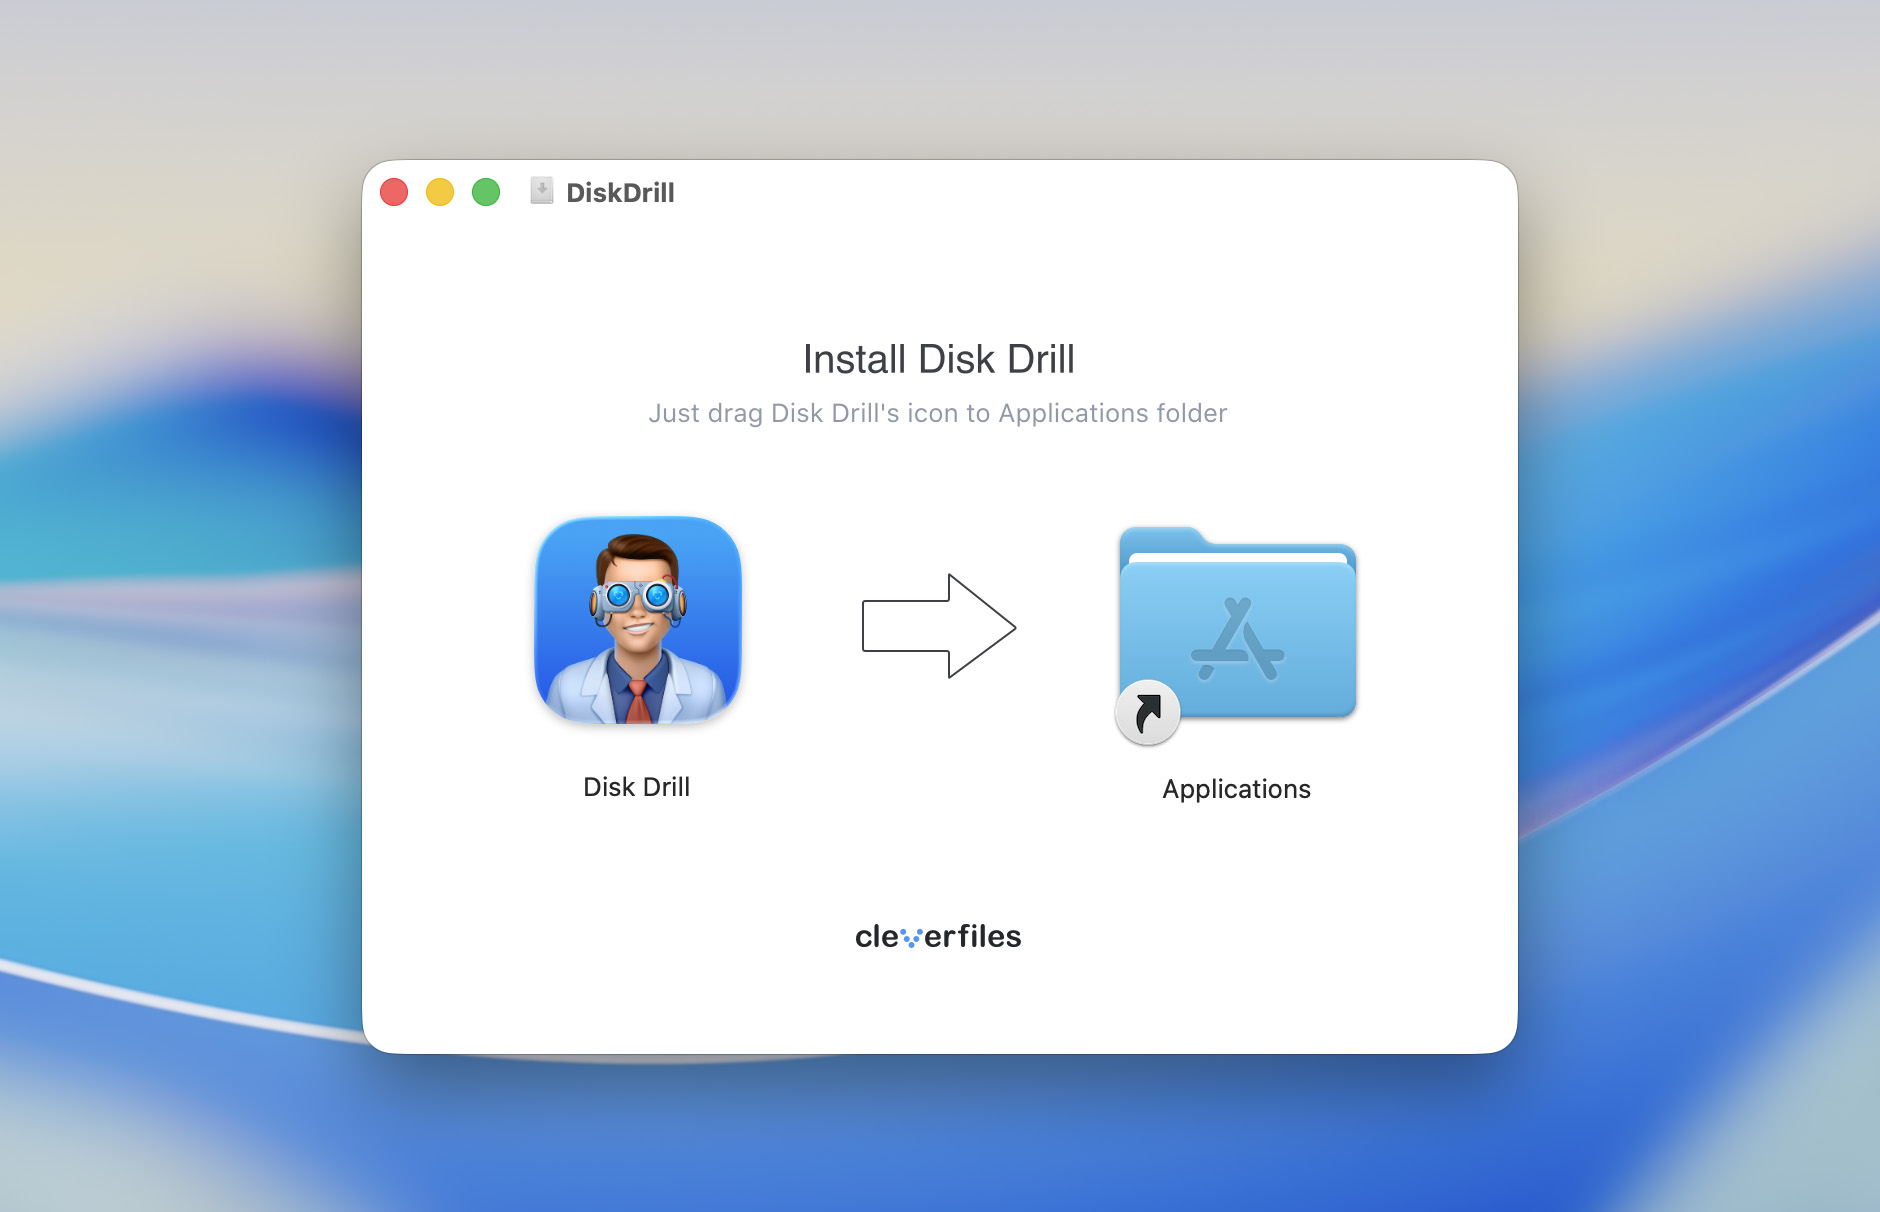
The first step in using Disk Drill is downloading and installing it from the official website. It is a freemium tool, meaning it has free and paid versions. The free version lets you preview all recoverable files, so you can only pay for a license when you know Disk Drill is actually restoring your lost files.
Downloading and installing Disk Drill is a straightforward process. The website provides step-by-step instructions with illustrations to help users.
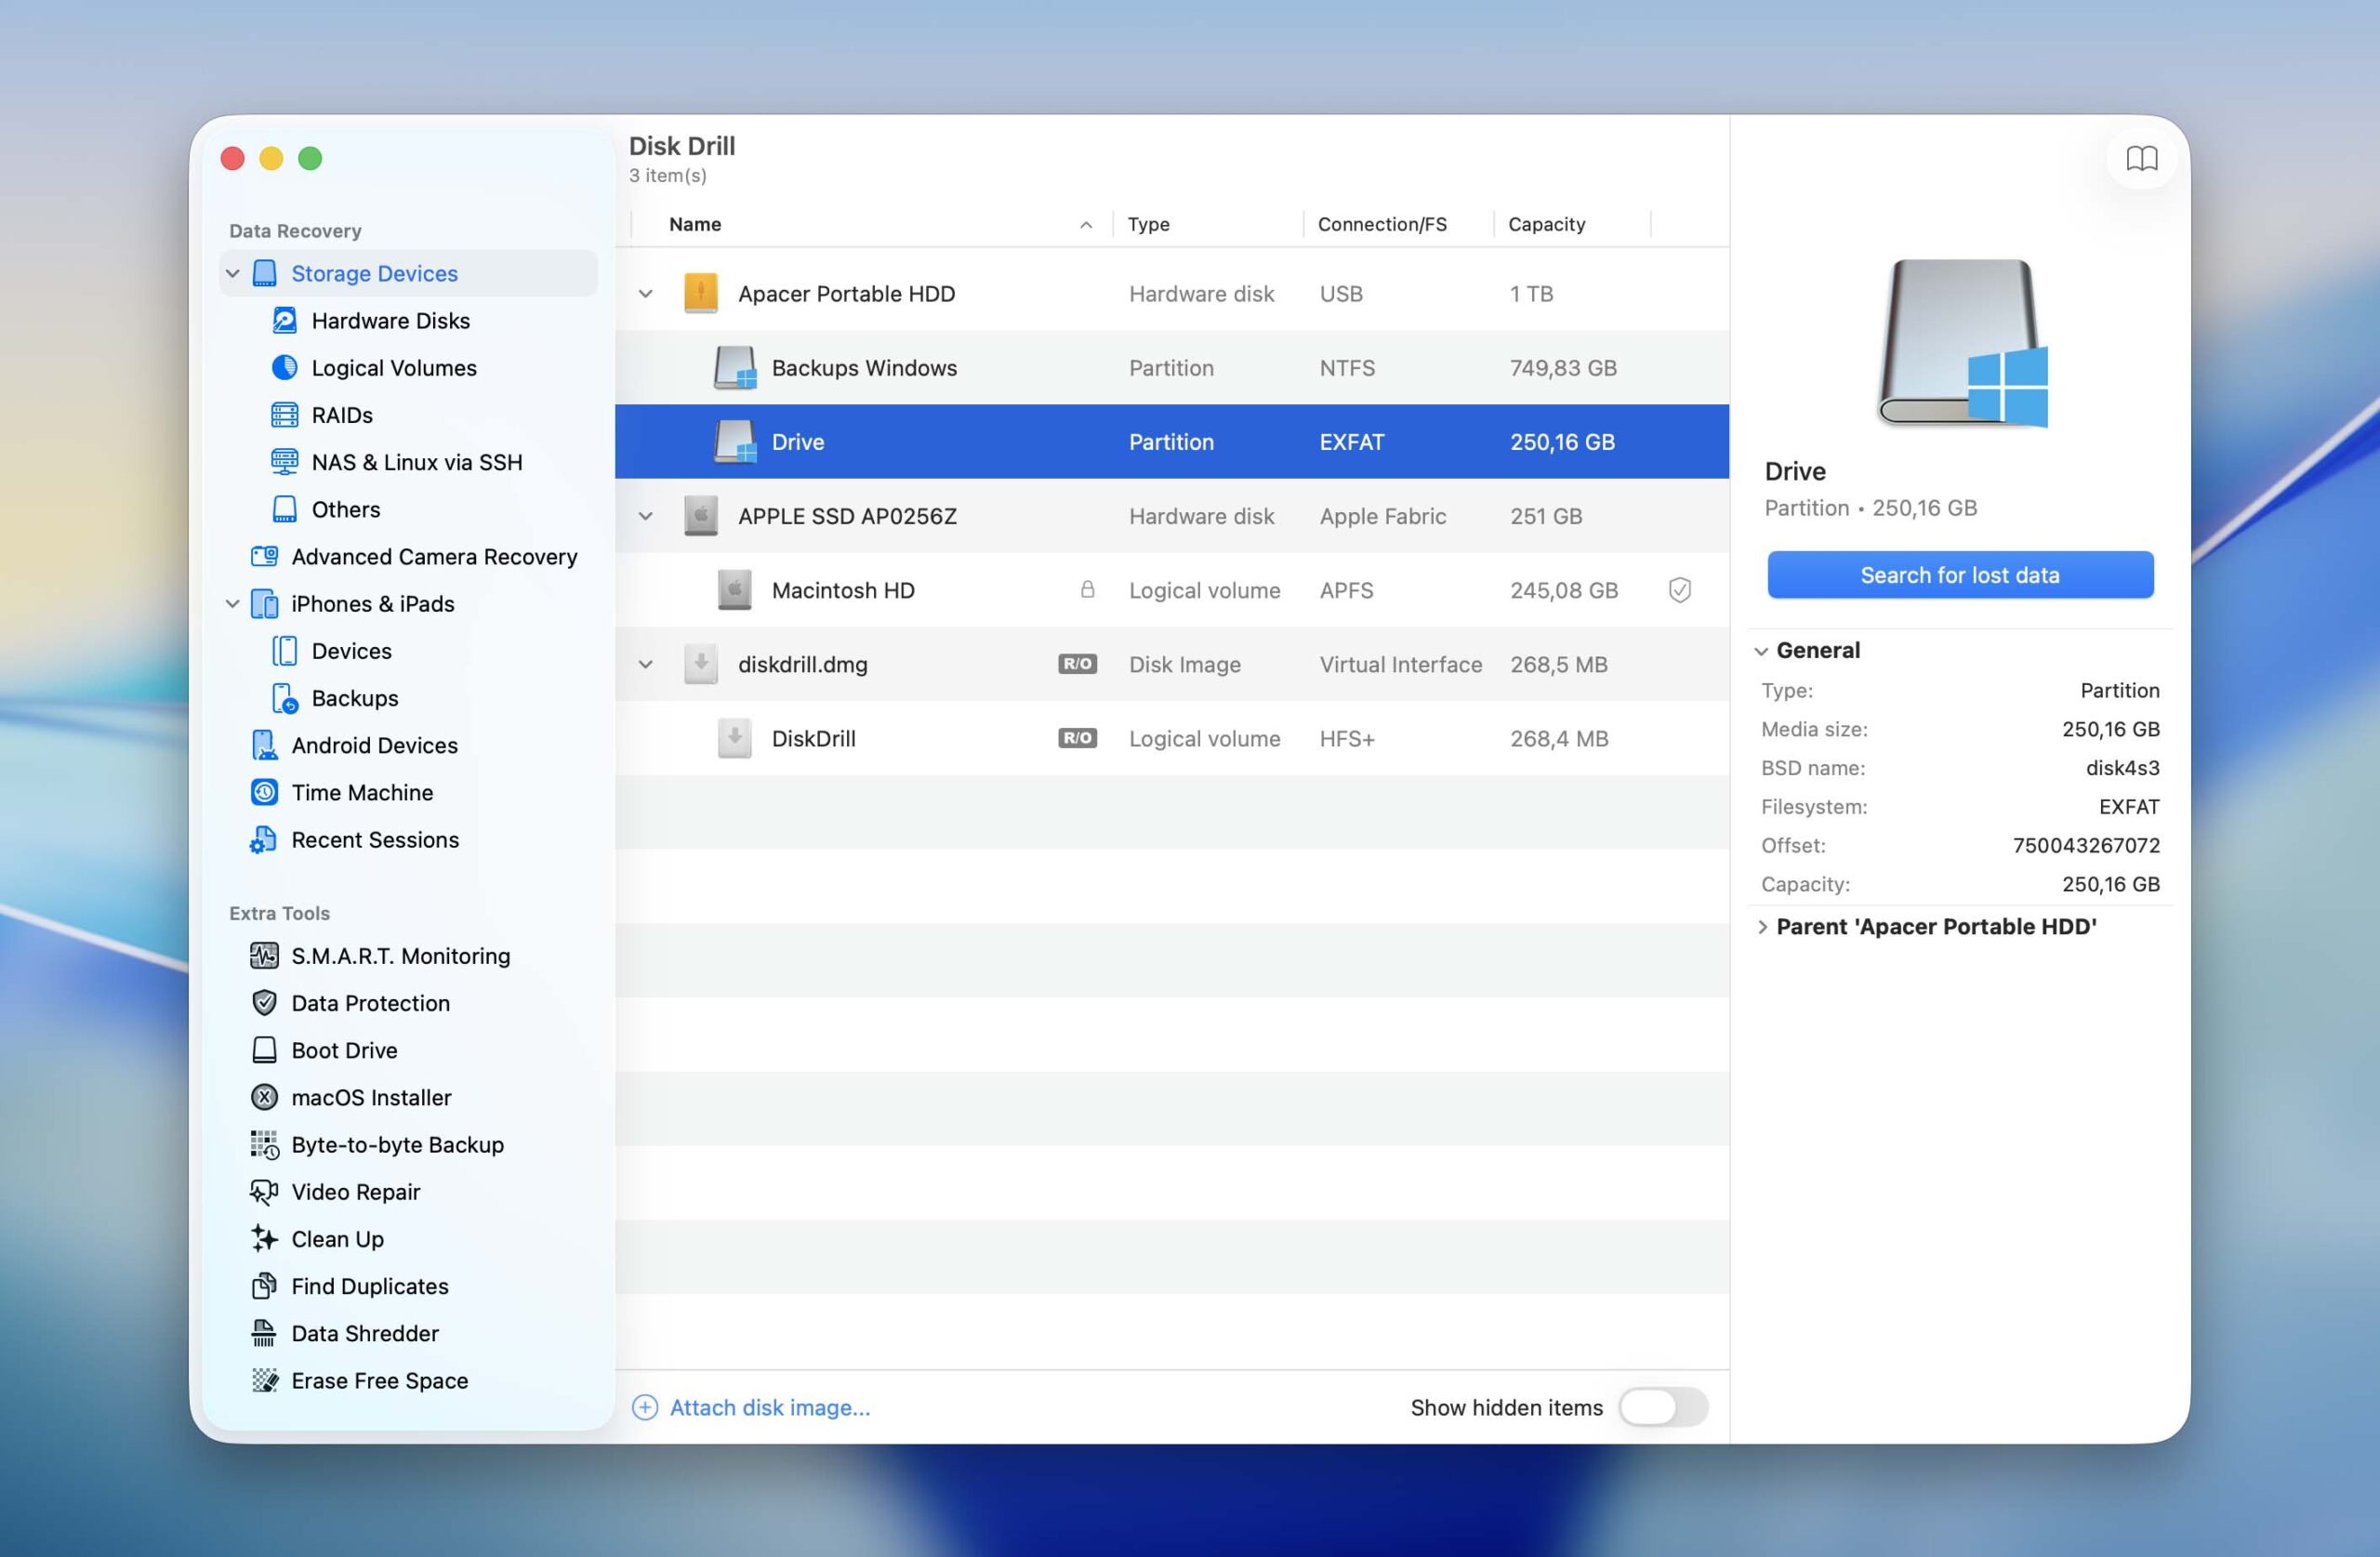
After installing Disk Drill, launch the app and select the drive that is not mounting. Disk Drill has a user-friendly, well-organized interface that makes it easy to select drives.
After selection, click the Search for lost data button to begin a scan. Disk Drill uses sophisticated external hard drive recovery methods to detect as many files as possible on the first attempt.
After clicking Search for lost data, Disk Drill asks you to choose between Universal Scan and Advanced Camera Recovery. The latter is intended for fragmented photo and video files from SD cards used in cameras and drones. Since the goal here is to recover existing files from a drive that won’t mount, Universal Scan is the recommended option. It is sufficient for this type of recovery.
Disk Drill gives you real-time updates as it scans your external HDD for lost files. It separates files into six categories (photos, video, audio, documents, archives, and others) and indicates the number of files detected in each type.
You can click Review found files while the scan is running, and you’ll get a preview of the recoverable files that Disk Drill has detected. Alternatively, you can let the scan finish before previewing the files.

You can use Disk Drill’s filters to sort files according to their type, sizes, and modification dates. This sorting is crucial when dealing with large files, which is likely the case for using external hard disks.
This app organizes files into three categories:
- Deleted or lost: deleted data was recovered.
- Existing: data is currently present on the disk.
- Reconstructed: data was recovered using file signatures.
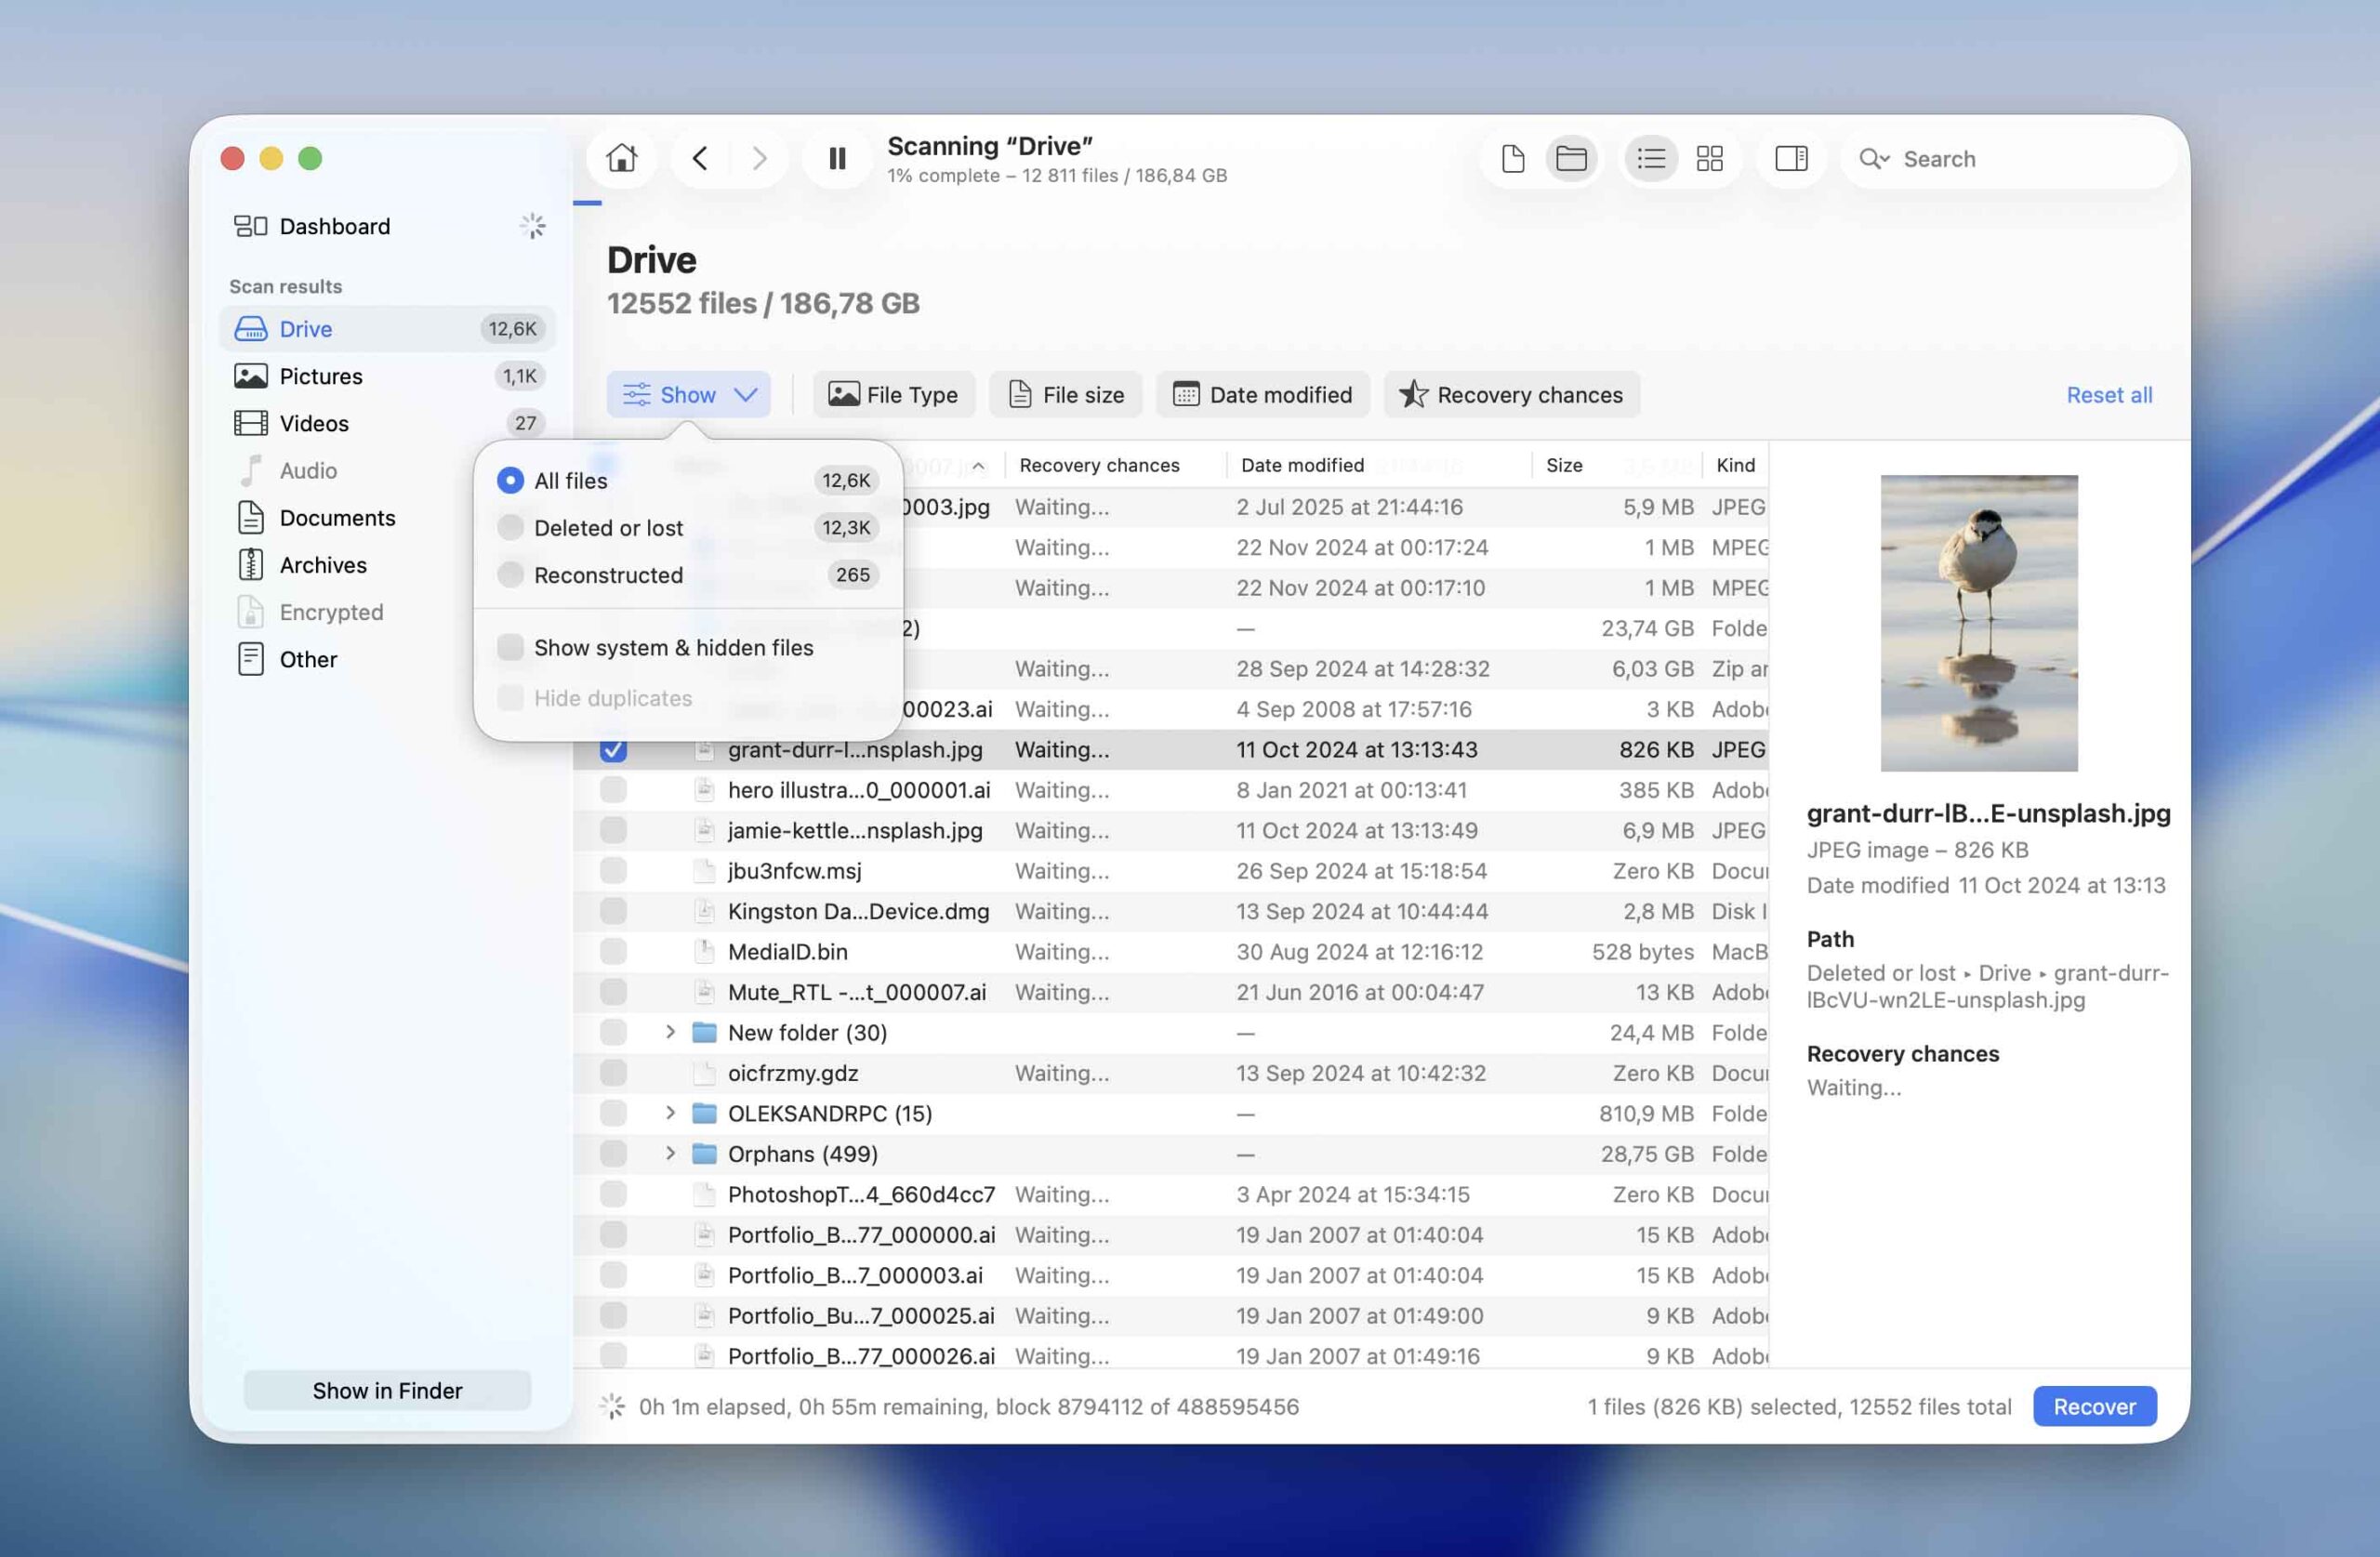
Disk Drill provides advanced filters to navigate between files in different categories. Our target for recovery here is the files in the “existing” category.
It also indicates the likelihood of recovering each file, letting you know what to expect.
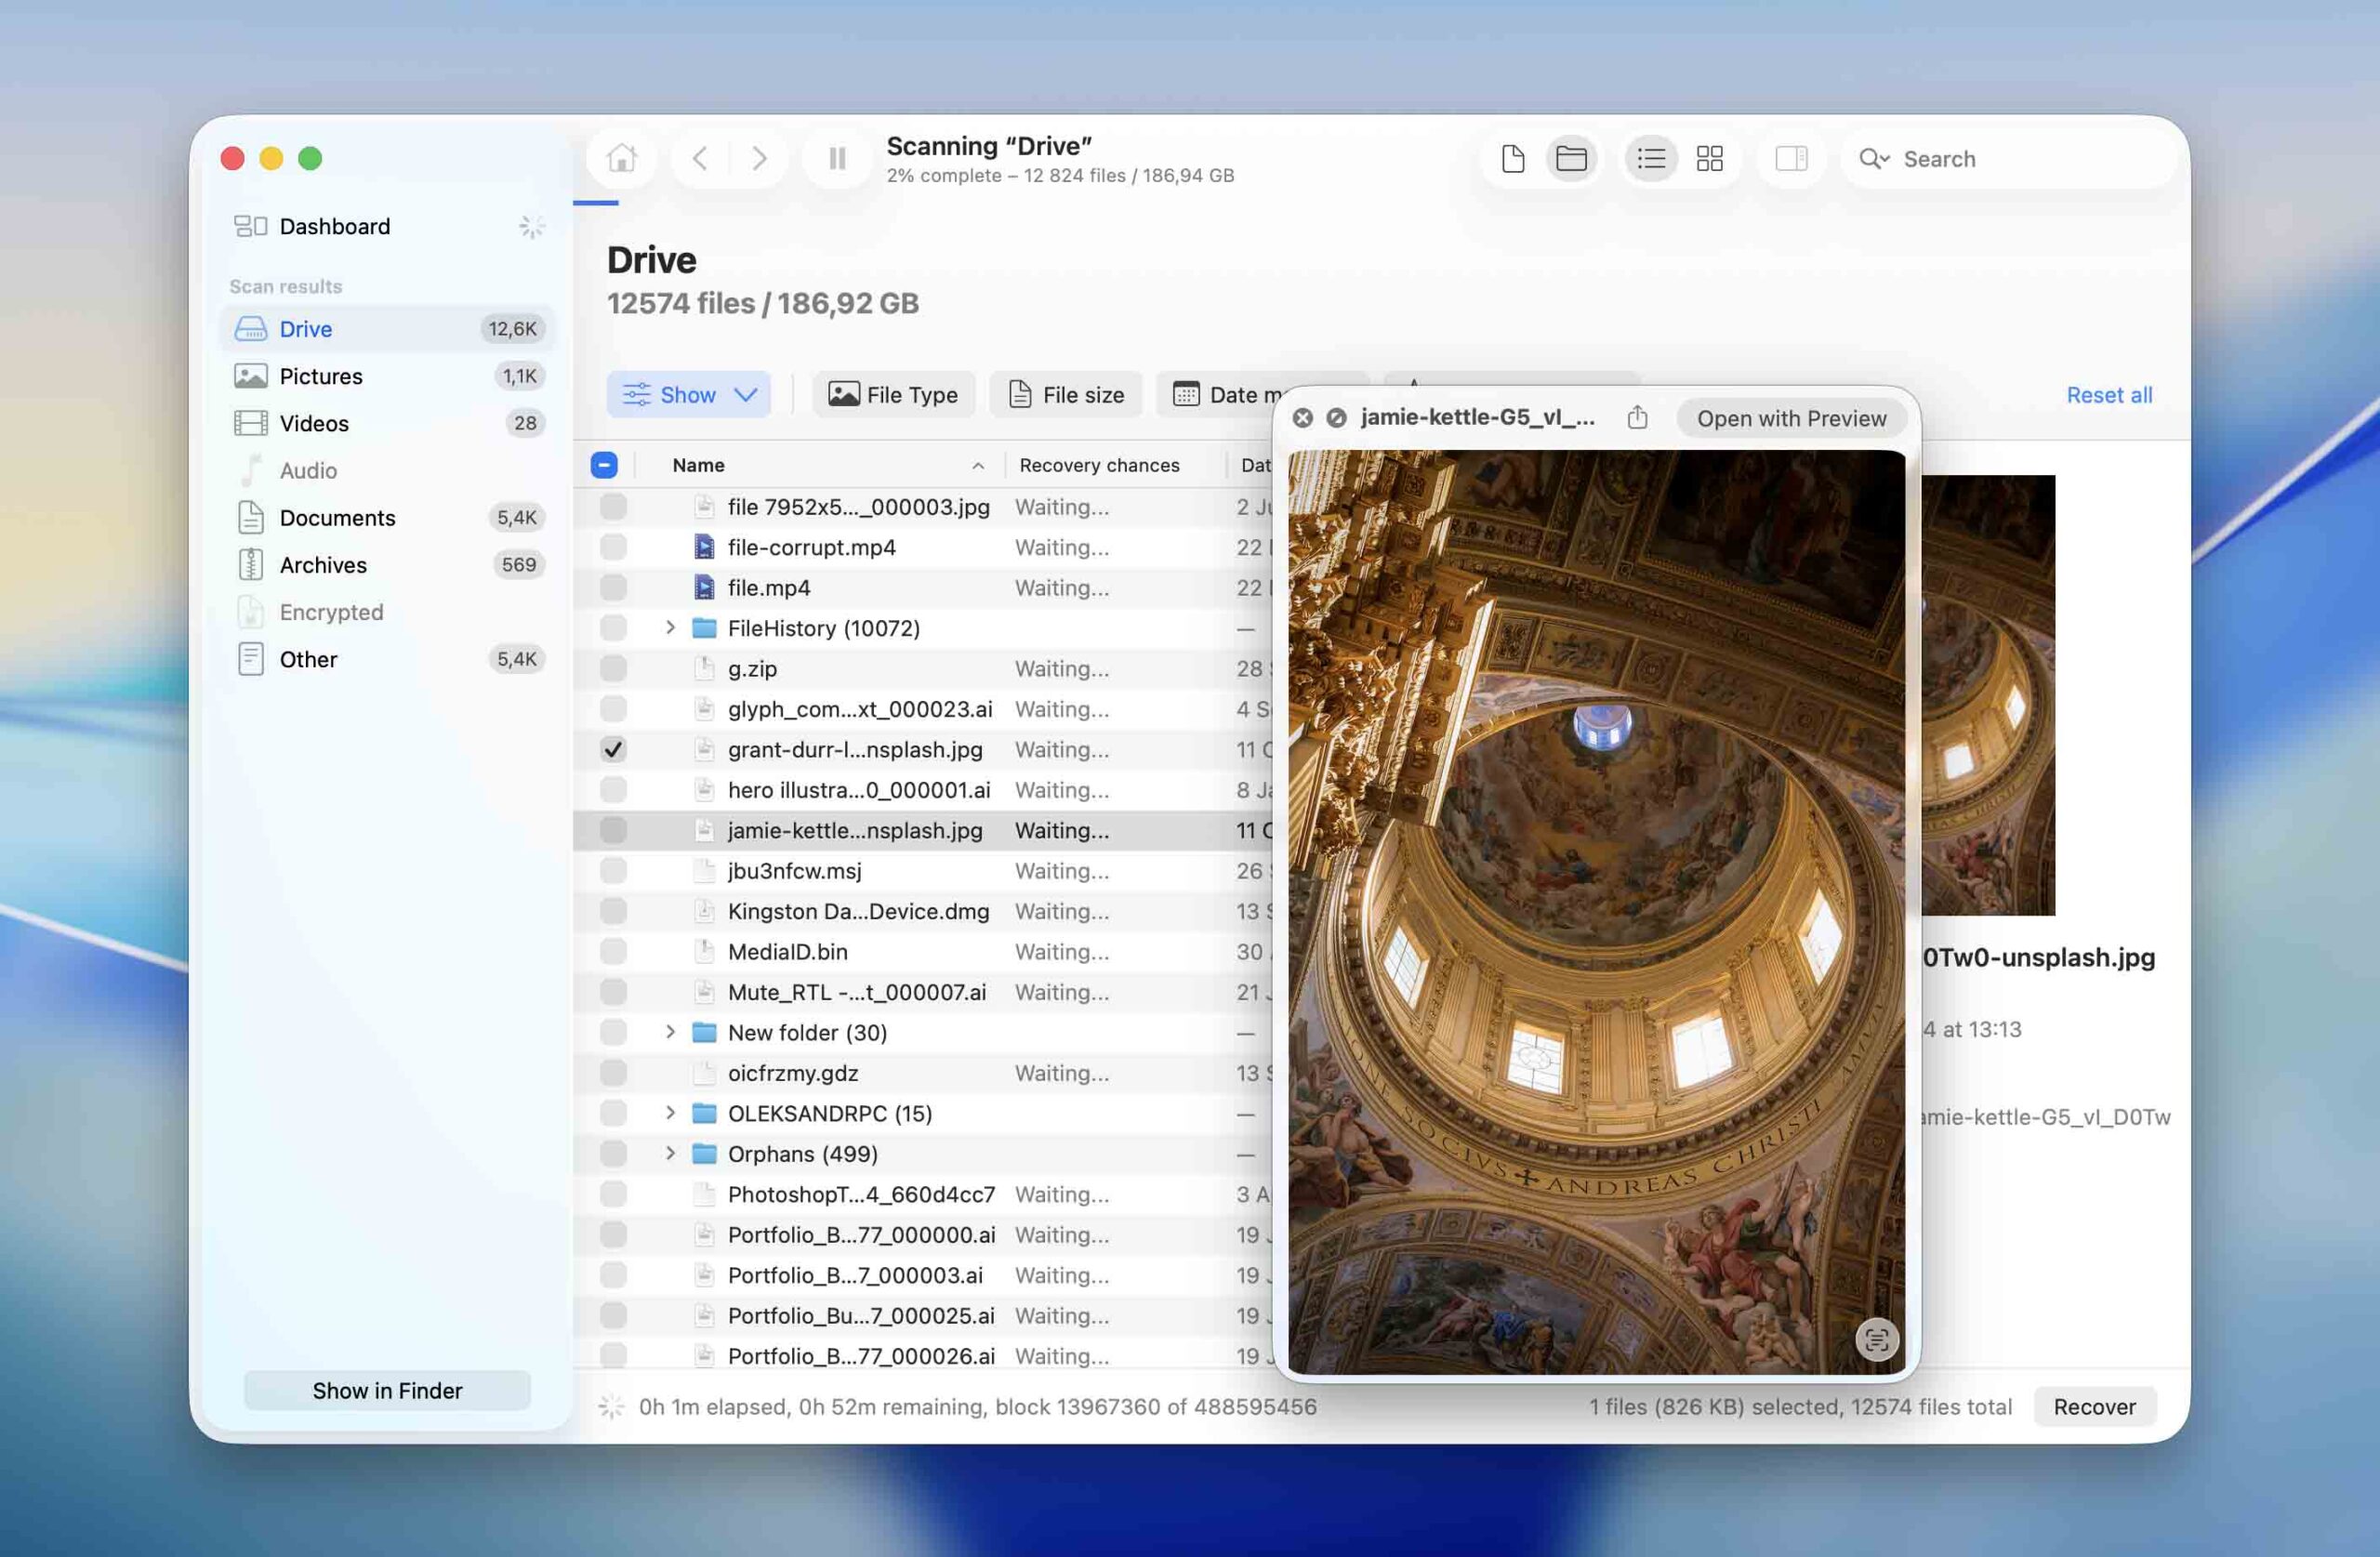
You can preview and select every file you want to recover. After selecting them, click Recover to kickstart the recovery process. Disk Drill will prompt you to choose a directory to store the recovered files, and recovery begins.
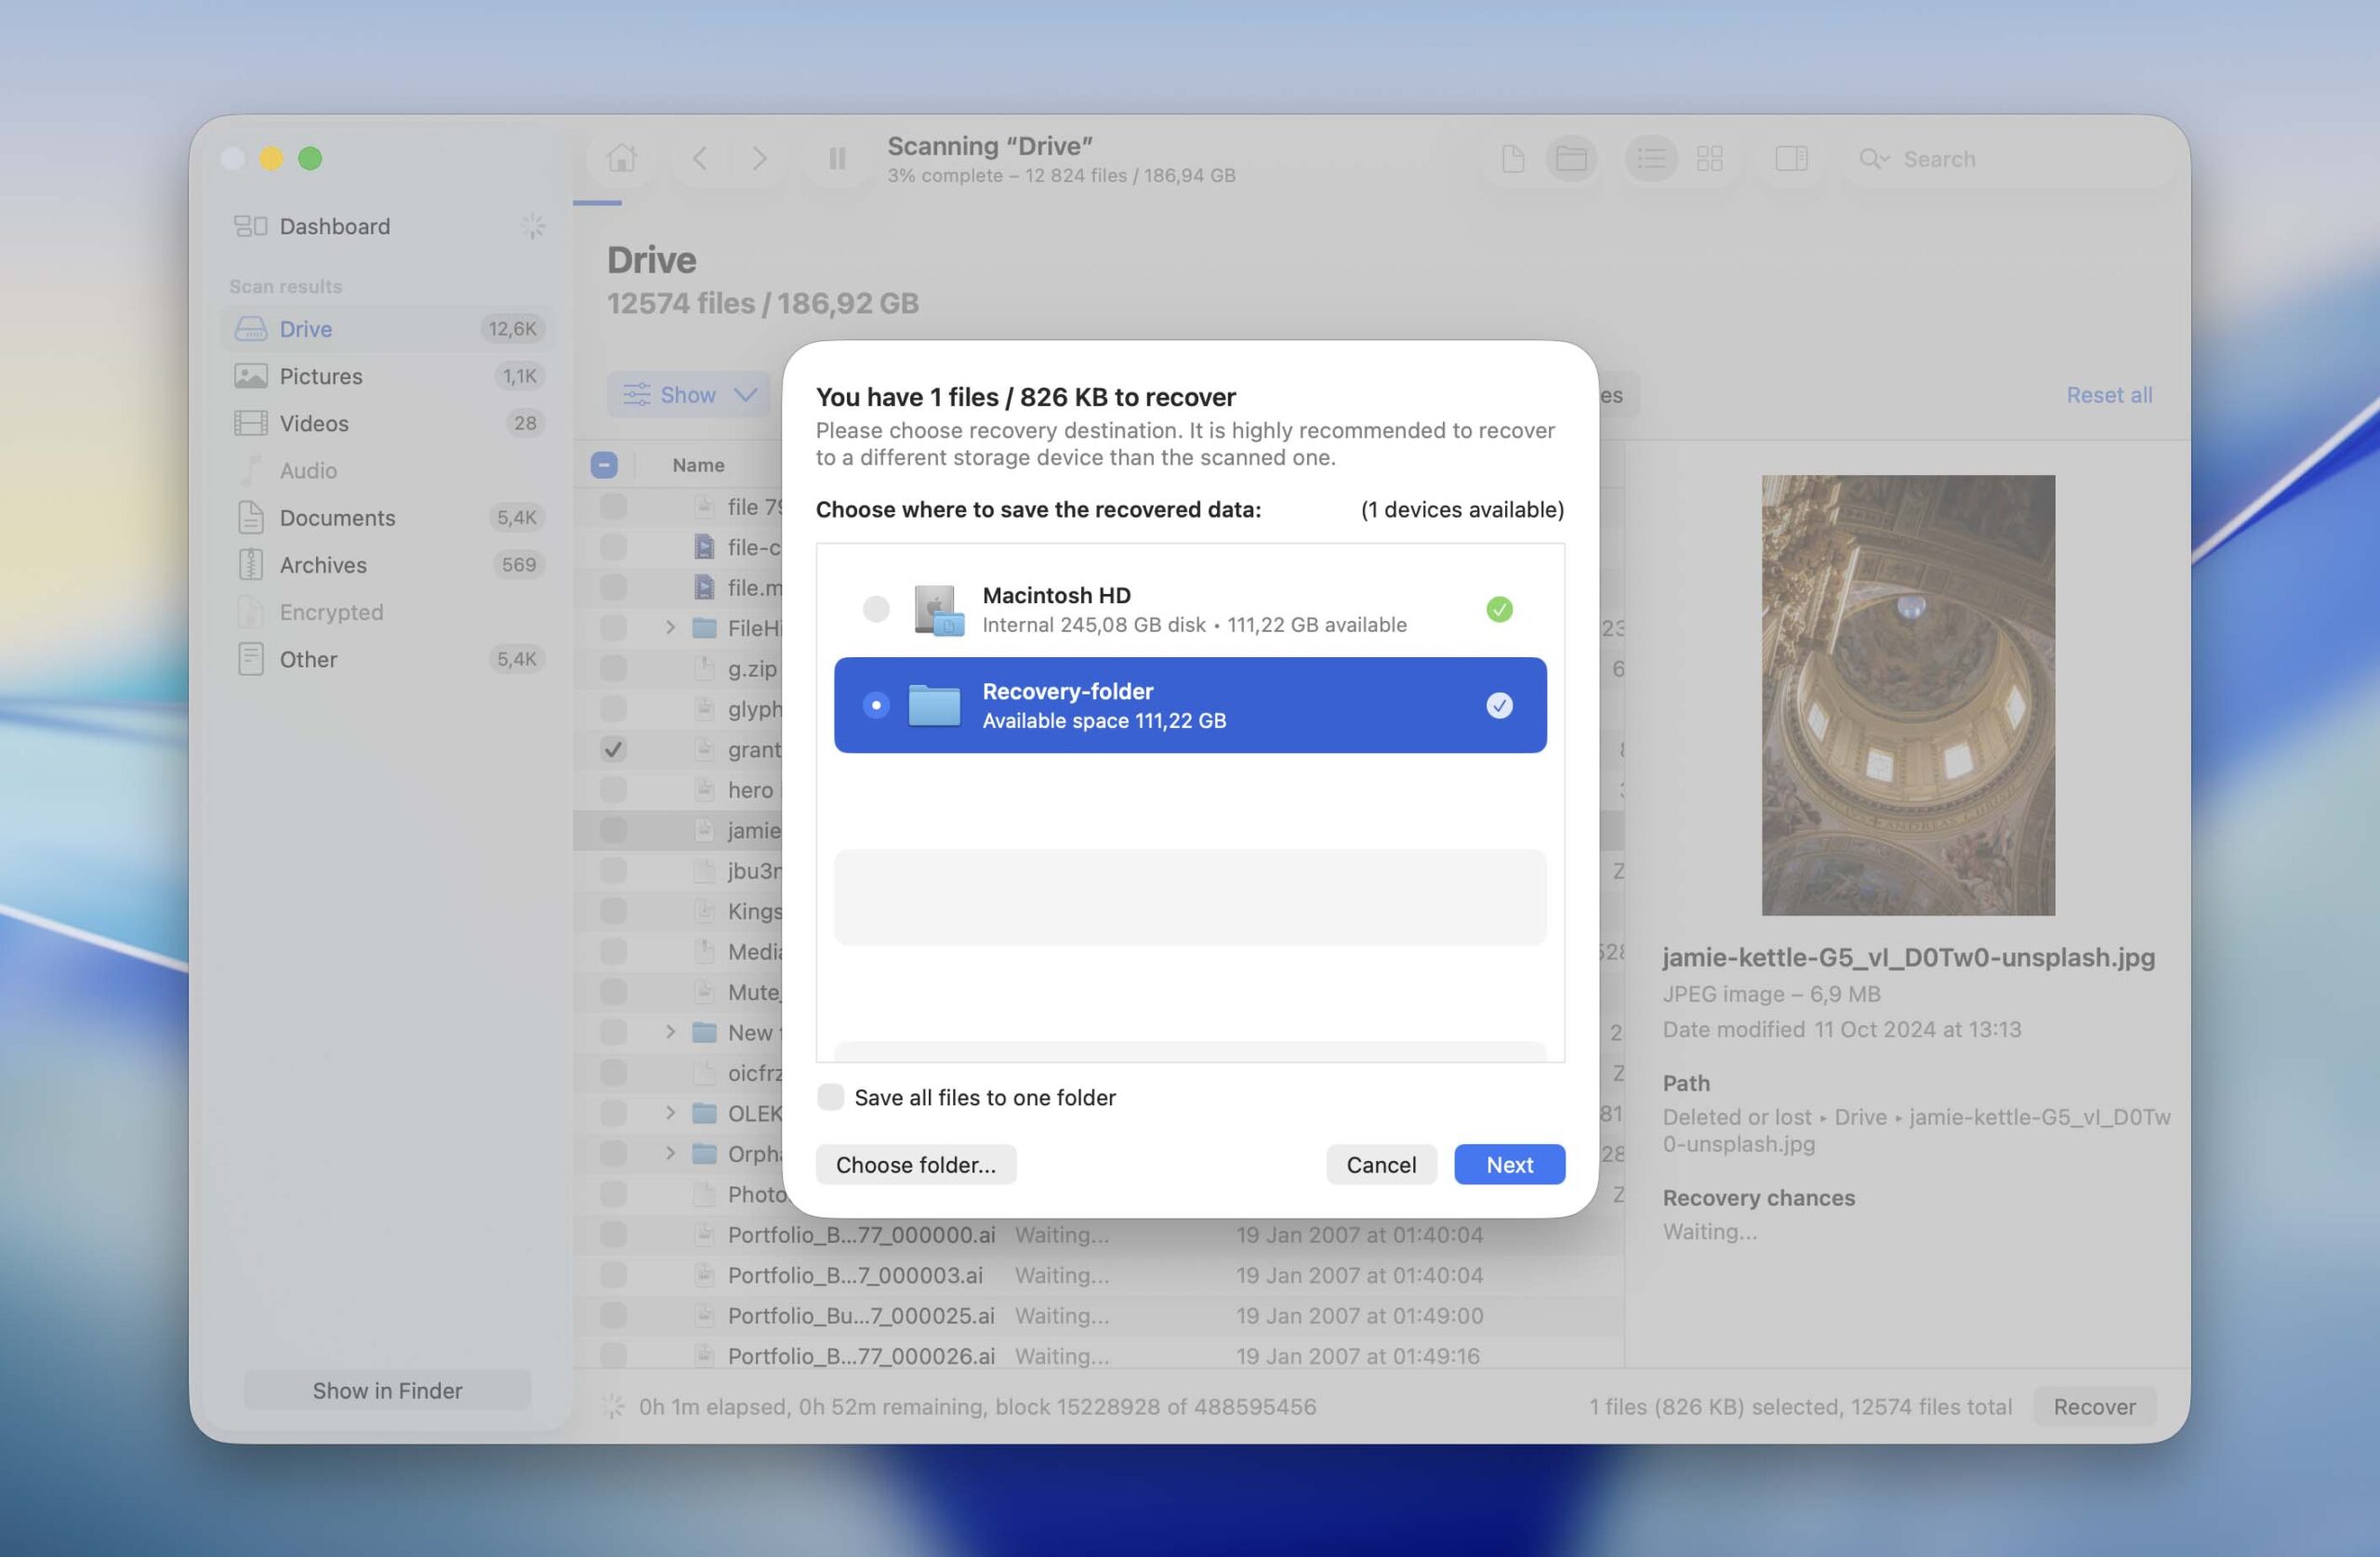
After the recovery is finished, Disk Drill gives you the option to view the files in Finder. Do this and confirm that the recovered files are in the directory you specified earlier.
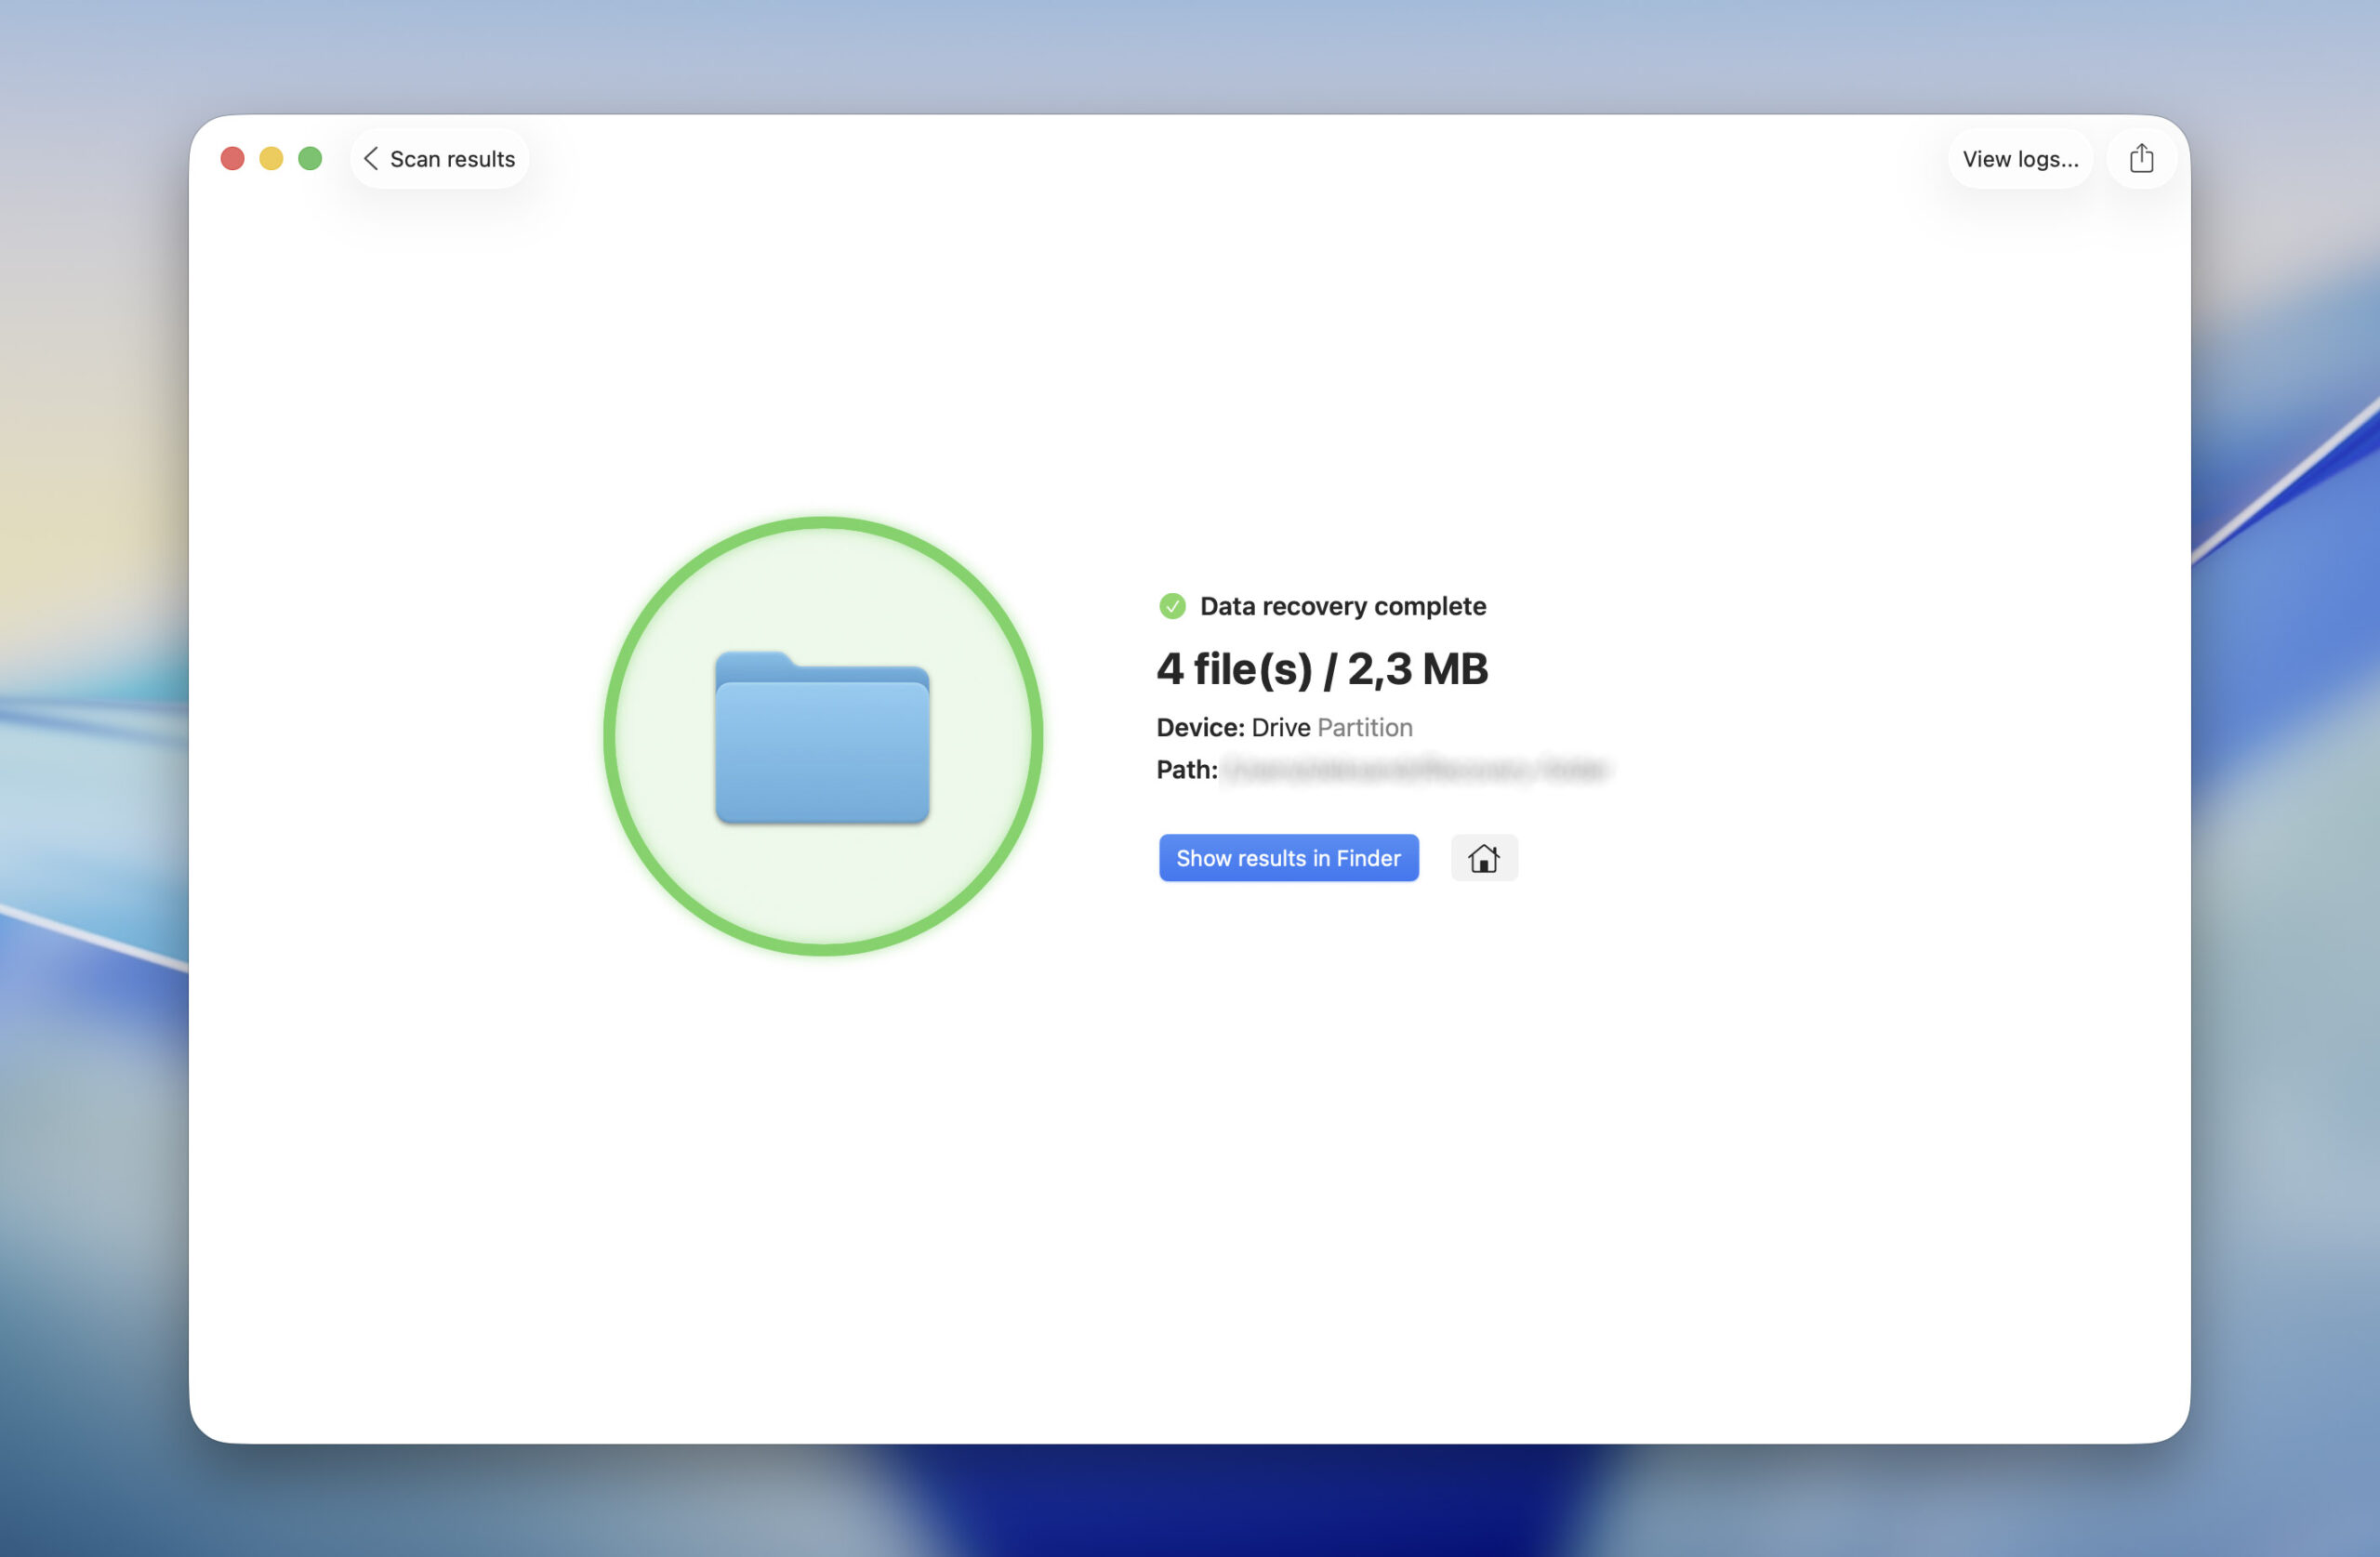
Congrats! You have successfully recovered lost data from your external hard disk.
How to Fix an External Hard Drive Not Mounting on a Mac
Method 1: Restart your Mac
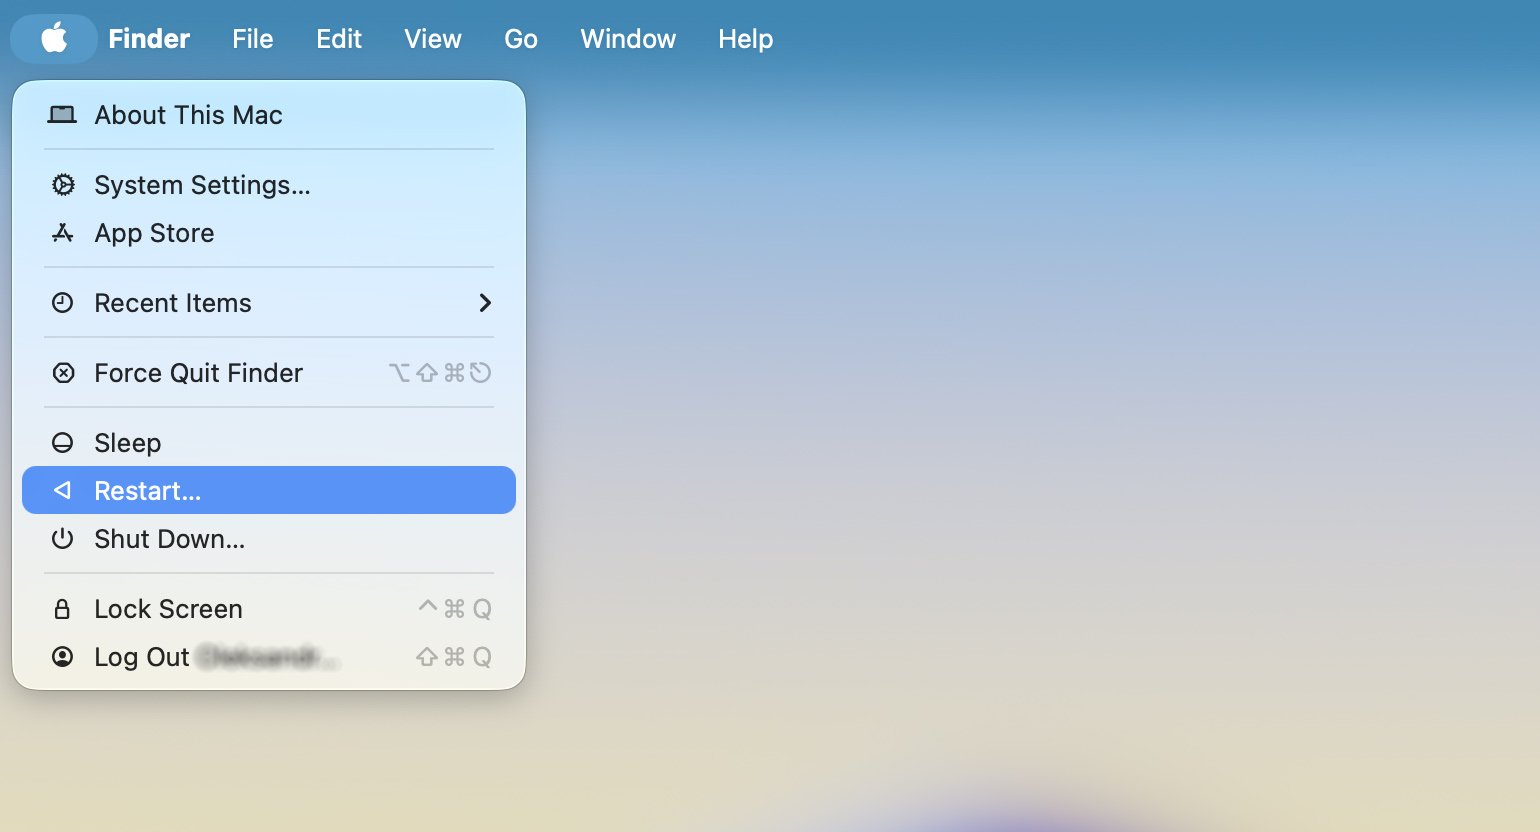
A simple fix to many bugs is to restart your computer. Software processes often get complicated behind the scenes and cause unexpected bugs. Restarting your Mac refreshes its memory and clears temporary processes that might have caused the hard drive not to mount.
Method 2: Check Your macOS Drive Display Settings
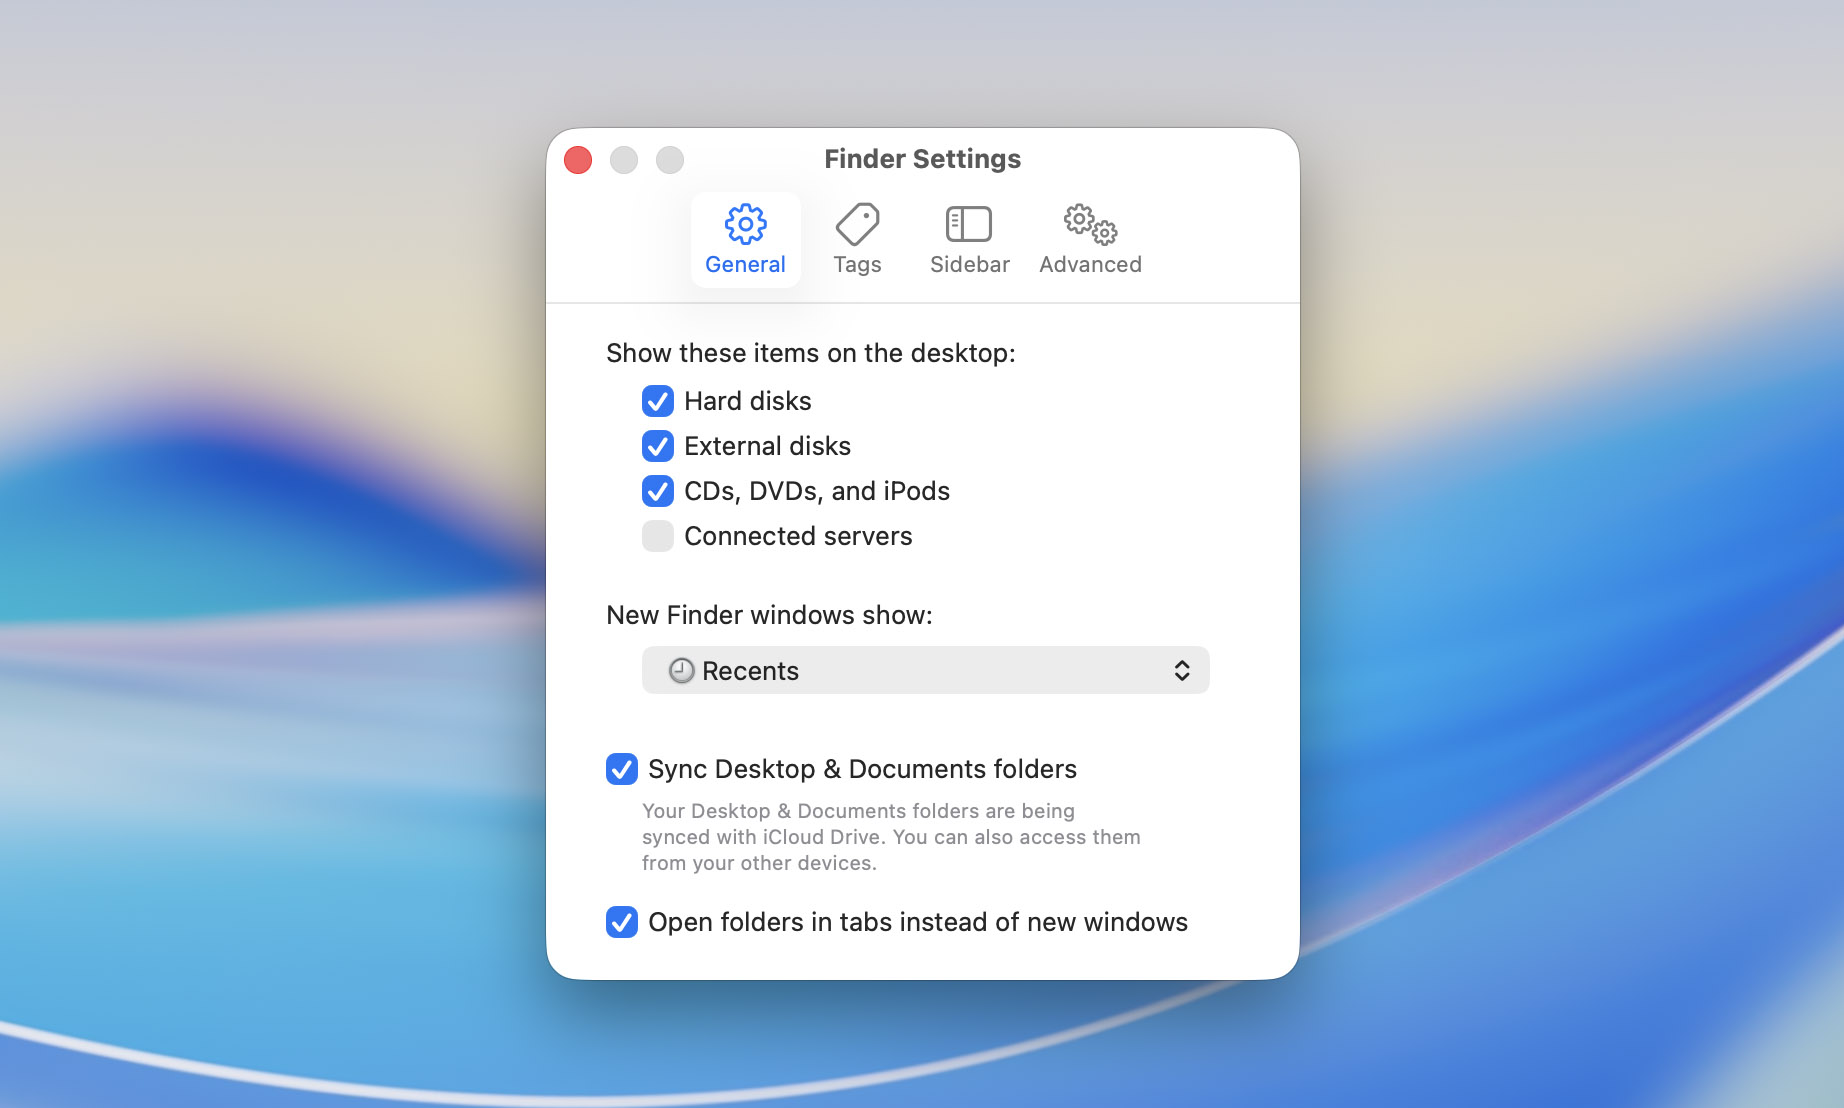
Your Mac’s display settings might be preventing an external hard drive from showing up. You can fix it by following these steps:
- Head to Finder > Preferences (Finder > Settings).
- Click General.
- Ensure Hard disks and External disks are enabled under “Show these items on the Desktop”.
Method 3: Test the External HDD Connectors and Cables
A loose or faulty cable can prevent an external HDD from mounting. Check your cables and ensure they are properly plugged in. Check if it’s loose in the port and adjust it if that’s the case. If it still doesn’t work, the cable might be damaged and needs replacement.
Method 4: Check the Power Supply
Make sure the external hard drive is receiving enough power. The power available through a USB port depends on the Mac model, port type, cable, adapter, hub, and connected device.
Connect the drive directly to your Mac instead of using an unpowered hub, docking station, or extension cable. You should also try another compatible USB or Thunderbolt port and, when possible, test the drive with a known working data cable.
Desktop drives, multi-drive enclosures, and other power-hungry storage devices may require a separate power adapter. Always use the original adapter or another compatible power supply recommended by the manufacturer. If a portable drive does not receive enough power directly from the Mac, try a powered USB hub.
Method 5: Try Different USB Ports
A faulty USB port on your Mac can prevent external hard drives from mounting. You can connect the drive via a different port to see if it solves the problem. If so, the previous USB port is faulty and needs repair or replacement.
Method 6: Check Your Drive’s File System
macOS is not compatible with all file systems, even though newer versions increasingly support as many as possible. For example, if your drive is formatted to the Linux ext4 file system, it may not mount on your Mac. But you can use third-party software like Paragon and Tuxera to mount ext4 drives.
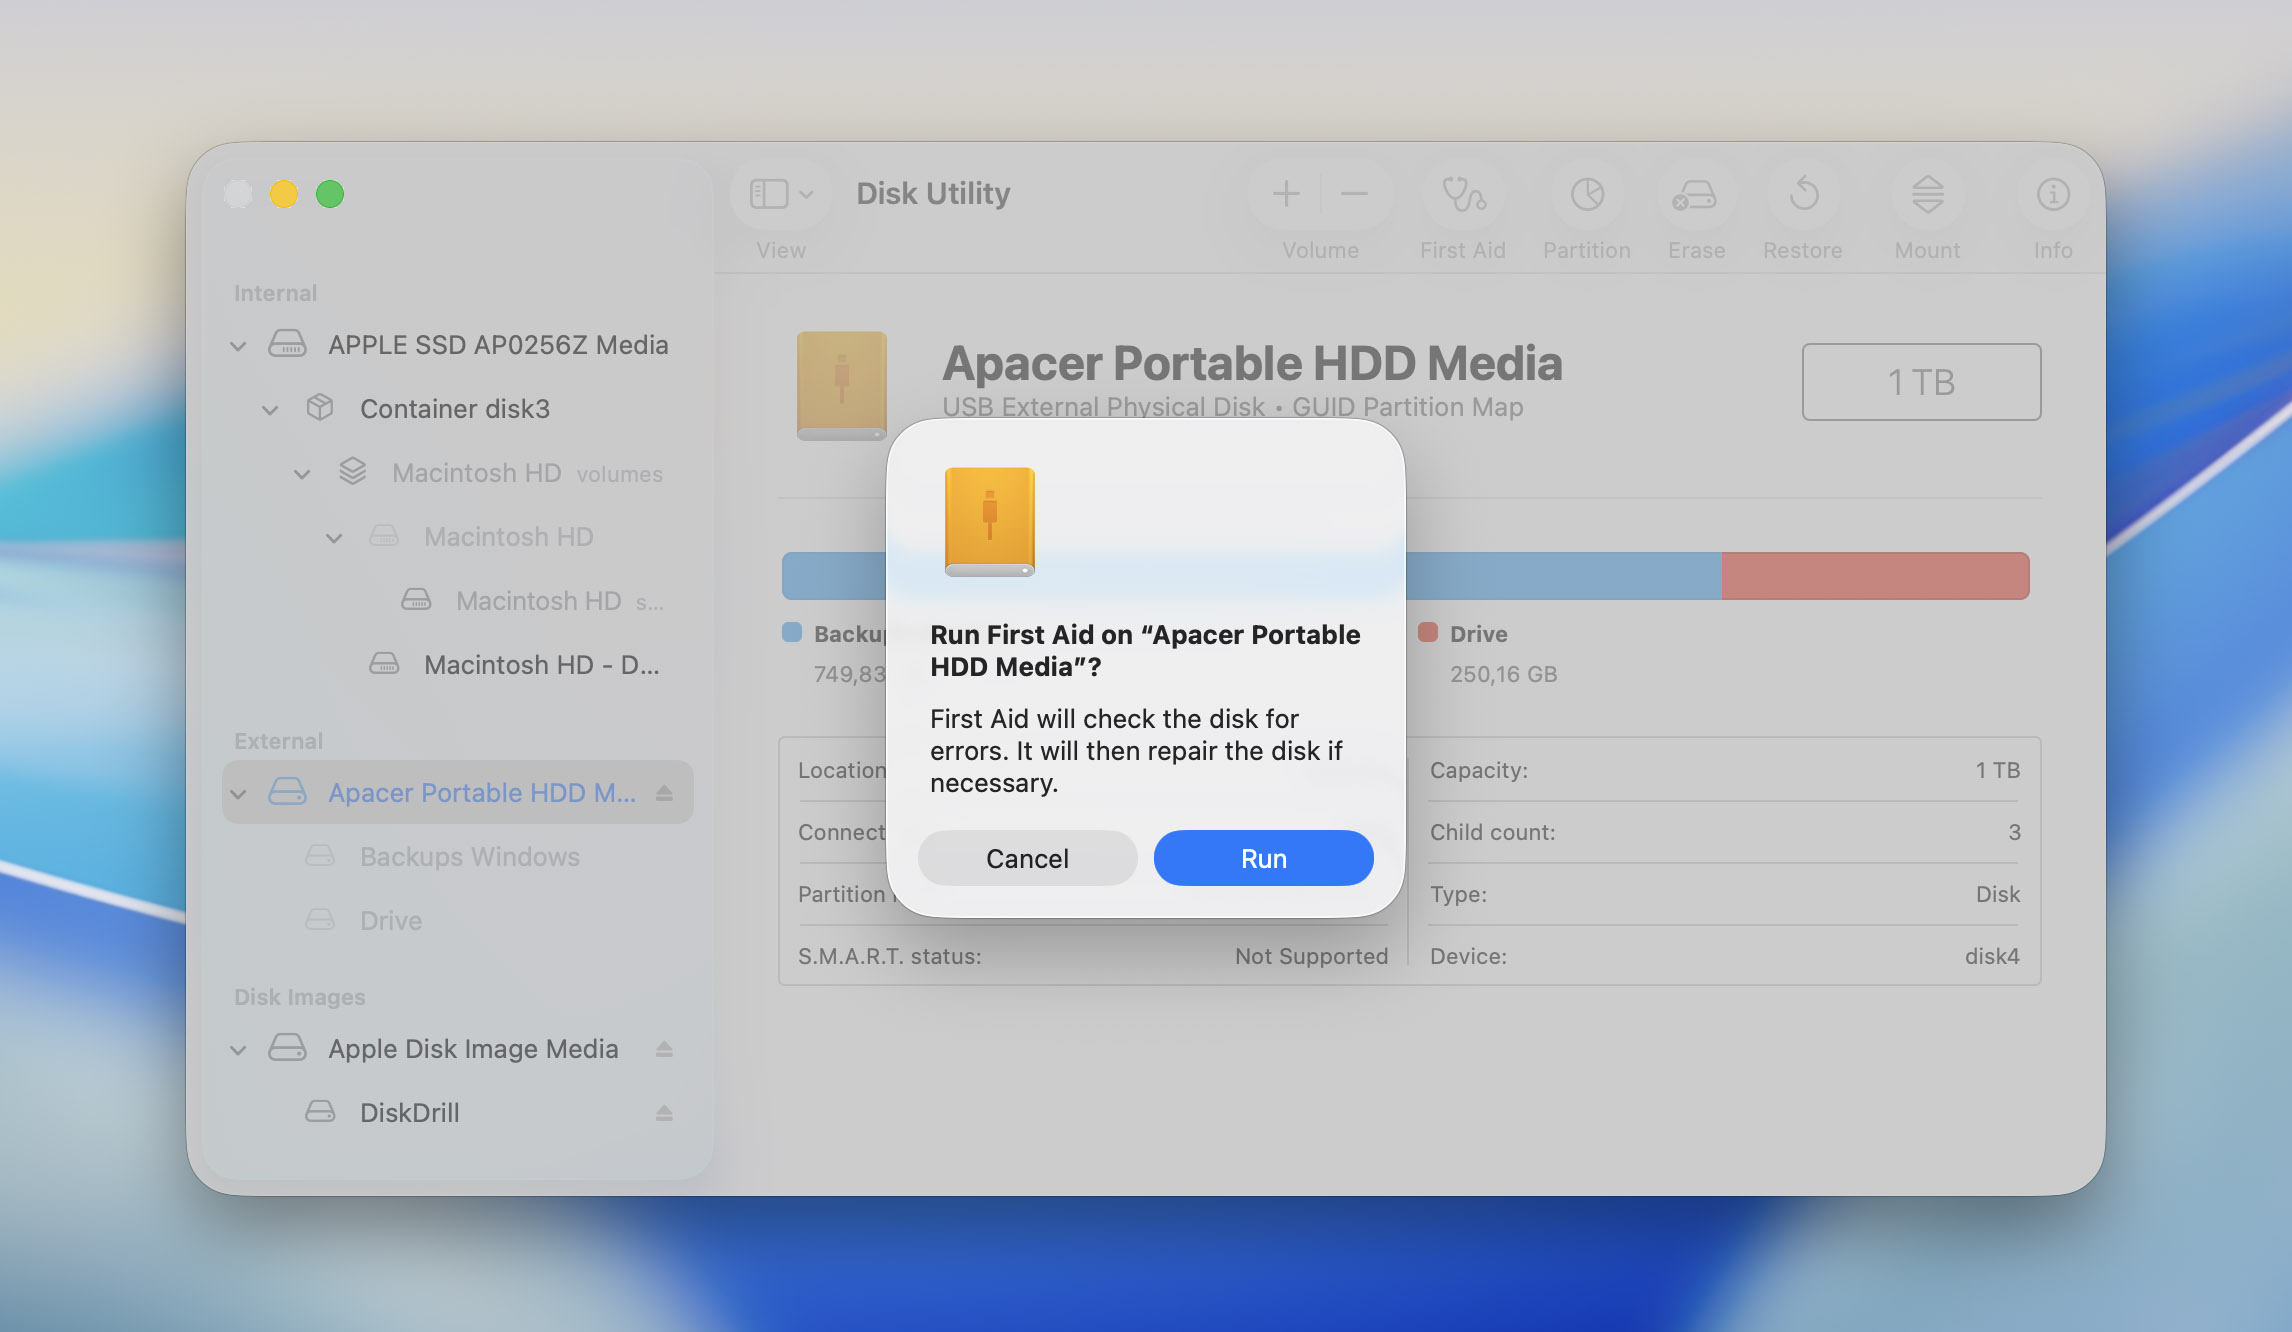
Method 7: Repair Drive Errors Using First Aid
Every Mac has a First Aid tool that helps fix drive-related errors. This tool checks the health of your internal and external hard disks. If it observes any drive not mounting on a Mac, it troubleshoots the drive and tries to find a feasible solution.
- Go to Finder > Applications > Utilities > Disk Utility.
- Select your external drive from the left sidebar.
- Click First Aid at the top and hit Run to check and repair disk errors.
Method 8: Force Mount the Drive on a Mac Using Terminal
If the external drive appears in Disk Utility but its volume remains unmounted, you can attempt to mount it using Terminal.
- Open Terminal from Applications > Utilities.
- Enter the following command and press Return: diskutil list Terminal will display all storage devices connected to your Mac. Find the external drive and note the identifier of the volume you want to mount. A volume identifier usually looks like disk2s1, not just disk2.
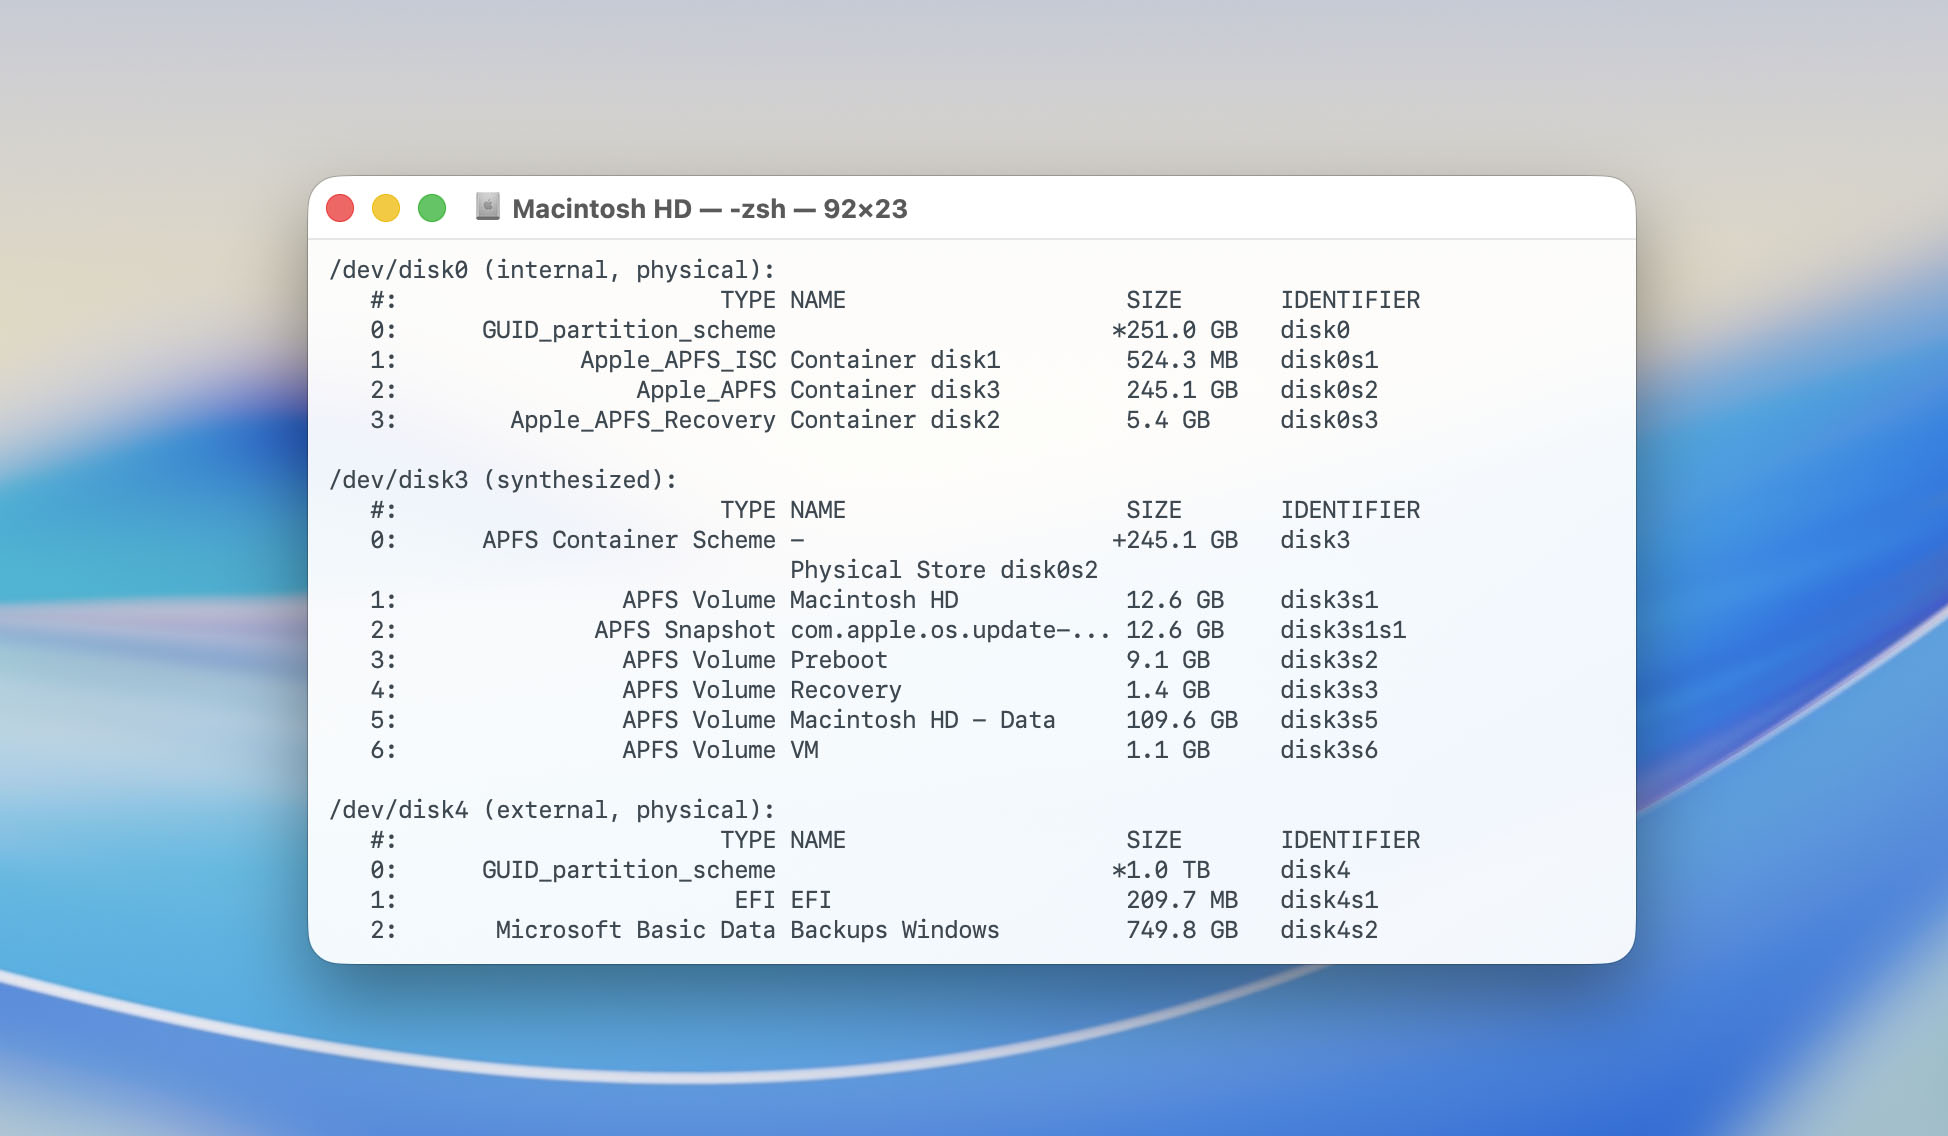
- Enter the following command, replacing disk2s1 with the identifier shown on your Mac: diskutil mount /dev/disk2s1
- If the command succeeds, macOS will display a confirmation message, and the drive should appear in Finder.
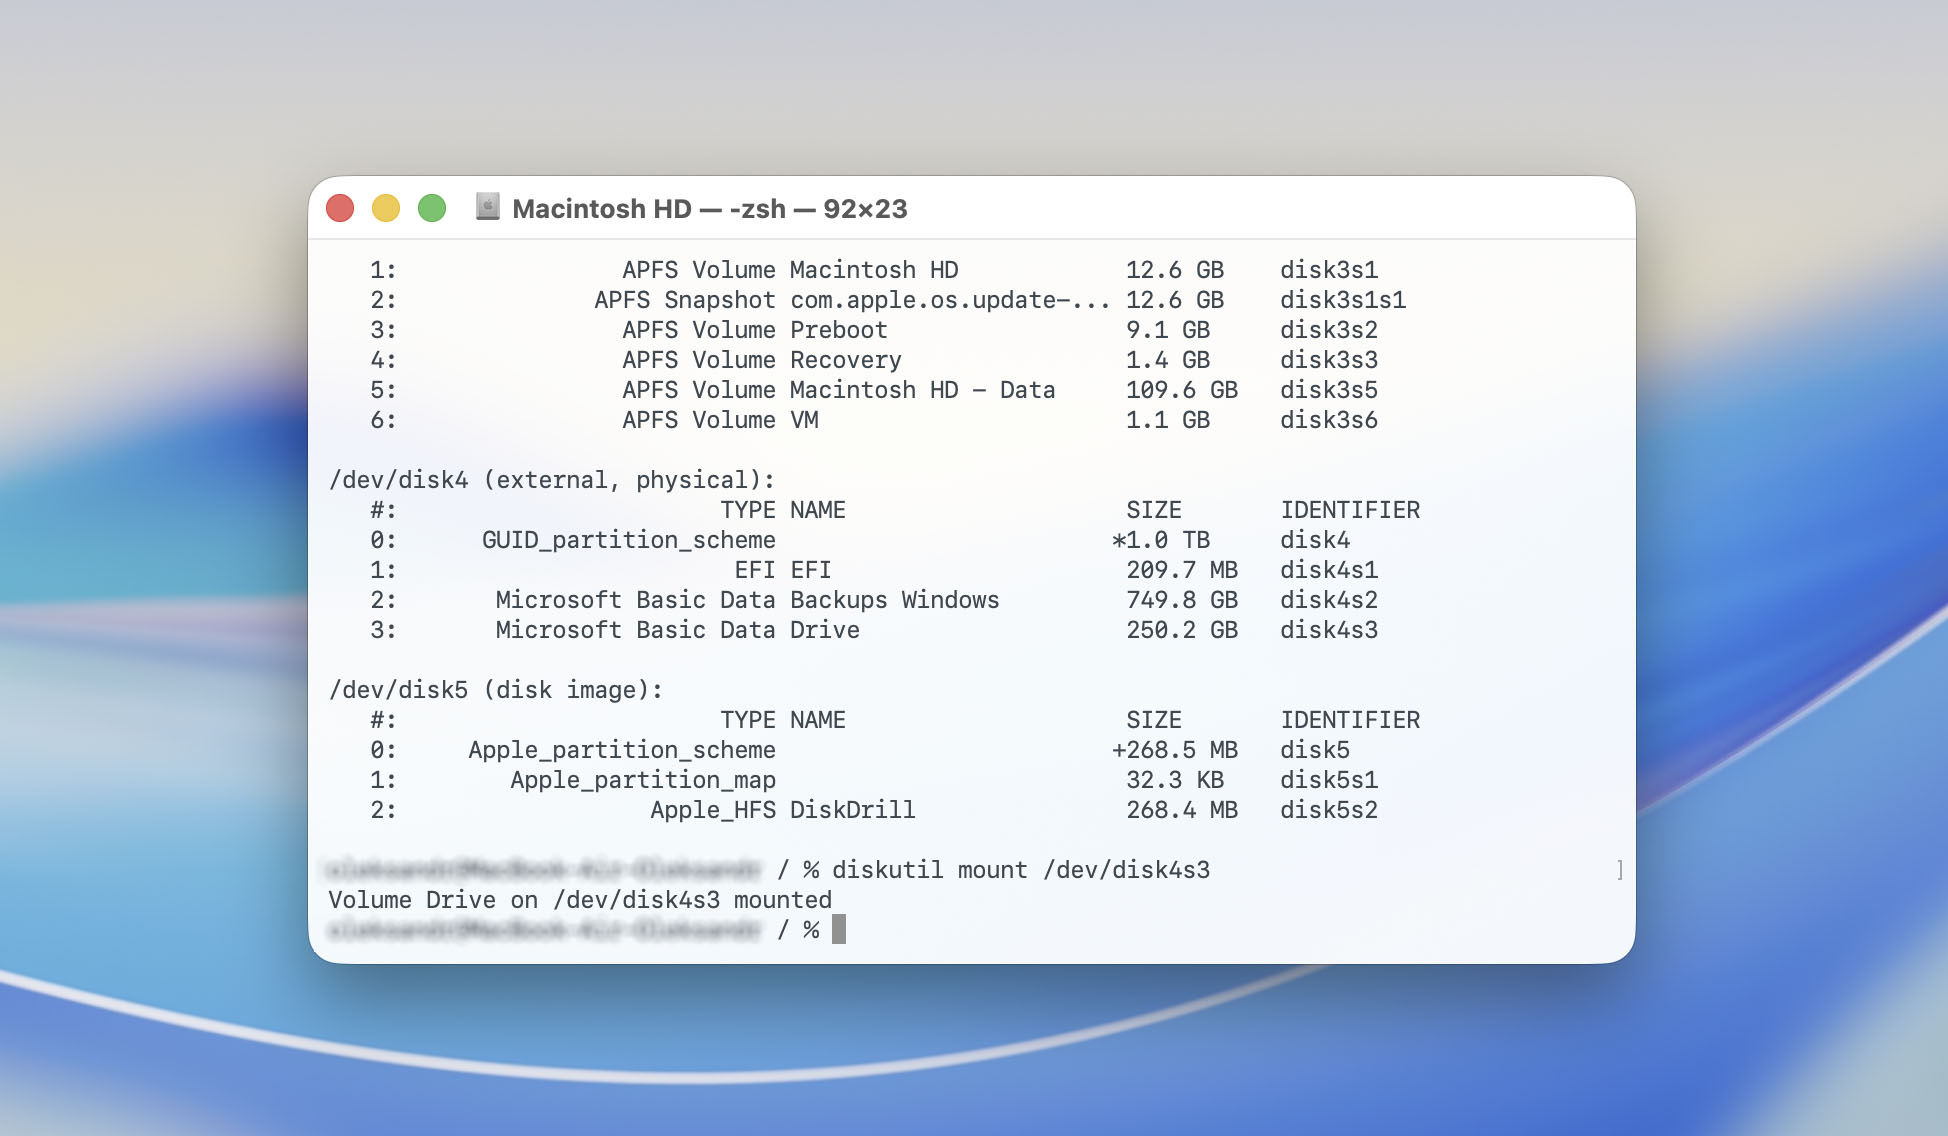
Do not copy the example identifier without checking it first. Selecting the wrong disk could affect another connected storage device. If Terminal reports that the volume cannot be mounted, do not format the drive immediately. The file system may be corrupted, encrypted, or unsupported by macOS, so recover any important data before attempting further repairs.
Method 9: Reset Mac Settings
In rare cases, a hardware-management or startup-setting issue may interfere with connected storage devices. If restarting your Mac and checking the drive, cable, ports, and power supply did not help, you can try resetting the NVRAM or System Management Controller on an Intel-based Mac.
Reset NVRAM on an Intel Mac
- Shut down your Mac.
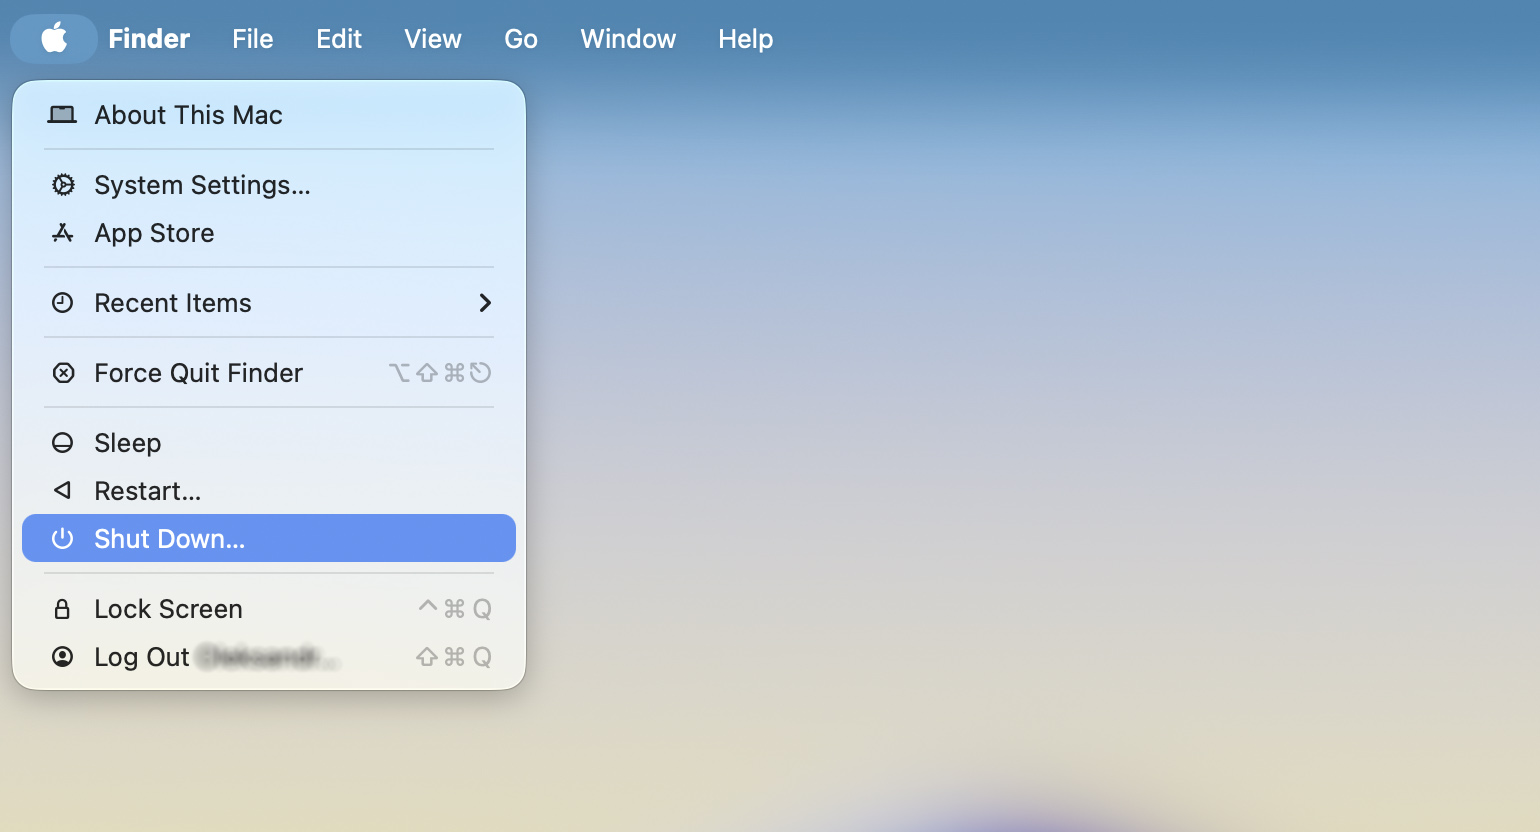
- Turn it on and immediately press and hold Option-Command-P-R.
- Keep holding the keys for approximately 20 seconds.
- Release the keys and allow your Mac to finish starting up.
- Reconnect the external drive and check whether macOS detects and mounts it.
Resetting NVRAM may restore certain startup, display, audio, and device-related settings to their defaults.
Reset the SMC on an Intel Mac
The correct SMC reset procedure depends on the Mac model and whether it contains the Apple T2 Security Chip. Do not use a generic key combination without first identifying your model.
For the appropriate instructions, open Apple’s official support guide for resetting the SMC and follow the steps provided for your Mac. After the reset, start the computer, reconnect the external drive, and check Disk Utility again.
Resetting the NVRAM or SMC will not repair a corrupted file system or physically damaged drive. If the drive still does not mount, continue with file-system troubleshooting or data recovery instead of repeatedly resetting the Mac.
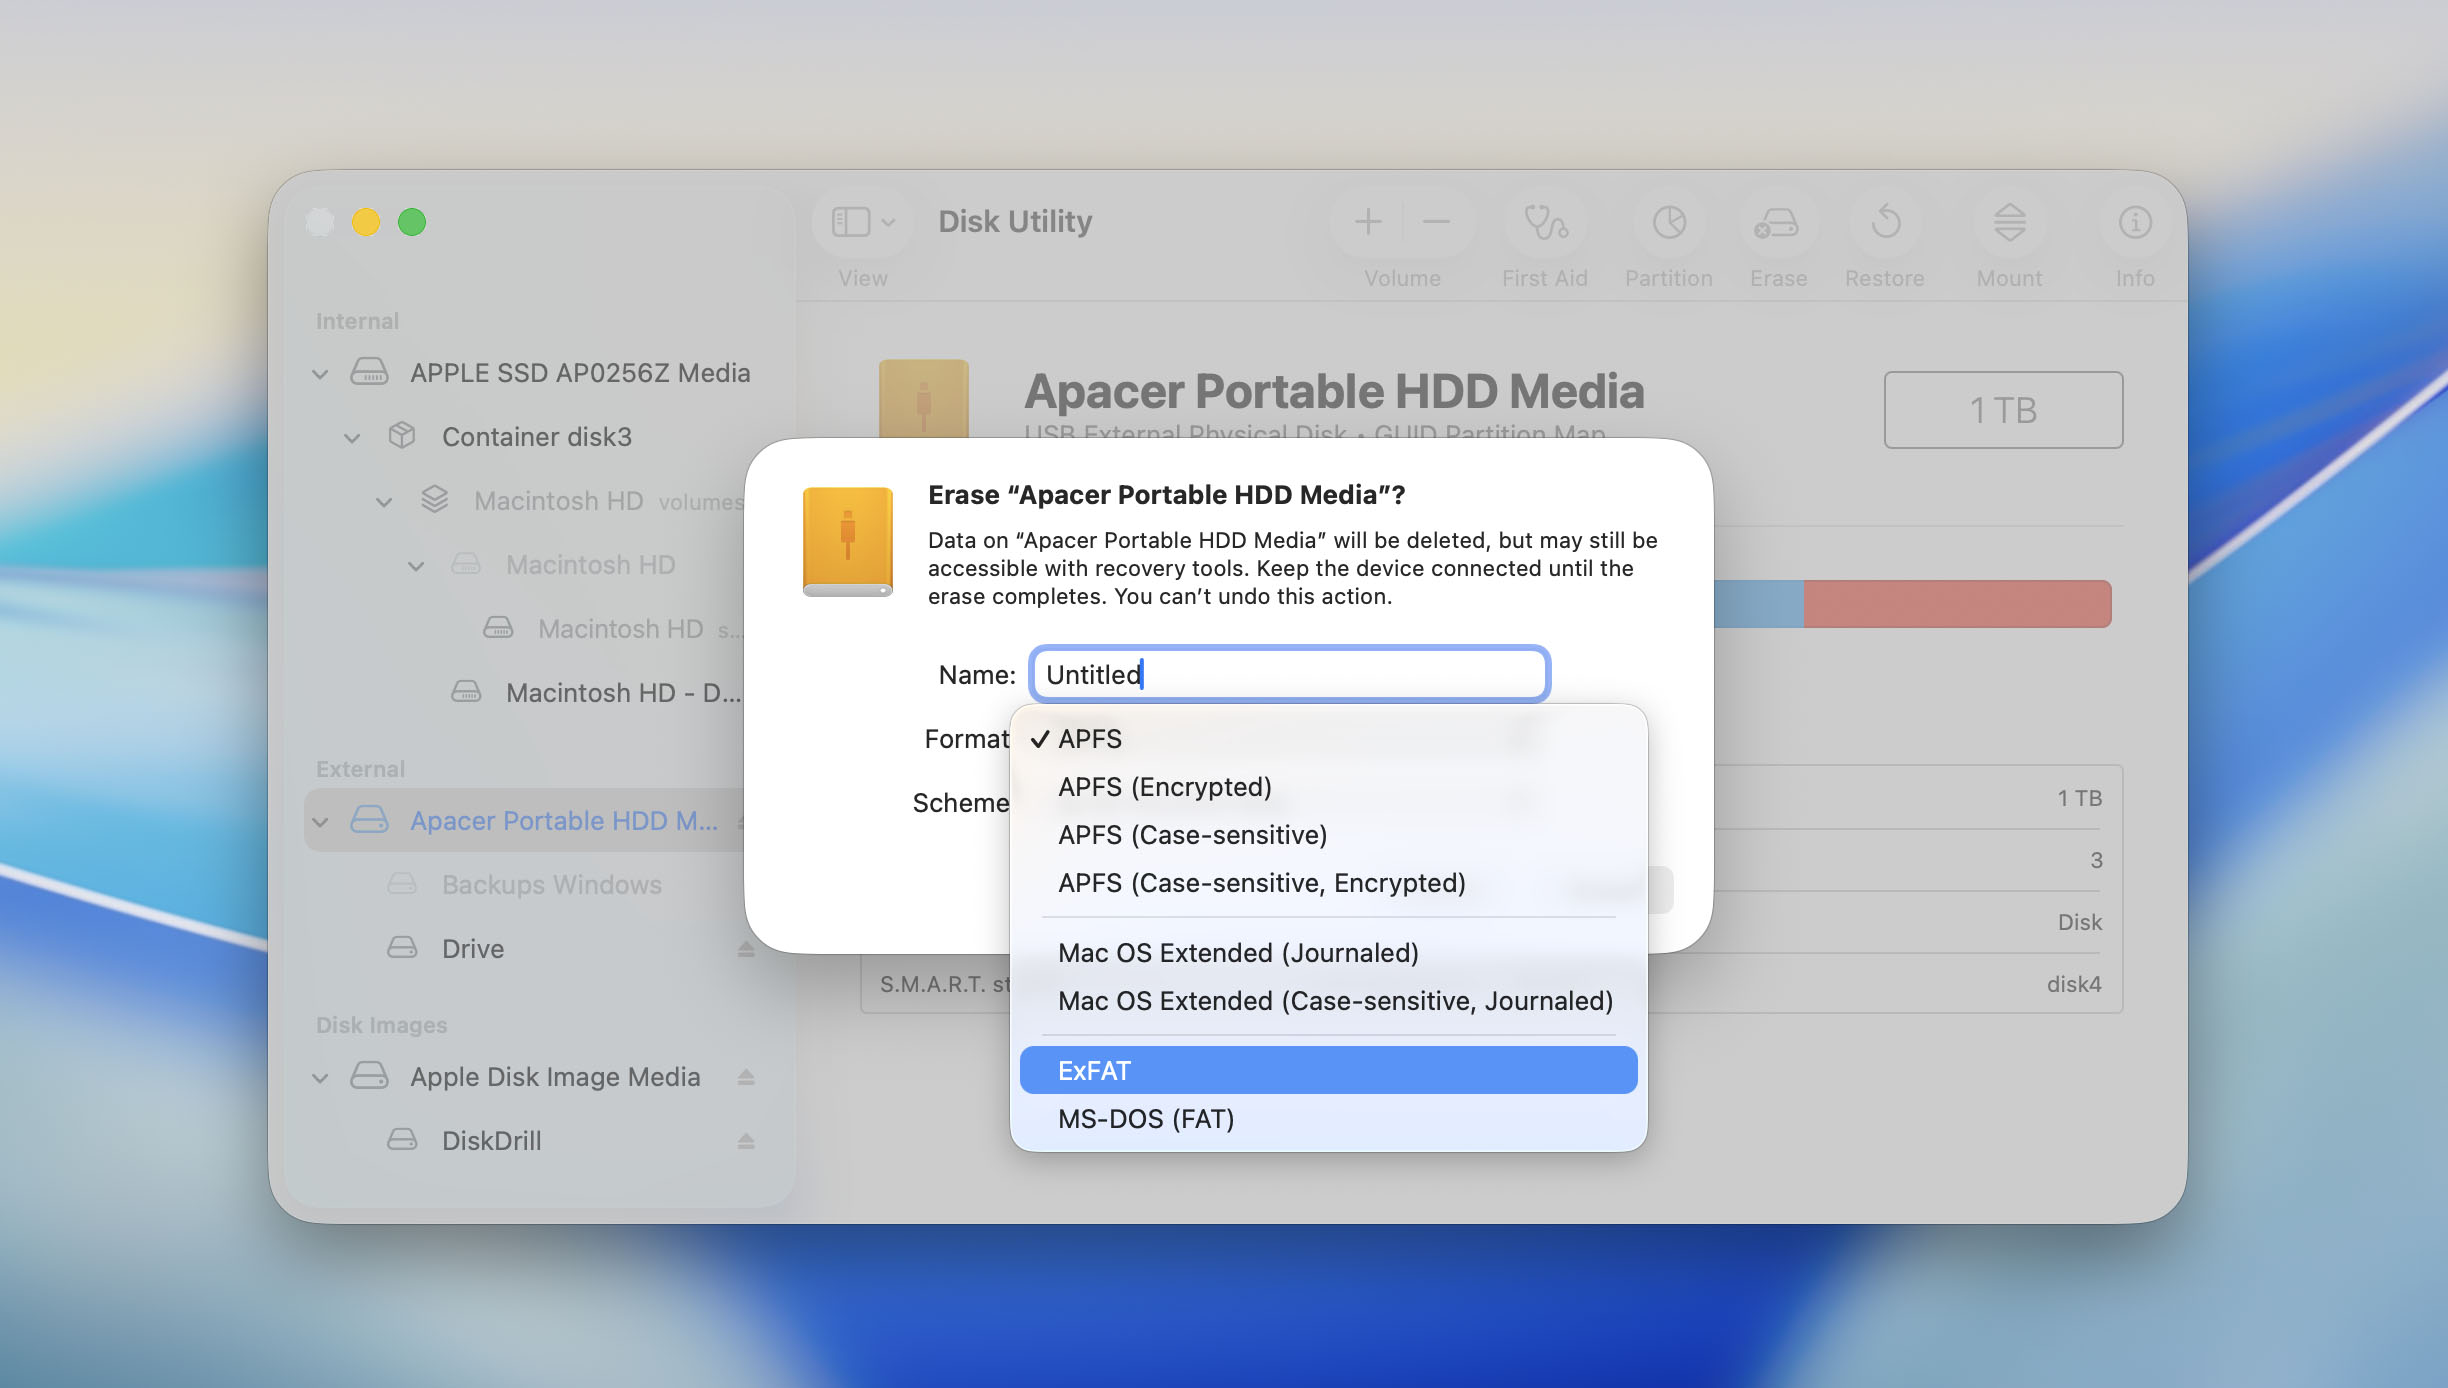
Method 10: Format Your External Hard Drive
If you try all the above options to resolve the hard drive not mounting on Mac and the issue persists, the last option is formatting the drive. This process wipes the files on the disk along with any viruses or bugs preventing it from mounting. The good news is that your files are not permanently lost: you can use Disk Drill to recover files from your hard drive even after formatting it.
How to Fix an External Hard Drive Not Showing Up on a Mac
If your external hard drive doesn’t appear where you expected, don’t jump straight to formatting or recovery. First, check every place where macOS can display storage devices. That includes the Finder sidebar, the Desktop, and Disk Utility (with the Show All Devices option enabled). Apple’s simplified Disk Utility view may show only volumes, while Show All Devices reveals the physical drive, its containers, and its volumes. Once you know where the drive appears (or doesn’t appear), you’ll have a much better idea of what the problem actually is and which solution to try next.
Start with the first row that matches what you see on your Mac, then follow the recommended next step. We’ll go through each of these cases in order below.
| What the reader sees | Likely issue | Next step |
| Drive appears in Disk Utility but not in Finder | Finder visibility setting or an unmounted volume | Check Finder settings and the volume’s mount status |
| Physical device appears, but no volume is listed | Damaged or missing partition or container | Protect or recover the data before making changes |
| Nothing appears in Disk Utility | Connection, power, permission, enclosure, or hardware issue | Continue with the hardware checks |
| Drive appears only intermittently | Cable, power, enclosure, or drive failure | Minimize use and test the drive carefully |
If the drive is visible in Disk Utility but missing from Finder or the Desktop, check Finder’s display settings as described in Method 2 of the previous section. These settings only affect where a recognized drive is displayed (they don’t control whether macOS detects the drive, so skip this step if the drive isn’t listed in Disk Utility).
If the drive still doesn’t appear, reconnect it directly to your Mac. Disconnect it first, then plug it back in without using a USB hub, docking station, extension cable, or unnecessary adapter. If your Mac has another compatible USB or Thunderbolt port, try that as well, then wait a few seconds for macOS to detect the drive. A hub or adapter may still provide enough power for the drive to turn on while failing to deliver a stable data connection. However, if the drive clicks, grinds, repeatedly spins up and down, or constantly disconnects, avoid reconnecting it over and over again. These symptoms can indicate a hardware problem, and repeated attempts may make the situation worse.
Also, inspect the cable and any adapters you’re using. USB-A to USB-C adapters, worn proprietary cables, loose connectors, or USB-C charging cables without data support can all prevent the drive from appearing. Likewise, some Thunderbolt drives won’t work properly with a standard USB-C cable. If possible, test the drive with a known working data cable.
Also make sure the drive is receiving enough power. Portable drives draw power from the Mac, so connecting your MacBook to its charger or using a powered USB hub may help. Desktop drives and multi-drive enclosures should be used with their original power adapter. If the status light turns on or the drive spins up, it only means power is reaching the device (it doesn’t confirm that the drive is working properly).
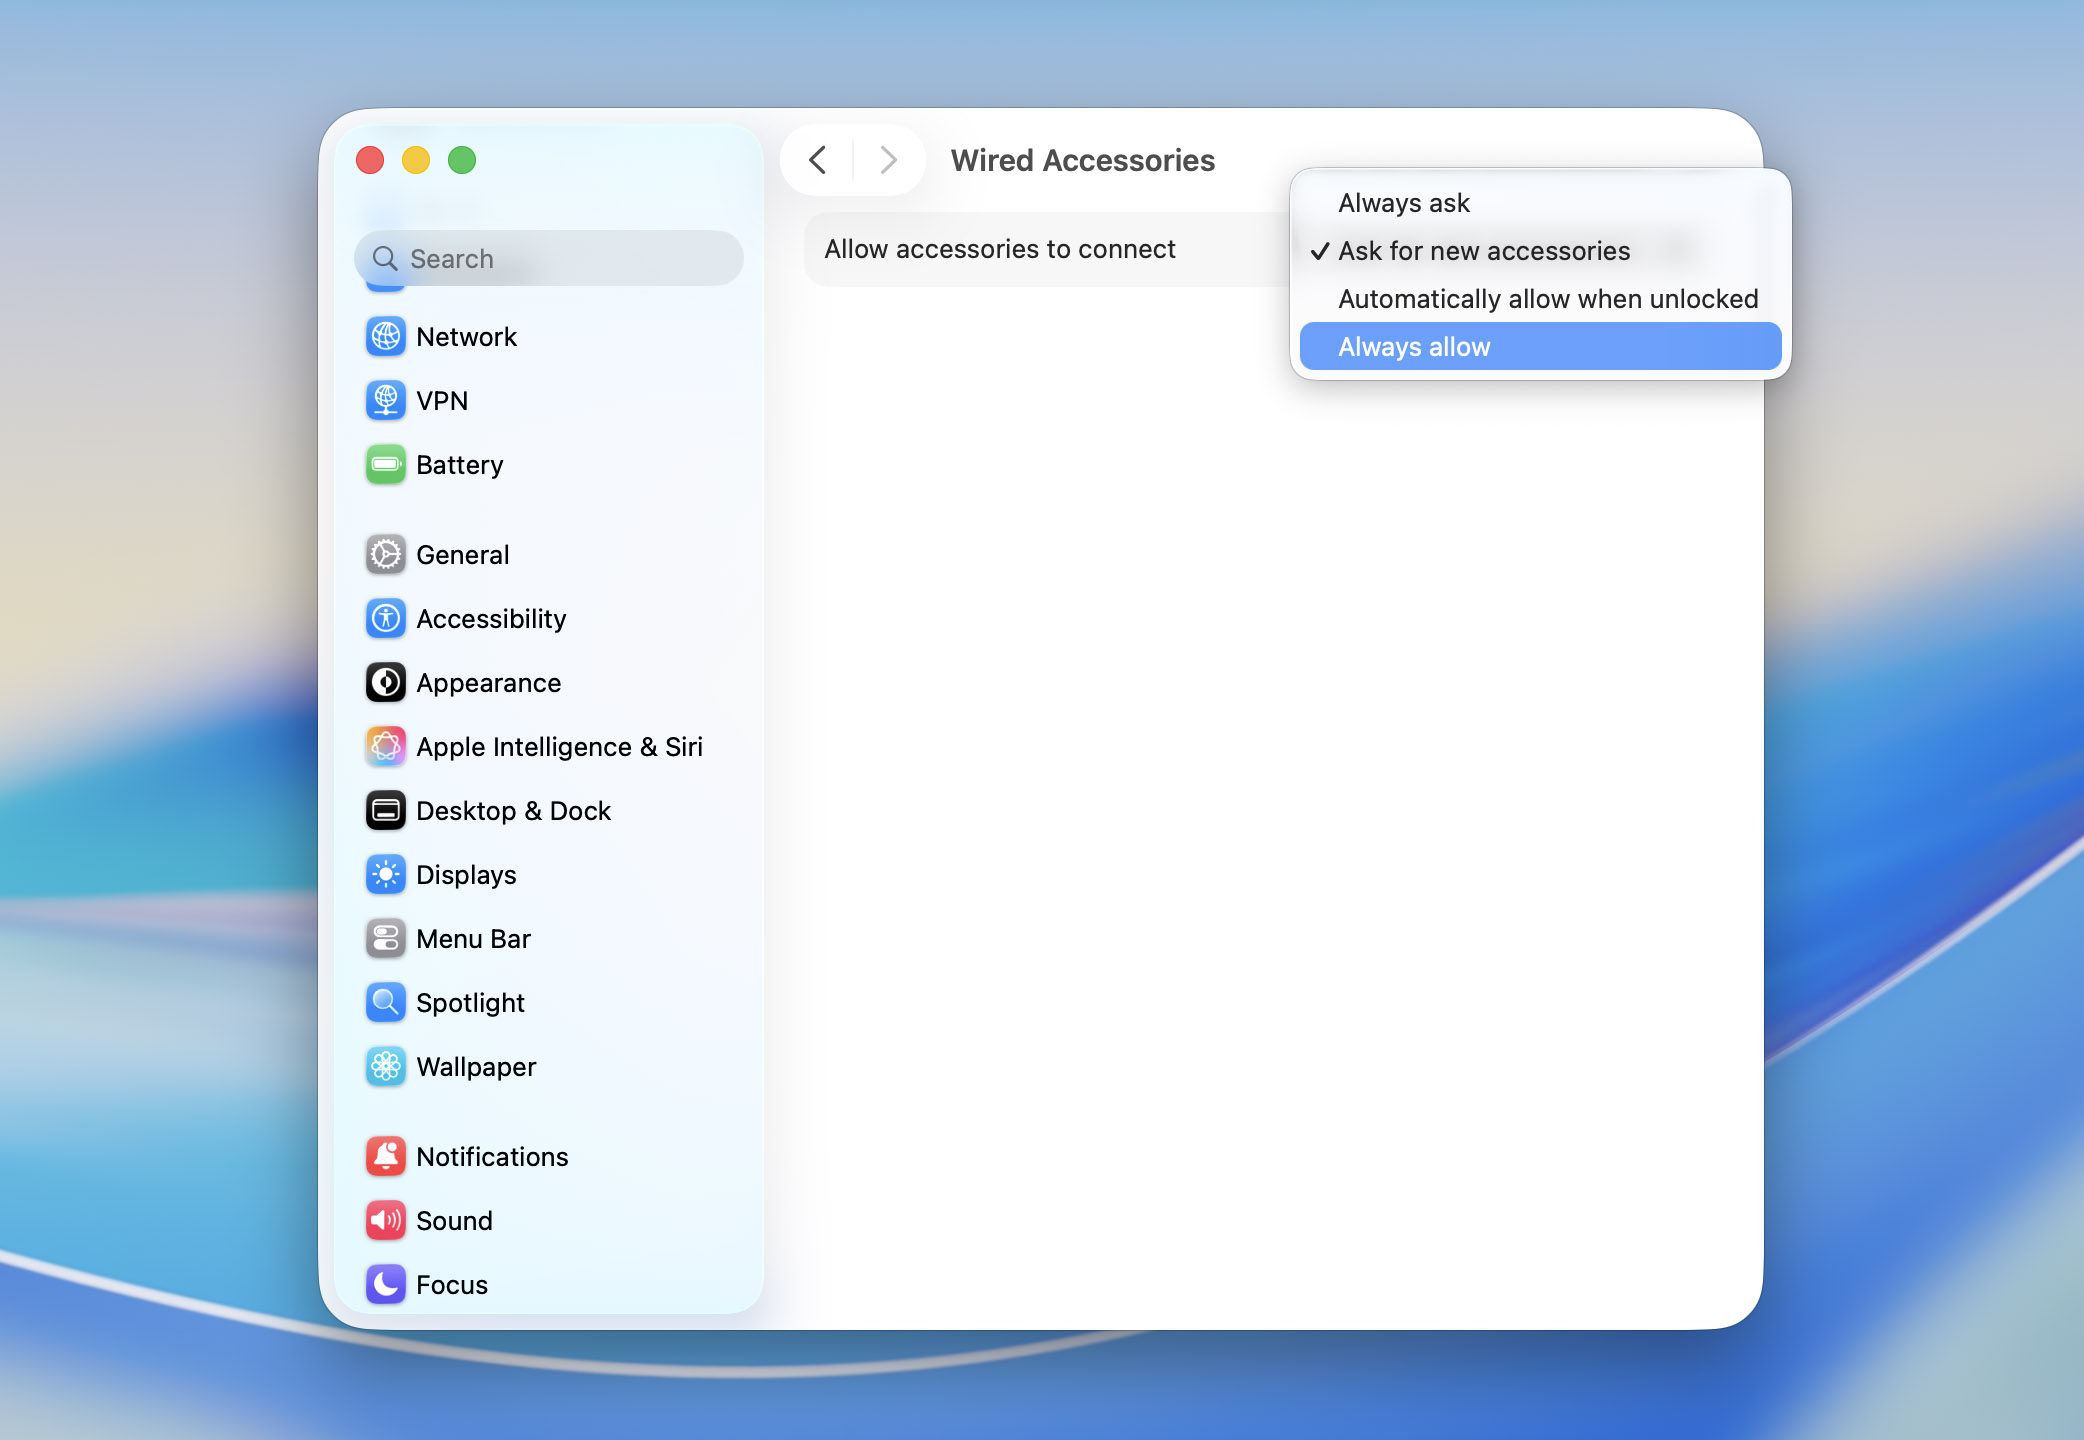
If you’re using a MacBook with Apple silicon, macOS may block new USB, Thunderbolt, or SD card accessories until you approve them. If your drive still isn’t detected, check Privacy & Security in System Settings and allow the connected accessory if prompted. After approving it, disconnect and reconnect the drive. This security feature applies to Apple silicon laptops and isn’t available on all Intel Macs.
If that doesn’t help, disconnect the drive, restart your Mac, log in completely, and reconnect it. A restart can clear temporary problems with Finder, USB or Thunderbolt connections, or the Disk Arbitration service that manages storage devices. If the issue persists, install any available macOS updates.
If the drive still isn’t detected, test it on another computer before assuming it’s failed. Try the same drive and cable on another Mac, or connect it to a Windows or Linux computer if the drive doesn’t use a Mac-native file system. You can also connect a different, known working drive through the same port, cable, adapter, or enclosure. The results usually point to the problem. If the drive works on another computer, the issue is likely with your Mac’s configuration, port, compatibility, or drivers. If it works with another enclosure, the original enclosure or adapter has probably failed. If the drive isn’t detected on any computer, the problem is most likely the drive itself.
What should you do if none of these attempts worked? It’s time to stop troubleshooting and consider professional data recovery (recovery software can only work with storage devices that macOS detects, so it won’t be able to access a drive that doesn’t appear in Disk Utility).
You should stop trying to fix the drive yourself if:
- The drive clicks, grinds, beeps, or repeatedly spins up and down.
- The drive disconnects during every access attempt.
- The drive or its enclosure becomes unusually hot.
- Disk Utility reports the wrong capacity.
- The drive has been dropped, exposed to water, or suffered electrical damage.
- The data is irreplaceable and the drive isn’t detected on any computer.
Repeatedly powering on a physically damaged drive can make the failure worse and reduce the chances of recovering your data. So, look for reputable data recovery services in your area and request a quote.
Frequently Asked Questions
How do I force an external hard drive to mount on a Mac?
Follow these steps:
- Launch the Terminal app, and a command line will open.
- Type diskutil list and press Enter. This command shows you all connected devices, with names and numbers for each one.
- Type this command: sudo mkdir /Volume/usb. Replace “usb” with the name of your external hard drive and press Enter. Provide an admin password if prompted.
- Then, type sudo mount -t hfs /dev/disk1 /Volumes/usb. Replace “disk1” with your external hard disk number and “usb” with the name to force-mount the disk.
How do I restore data from my external hard drive that won't mount?
You can use Disk Drill to recover data from external hard disks that refuse to mount, even if they’re corrupted or broken.
- Download and install Disk Drill.
- Connect the external hard drive that is not mounting and launch Disk Drill.
- Click Search for lost data to scan the drive.
- Preview the detected lost files and select the ones to recover.
- Click Recover to complete the action.
Why external hard drive won't mount in Mac’s Disk Utility?
There are many reasons why an external hard disk won’t mount in Mac’s Disk Utility, such as faulty cables or USB ports, low power supply, misconfigured Mac settings, or incompatible file systems. The good news is that any source has a solution, which we’ve explained.
Conclusion
Dealing with GoPro SD card errors can be a challenging ordeal, especially if you’re at risk of losing precious photos or videos. But if you follow the steps described in this article, you can significantly increase your chances of successful file recovery. Good luck!

- 2 publishings
Stefan Ionescu is a passionate technology enthusiast and freelance writer with an MSc in Geological Engineering. Despite his educational background, his love for technology and natural flair for writing have led him to carve out a successful career in the world of tech content creation. Stefan has also developed a strong expertise in data recovery topics, providing valuable insights and guidance for those facing data loss challenges. He is an advocate for both Windows and Mac, emphasizing the advantages and innovations they bring to the world, including their data recovery capabilities. With vast experience and a deep understanding of technical aspects, he is adept at breaking down complex technological topics into easily digestible content for a broad audience.
- Frisco, Texas, United States
Yevgeniy Tolkunov is Hardware Engineer at ACE Data Recovery. Yevgeniy has a Master's Degree in Physics, Information Technology; 15+ years of experience.