
How to Access and Recover Your Data From USB Drive That is Not Recognized
You plug in a USB drive to your PC, hoping to hear a familiar notification sound, followed by the “Choose what happens with this device” AutoPlay prompt. But nothing happens, there’s just radio silence. Well, no pressure, it must be visible in File Explorer, right? Nope…it’s not there either. So, what do you do now? Well, fixing an unrecognized USB drive isn’t as dramatic as the previous lines would lead you to believe. The article below contains all you need to do. First, recover data from the USB drive that’s not recognized (this issue usually arises in malfunctioning USB drives), and then repair it. As for how? That’s what the sections below answer.
Recognized but Inaccessible vs Completely Unrecognized
It’s important to differentiate between inaccessible and unrecognized USB drives.
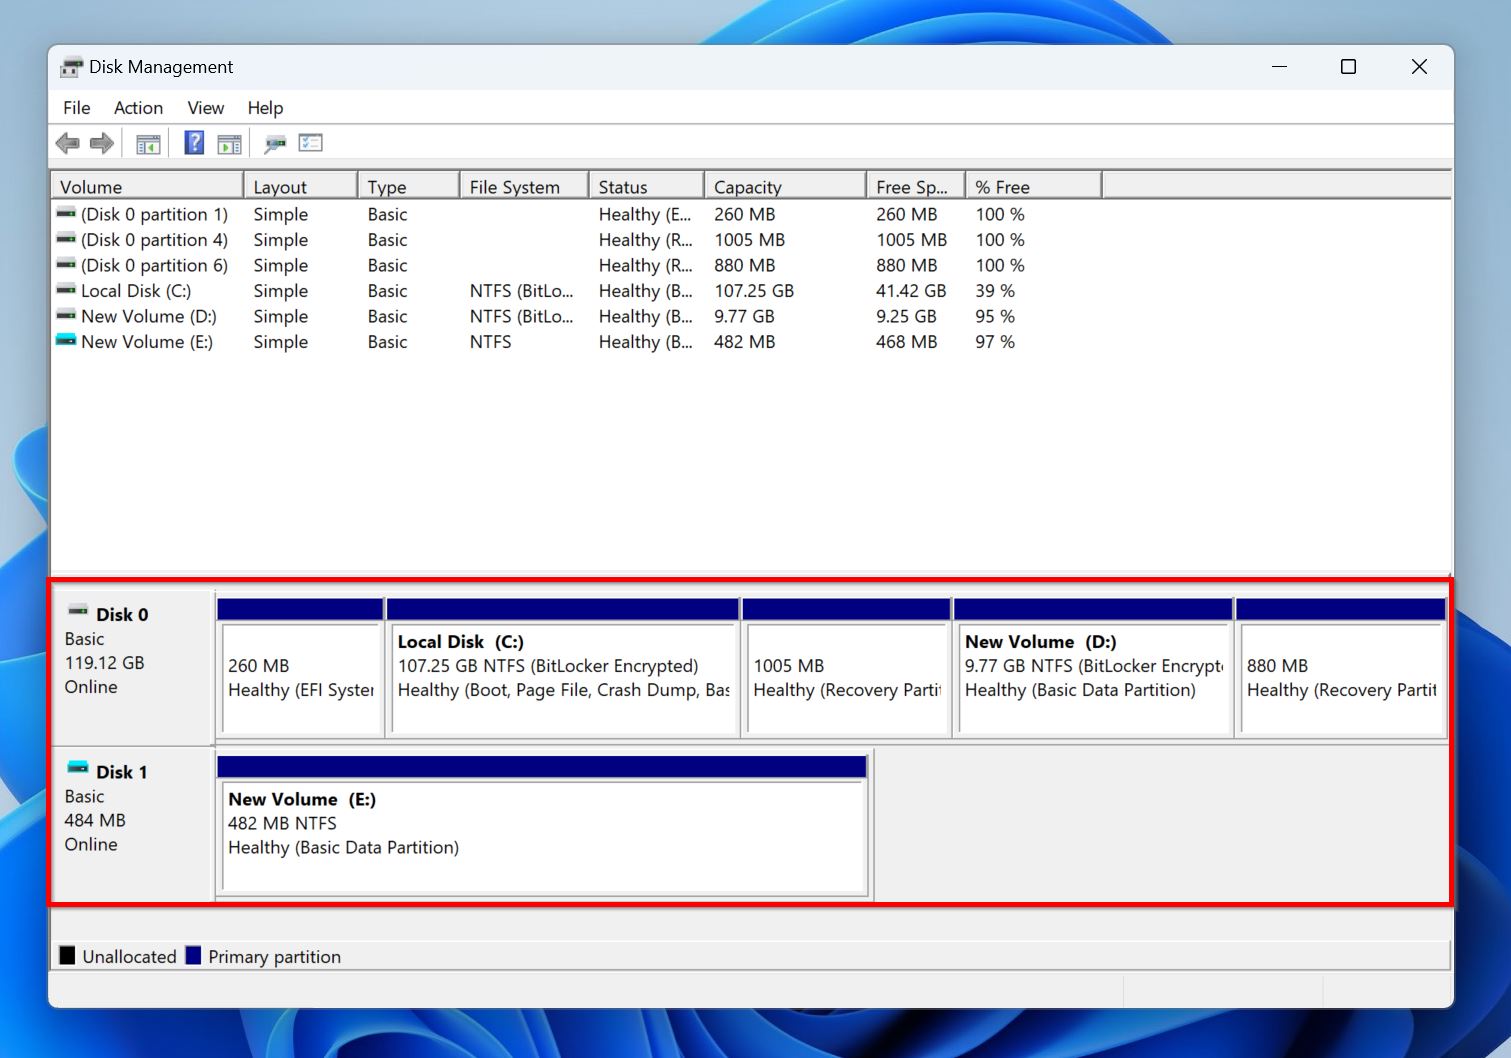
An inaccessible USB drive may not show up in File Explorer, but it will be visible in Windows Disk Management. To confirm this, right-click the Start button, and choose Disk Management. You may see it as a healthy partition with no drive letter, while the remaining partitions have a specific drive letter assigned to them. Double-check the size to confirm that it’s the USB drive. A USB drive that appears with an incorrect storage capacity may have serious issues that require experts.
A completely unrecognized USB drive will not appear in File Explorer, and Disk Management. Maybe the USB port’s not working anymore. But, it’s also possible that the USB drive itself is severely damaged, in which case you’ll need professional help to repair it.
But why do USB drives become unrecognizable in the first place? Well, we outline these reasons towards the end of this article. For now, let’s get to recovering data from that USB drive, and then fixing it using the methods that follow.
Before You Do Anything – Check These Basics First
To recover a USB drive that’s not recognized, start with simple fixes first. These are:
- 🔌 Use a different USB port or adapter. Slot the USB drive into a different port and see if your PC detects it. If you’re on a desktop, plug the USB drive into the ports at the back of your PC case. Also, try switching between a USB 3.0, and 2.0 port. If you’re using an adapter, try changing it or connecting the USB drive directly to a USB port.
- 🖥️ Test on another computer. To rule out your computer as the source of the problem, try testing the USB drive on another PC. Check if it appears in File Explorer, and Disk Management. If it does, your PC is the issue.
- ✅ Update USB Drivers: Outdated USB drivers can cause several issues, including the USB drive becoming unrecognized. It’s best to check that you’re running the latest drivers and update them if that’s not the case. You can do this using Device Manager.
- ❌ Avoid USB hubs. It’s best to connect a USB drive directly to a USB port on your computer. It’s possible the USB drive isn’t receiving enough power from the hub, or the hub itself is faulty. If you must use a USB hub, disconnect all other peripherals from it, and only keep the USB drive.
- ⛓️💥 Check for physical damage. USB drives are susceptible to physical damage. Check if the pins are bent or if there’s debris on them. Additionally, see if the casing has cracks or looks warped. There could also be internal damage to the drive because of water, heat, or power surges. Avoid performing DIY repairs on physically damaged drives, and contact an expert instead.
What Are the Best Methods to Recover Data From a Flash Drive That Is Not Recognized
No luck with the methods above? Well, it’s time to bring out the big guns. But, before you do that, we suggest recovering your data from the unrecognized USB drive. Some repair methods can cause data loss, and if your USB drive’s already malfunctioning, it’s best to get your data off of it before it becomes unrecoverable.
There are two ways to recover data from a USB drive that’s not recognized. Option 1: go the DIY data recovery route—pick an option from our list of the best USB data recovery apps, and get your files in a few steps. Option 2: contact a professional data recovery service.
Here’s how to recover data from an unrecognized USB drive, and what to expect when contacting a professional data recovery service:
Option 1: Try DIY USB Recovery Software
Most good data recovery tools can detect and recover data from USB drives that are visible in Disk Management, even if they don’t show up in File Explorer.
(Recommended) Part A: Create a Disk Image Of The USB Drive
We highly recommend creating a disk image of the unrecognized USB drive. It’s essentially a soft copy of the entire drive—you can scan and recover data from it. Not only does this shield you against further data loss, but it also prevents further stress to the USB drive caused by a data recovery scan. If you don’t want to create a disk image, you can skip to the data recovery section.
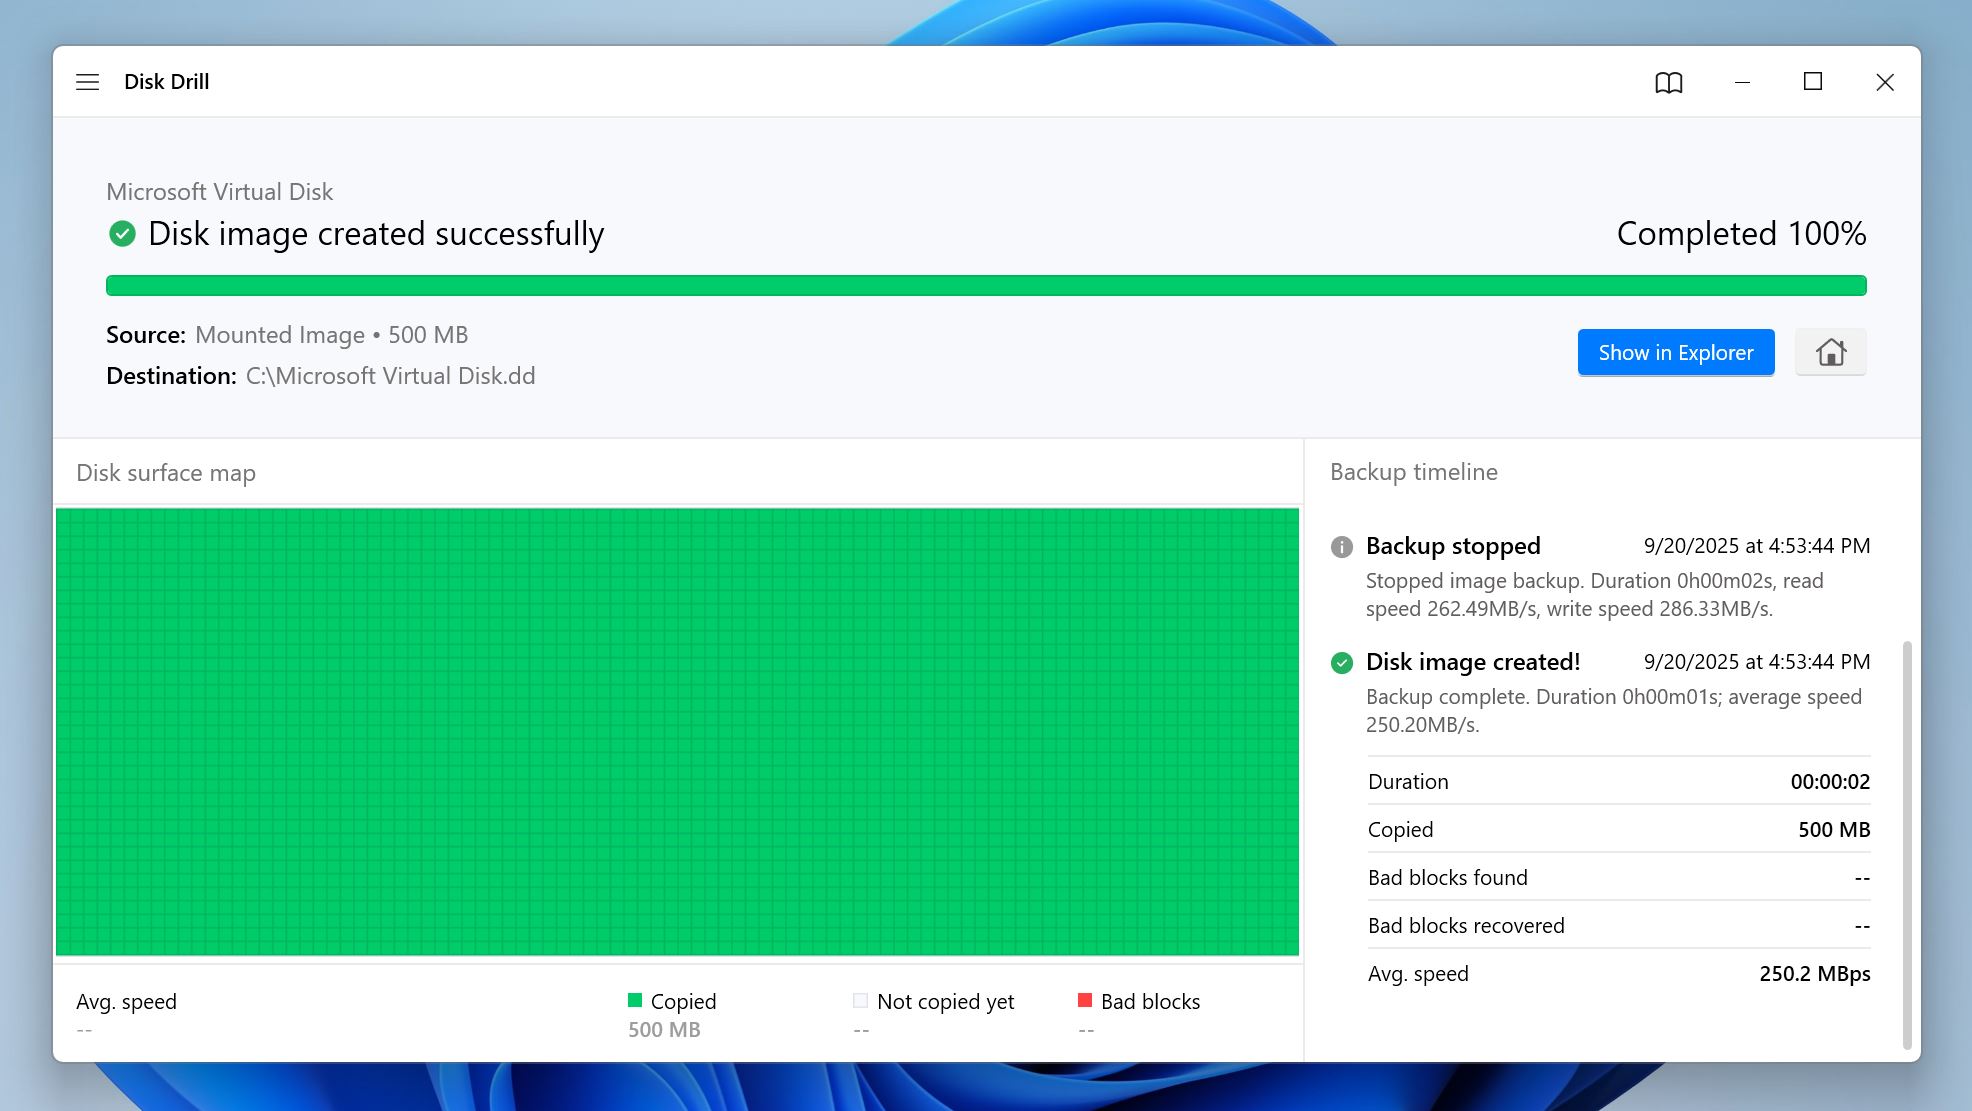
You can create and scan a disk image using Disk Drill’s Byte-to-Byte Backup feature:
- Download Disk Drill and install it.
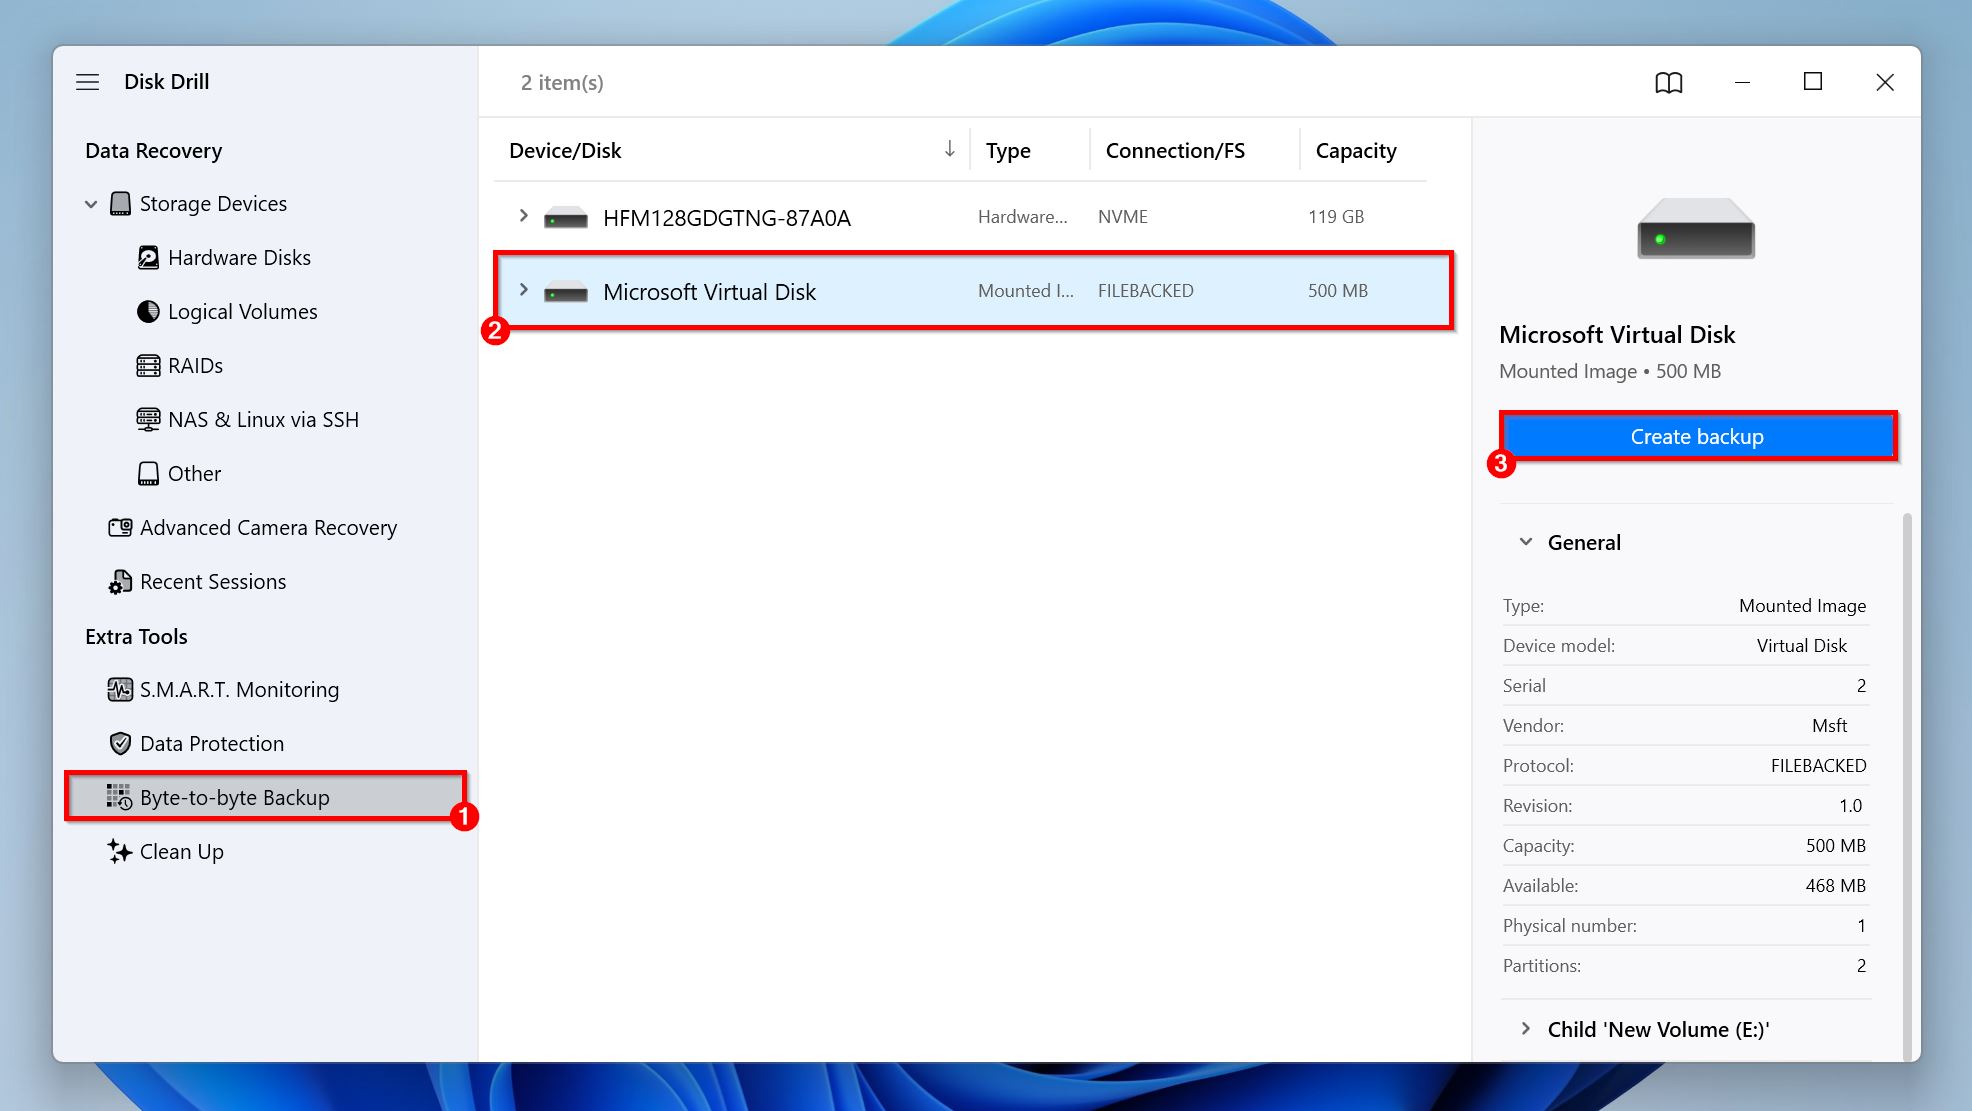
- Open Disk Drill, and click on Byte-to-Byte Backup, under Extra Tools.
- Select the USB drive, and click Create backup.
- Click the three dots (…) next to Path. Select where you want to save the disk image, and click Select Folder. The destination should have enough free space (equal to, or more than the total storage capacity of the USB drive).
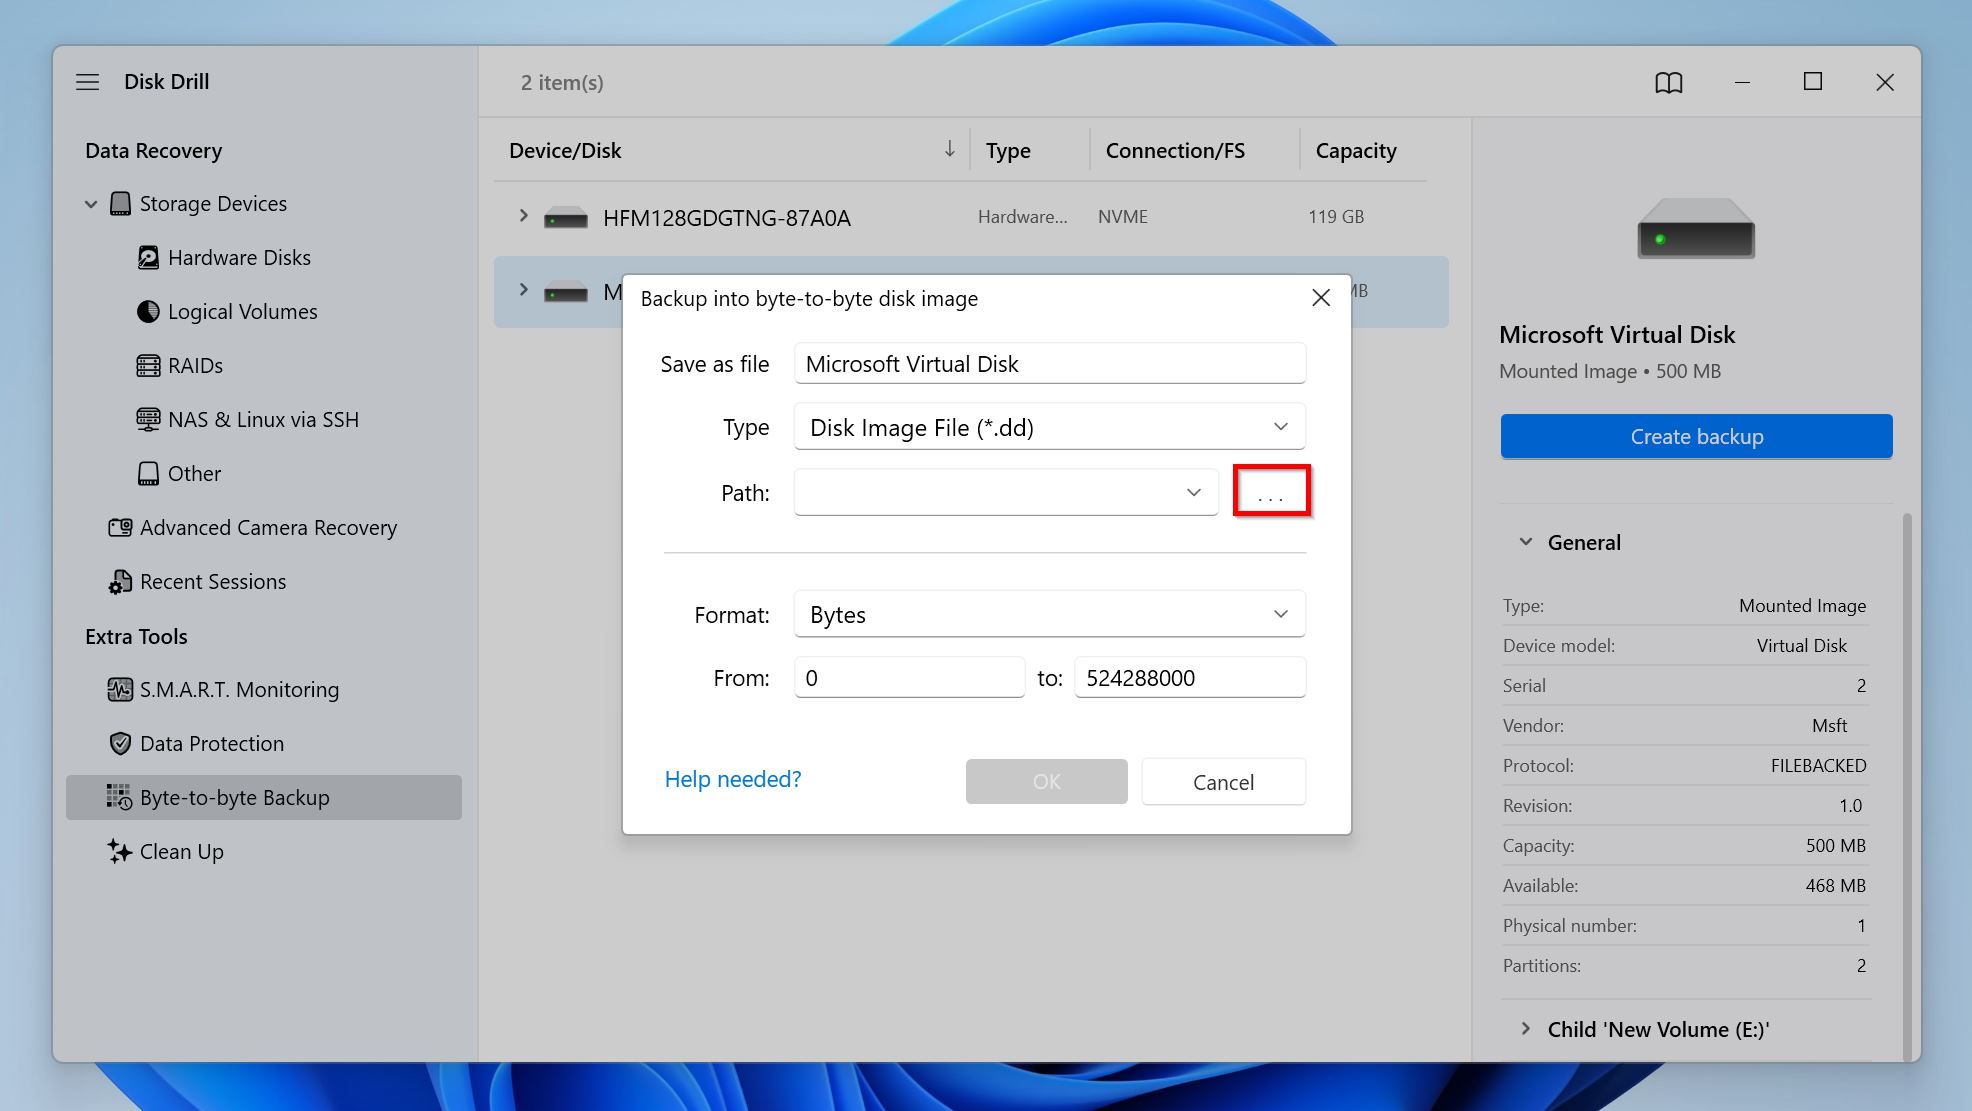
- Disk Drill will create the disk image.
Part B: Recover Data From the Unrecognized USB Drive
Regardless of whether you made a backup in the previous step, the priority now is to get your data off the USB flash drive.
Here’s how to recover data from a USB flash drive that’s not recognized, using Disk Drill:
- Download Disk Drill and install it.
- Connect the unrecognized USB drive to your PC.
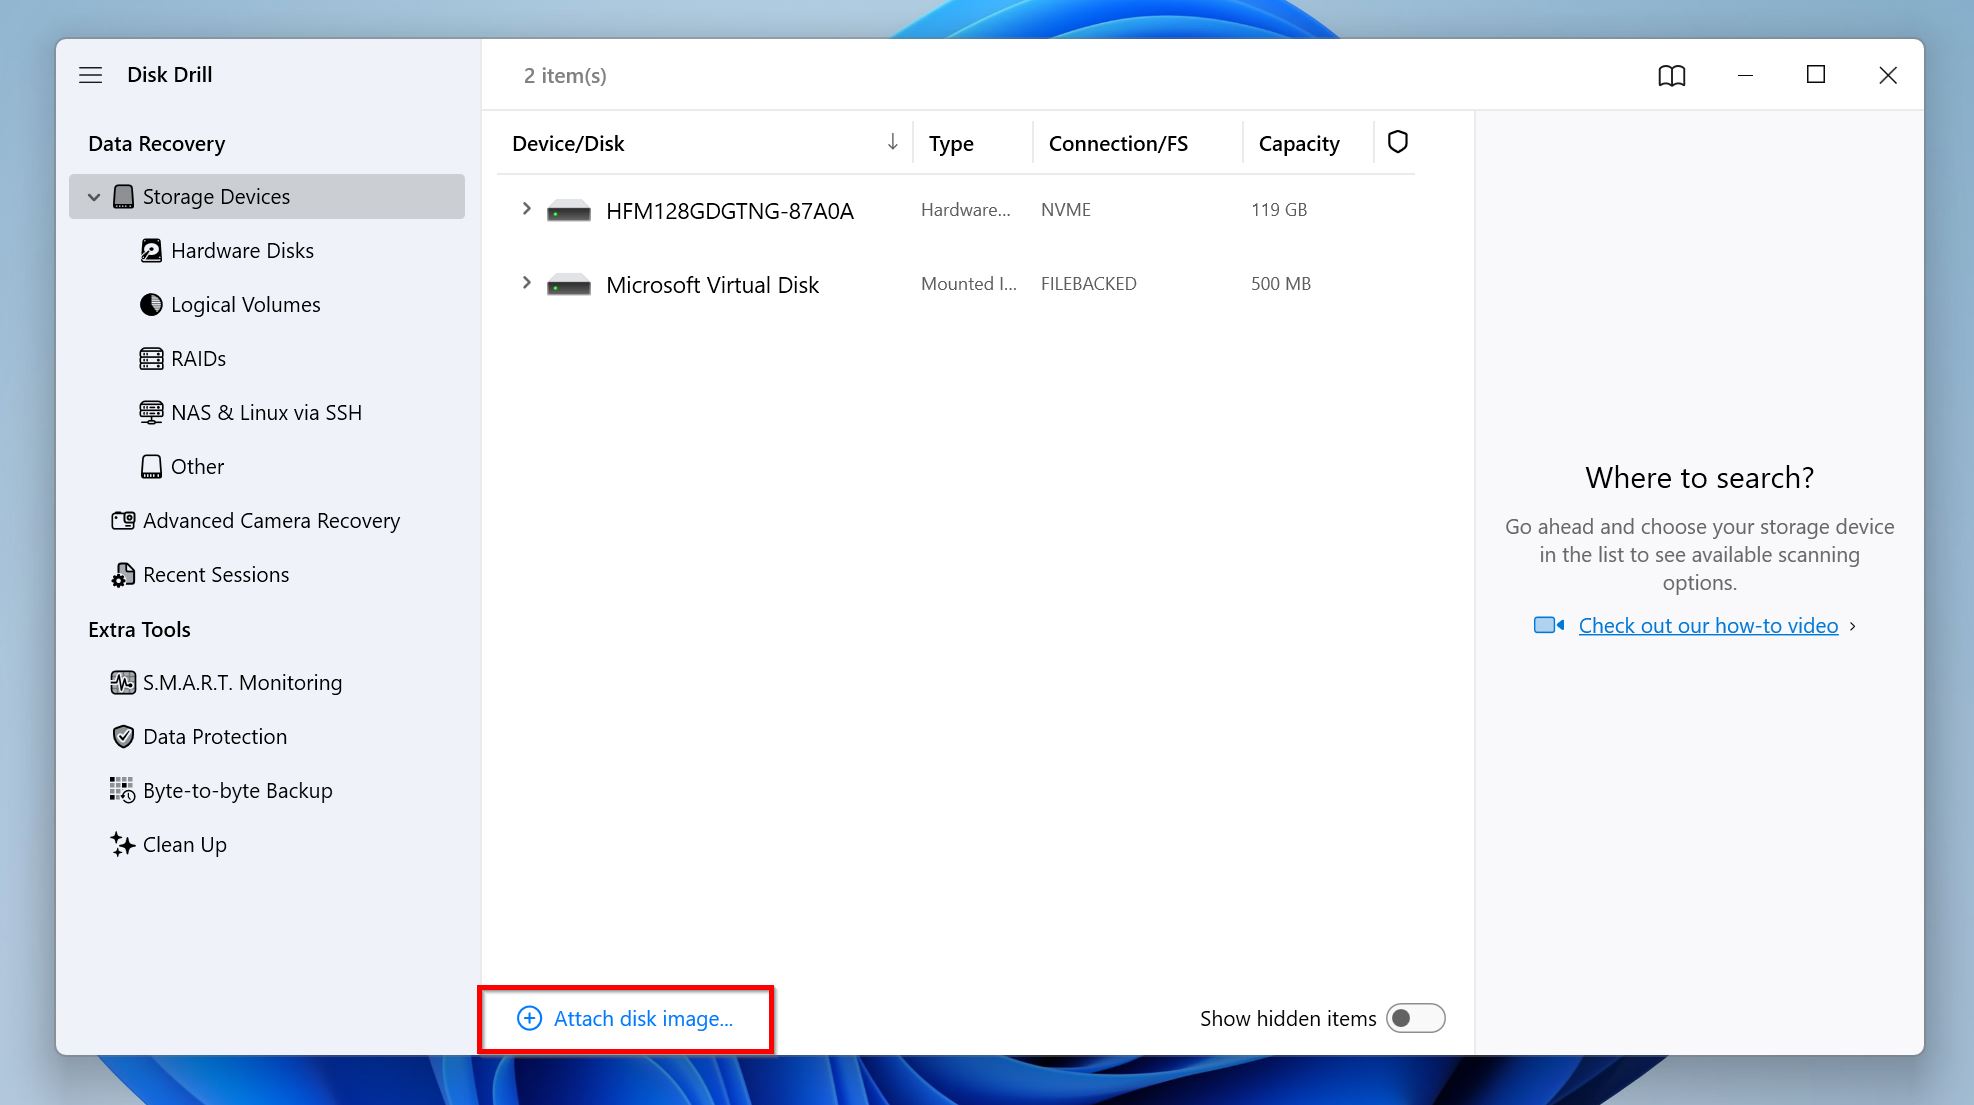
- Launch Disk Drill. If you created a disk image, click Attach disk image, navigate to the disk image and double-click it. It’ll show up as a separate drive on the screen.
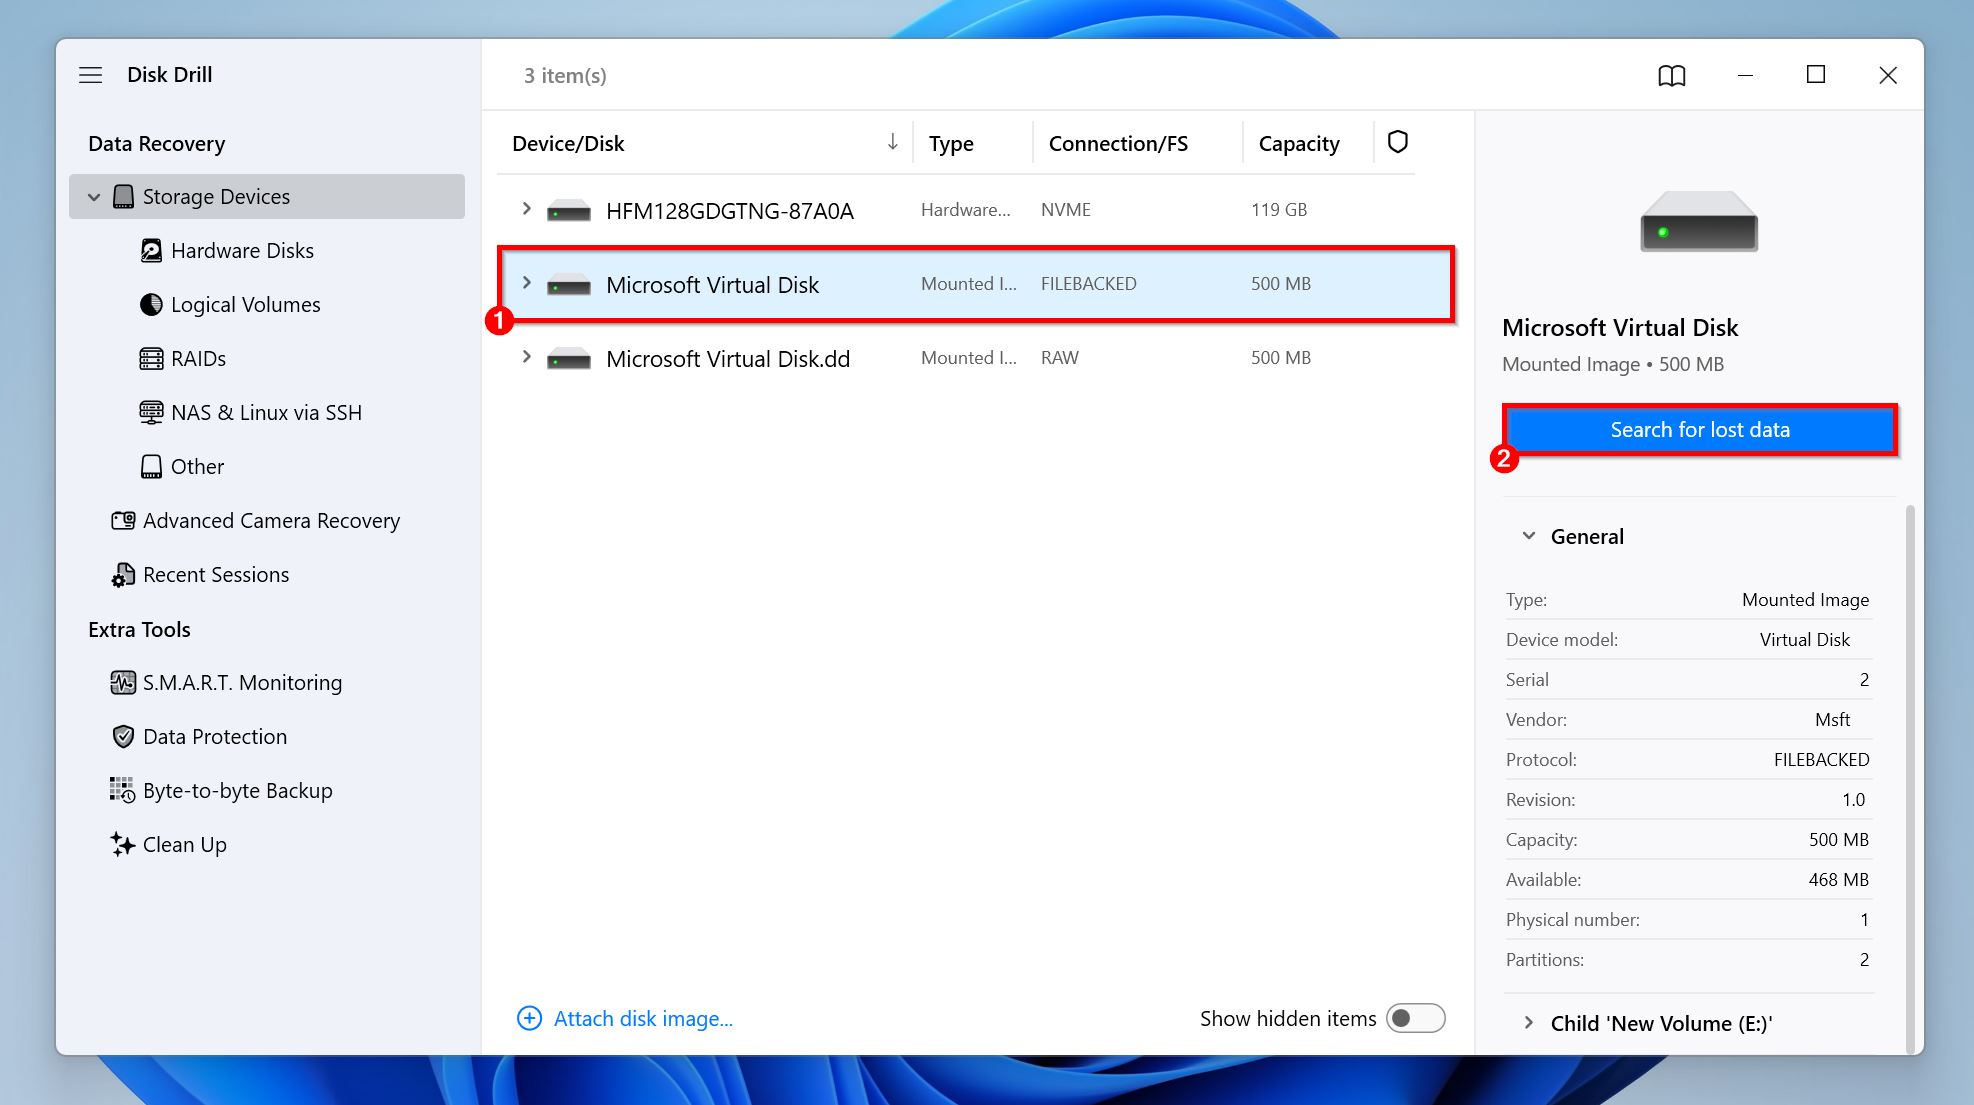
- Click the USB drive, or its disk image Search for lost data.
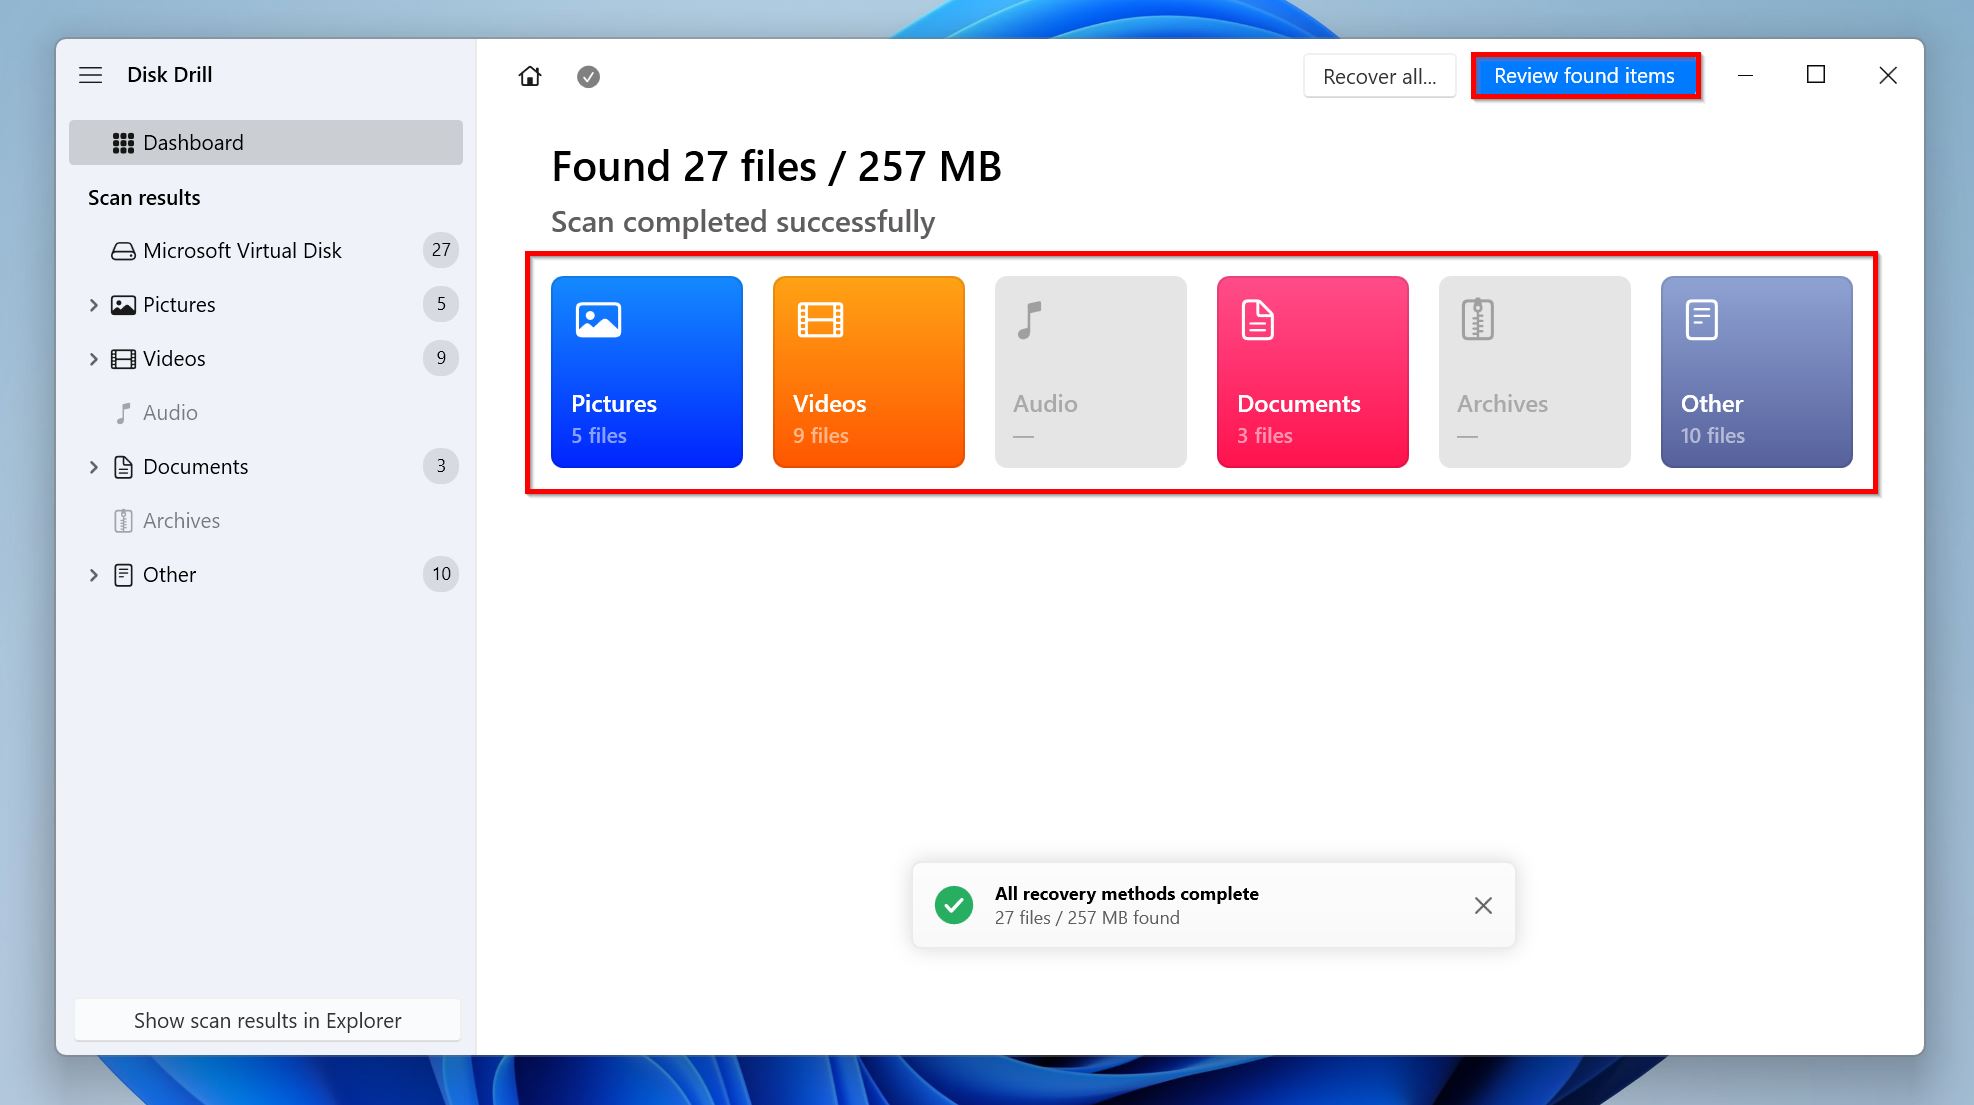
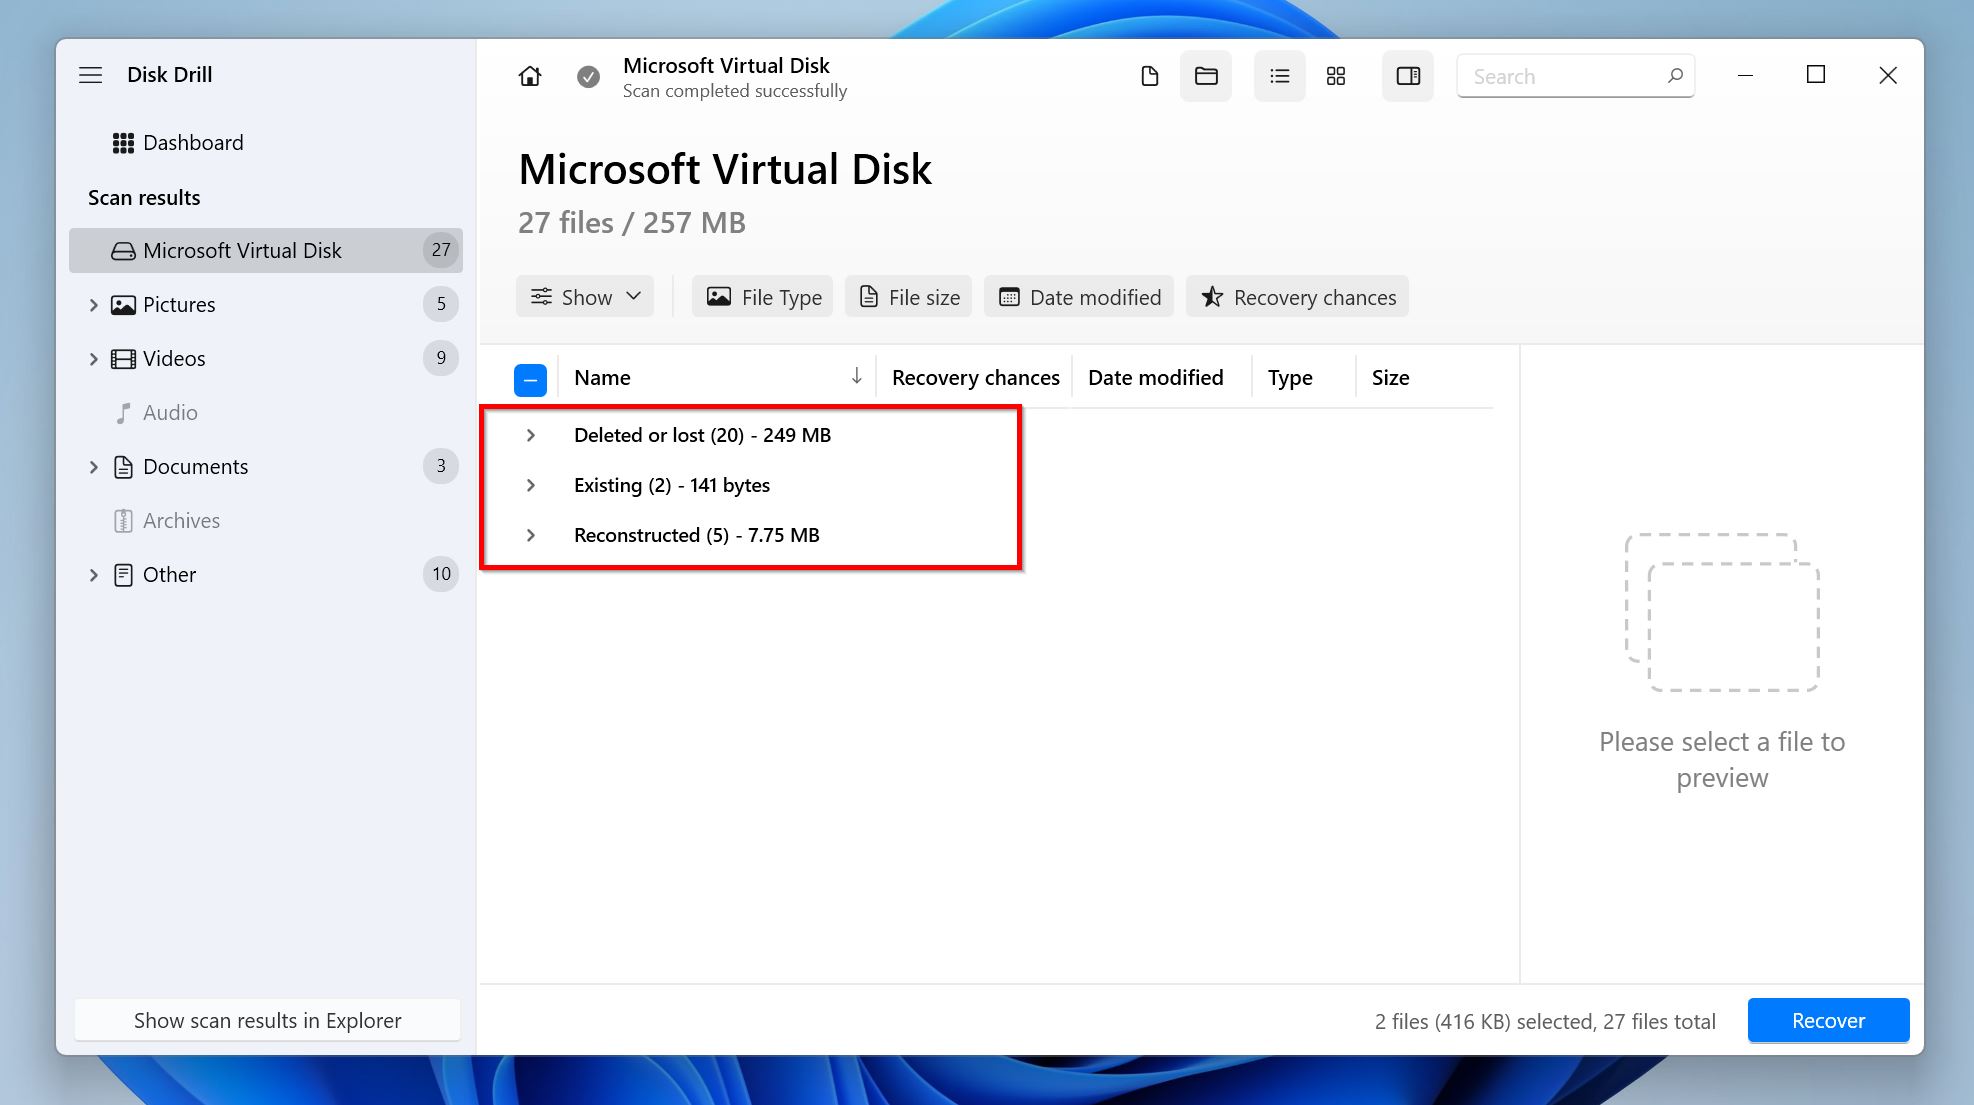
- Click on Review found items once the scan is complete. Looking to only recover a specific file type? Click the relevant file type tile instead: Pictures, Videos, Audio, Documents, Archives, and Other.
- Expand the Deleted or lost, and Reconstructed sections to view recoverable deleted files. The former contains files that have their folder structure and filenames intact, while the latter lists files whose filenames and folder structure couldn’t be recovered but they’re still complete files. To view currently present files on the drive, expand the Existing section—you’ll find most of your files here if the drive simply became unrecognizable but the stored files remained unaffected.
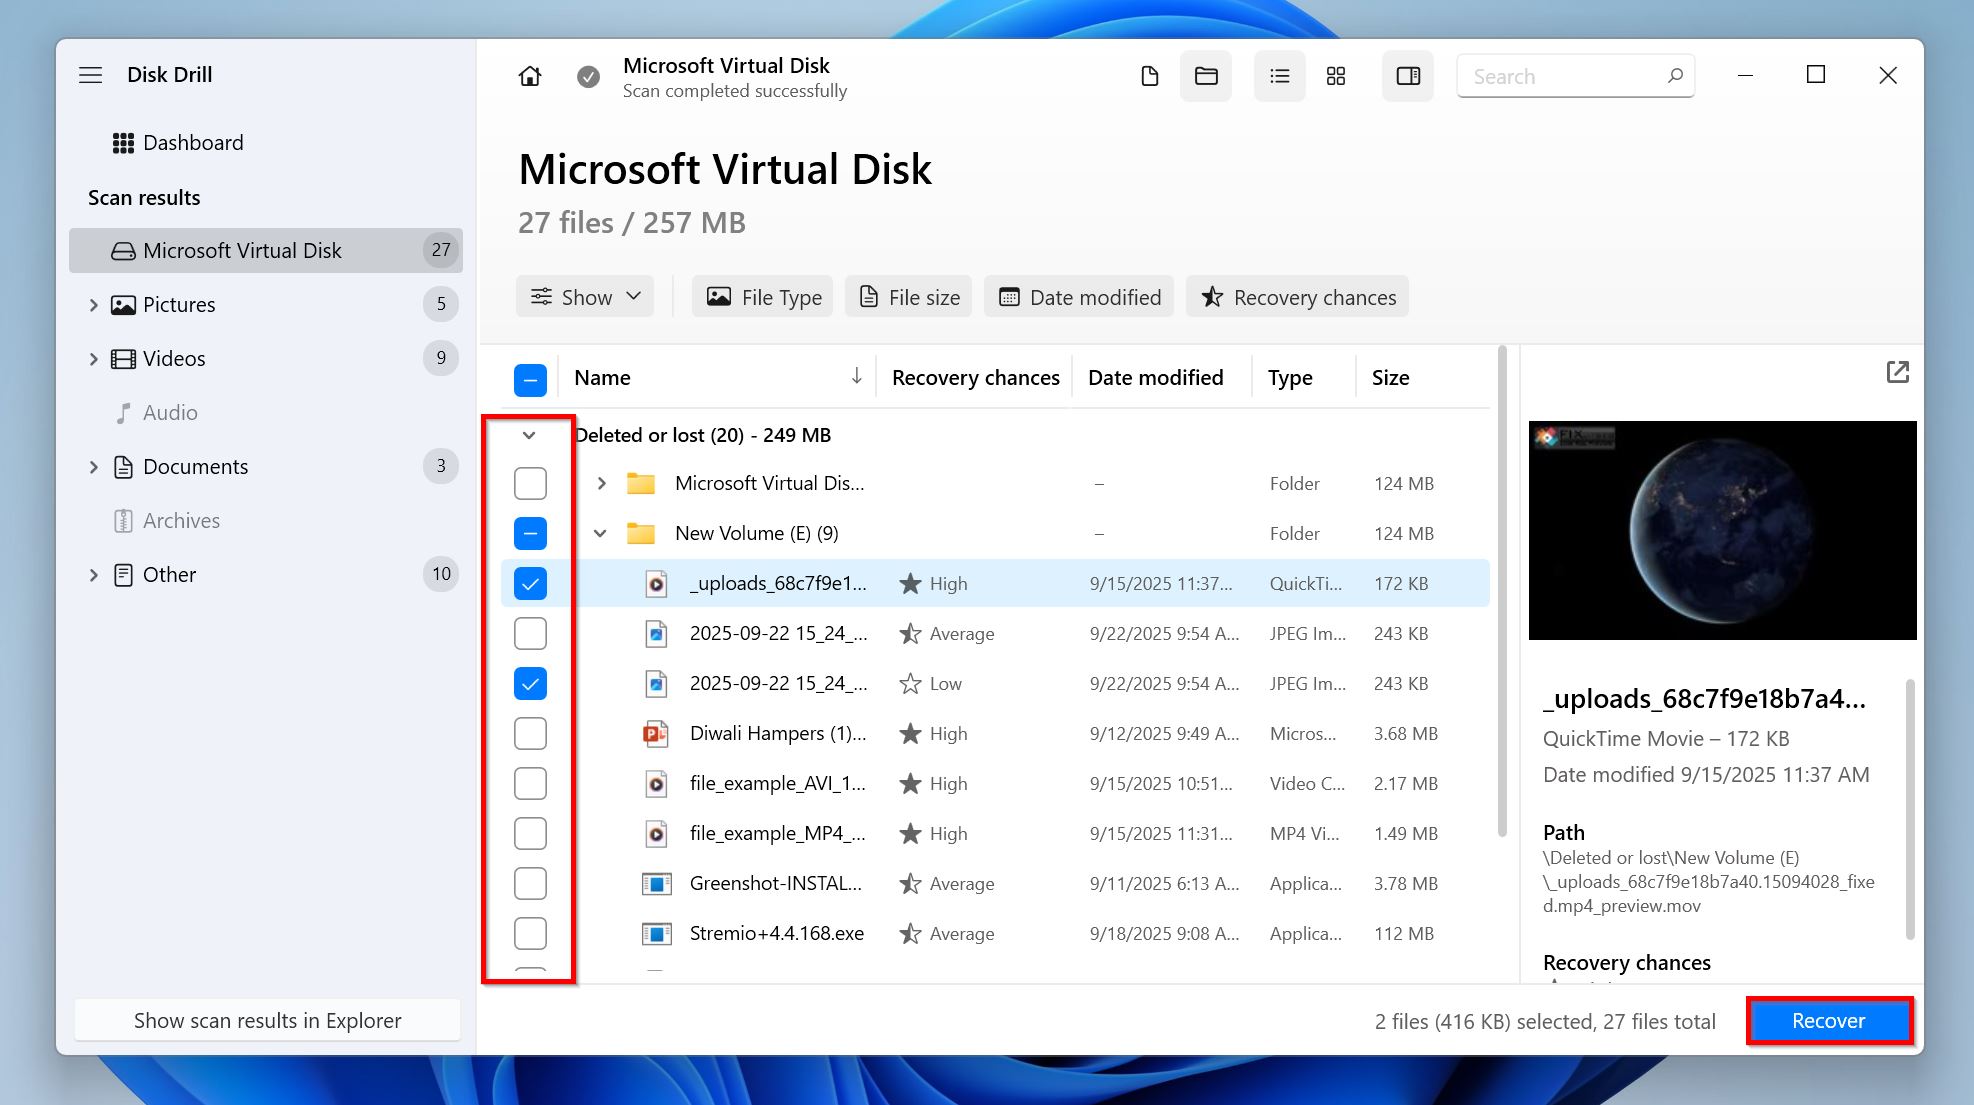
- Select the files you wish to recover. Disk Drill automatically displays a preview of the currently selected file, but you can manually preview any file by hovering your cursor next to the filename and clicking the eye icon that appears next to it. If a file can be previewed, it’s also recoverable. Click Recover once you’re done selecting.
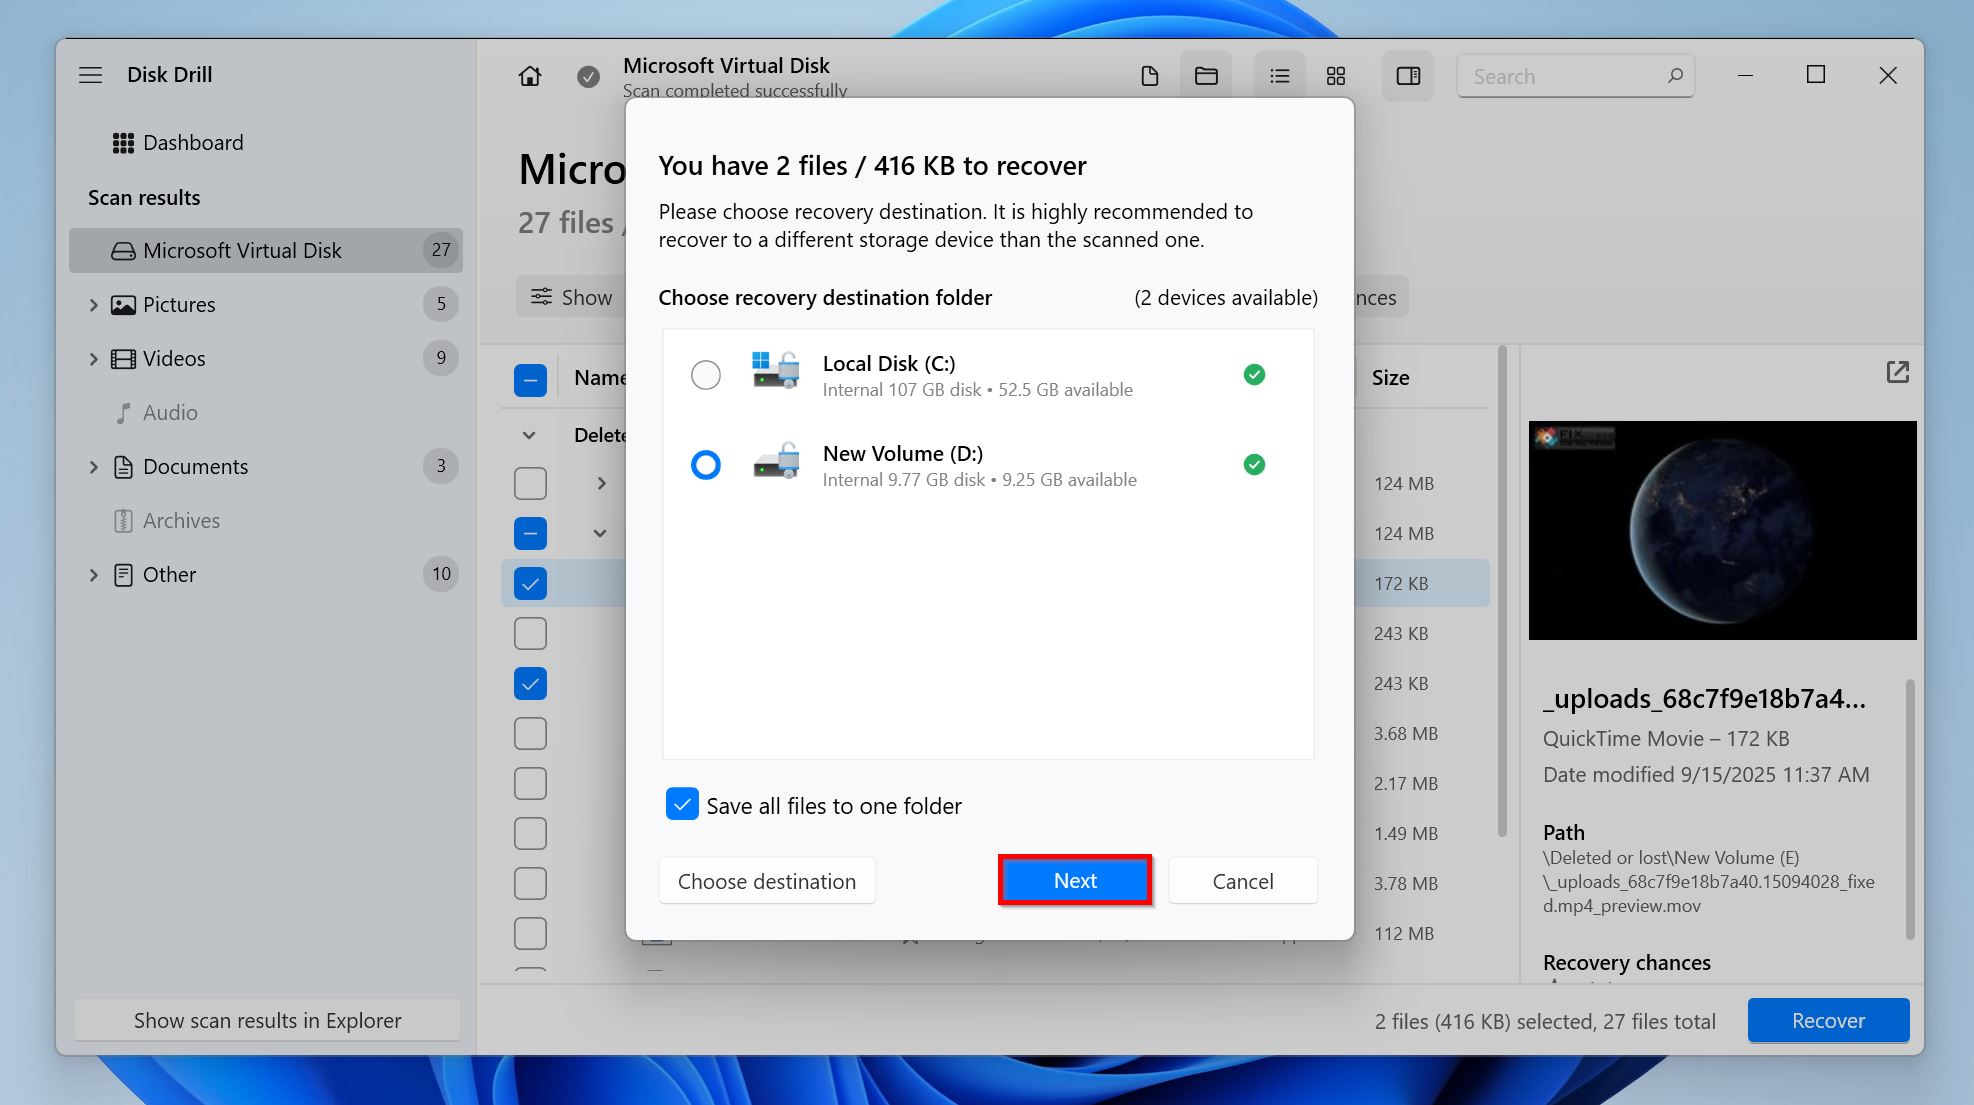
- Choose a recovery destination for the files and click Next.
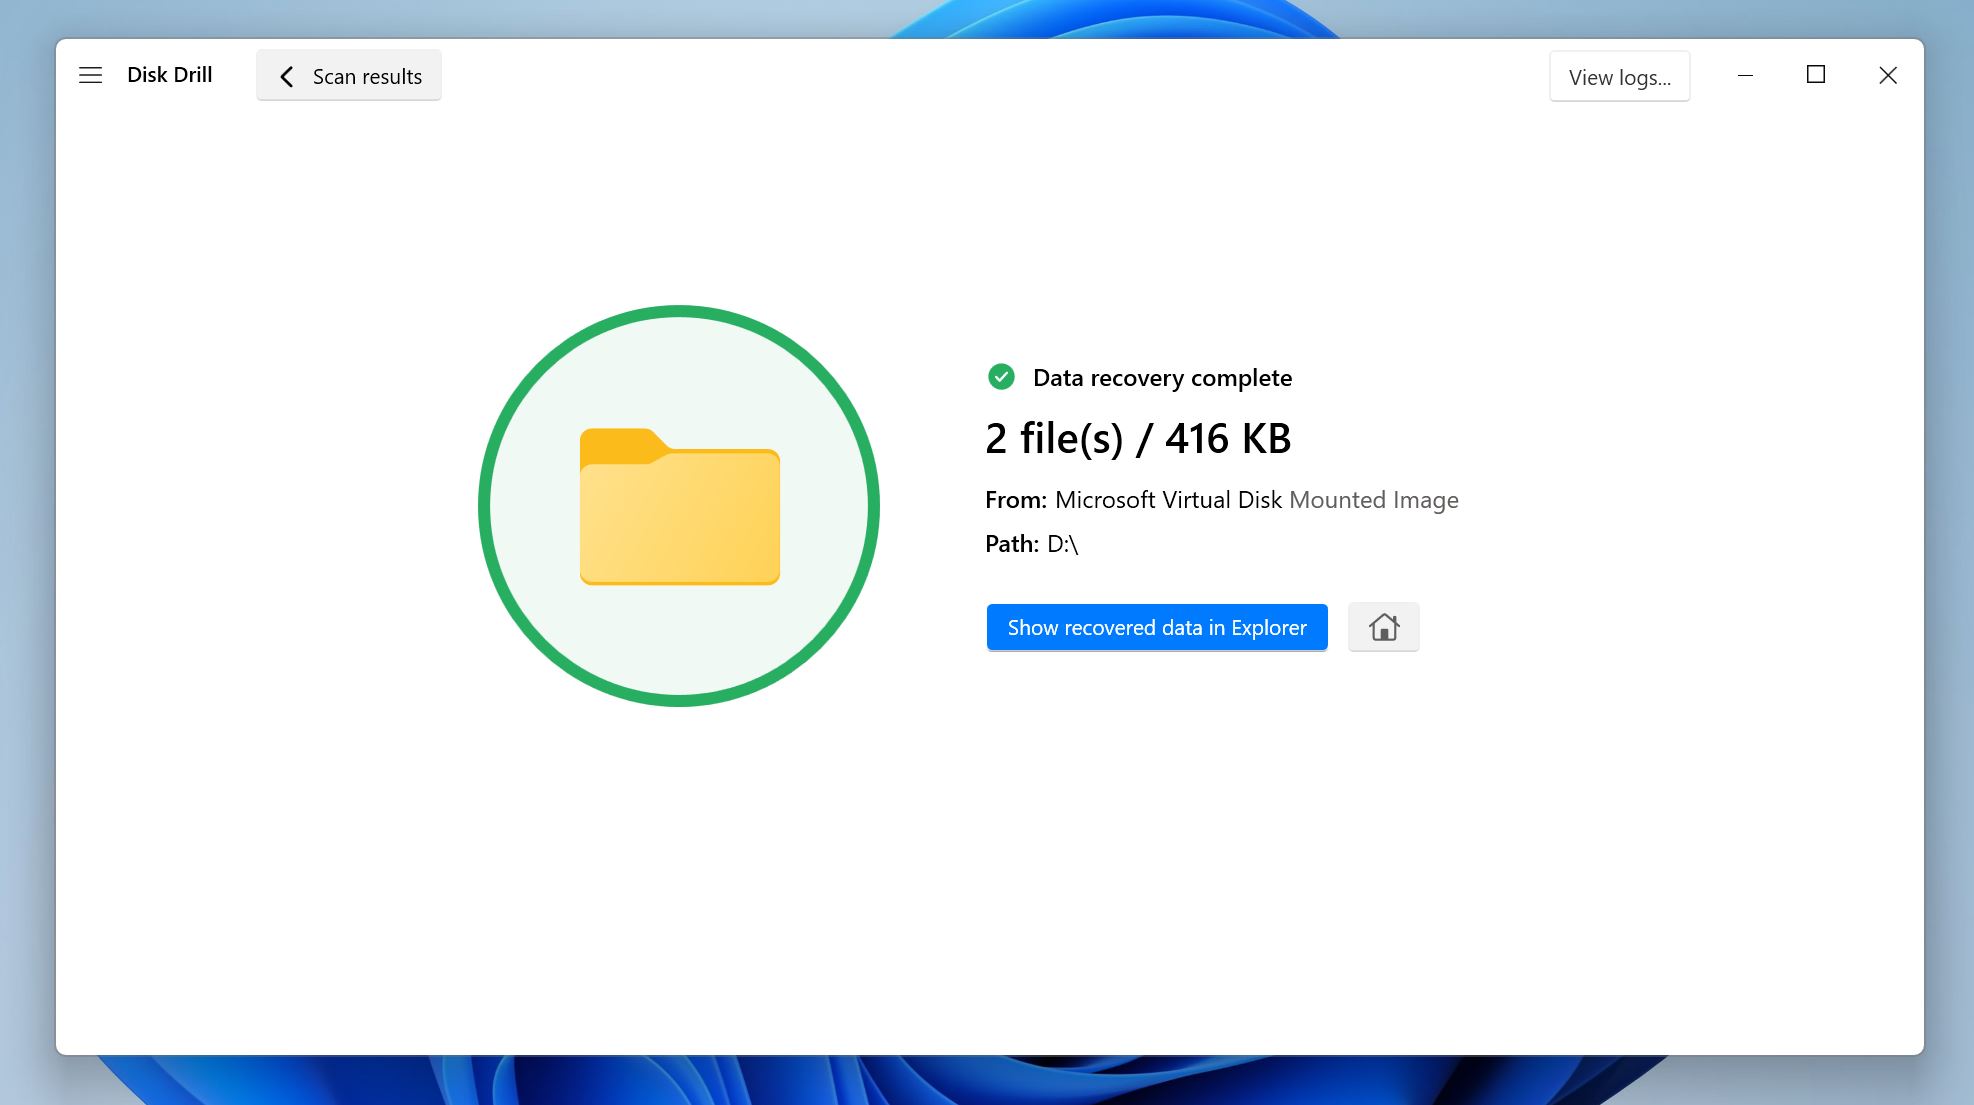
- Disk Drill will recover the selected files.
Option 2: Contact a Data Recovery Service
If your USB drive is physically damaged, or it doesn’t show up in Disk Management (even if it does, the storage capacity is incorrect), contact a data recovery service to recover the USB flash drive that’s not recognized. While they’re expensive, professional data recovery services stand the highest chances of recovering your data.
Here’s what to expect when availing the services of a professional data recovery company:
- Contact the data recovery company and explain your data loss scenario. Most companies have a 24*7 hotline you can use for emergencies.
- Ship the USB drive or drop it off at a collection center.
- The company will analyze your flash drive, state the amount of data that can be recovered, and get back to you with a quote.
- You can then decide to proceed or not.
- If you do, then the data recovery company will recover your data and ship it to you on a new drive.
4 Repair Techniques to Make the USB Drive Recognizable Again
Once you’ve tried basic troubleshooting and recovered your data, it’s time to repair the unrecognized USB drive. One of the 5 fixes listed below should do the job. Attempt them in the order in which they’re listed, since the later ones delete your data.
Here’s how to recover a USB drive that’s not recognized:
Method 1: Reassign The Drive Letter
A missing or conflicting drive letter (C:, E:, etc.) is one of the most common culprits behind a USB drive not showing up in File Explorer while being perfectly visible in Disk Management.
To fix this, assign a drive letter to the unrecognized USB drive. Here’s how you do this:
- Right-click the Start button, and click on Disk Management.
- Find the USB drive in the list of storage drives, right-click it, and select Change Drive Letter and Paths.
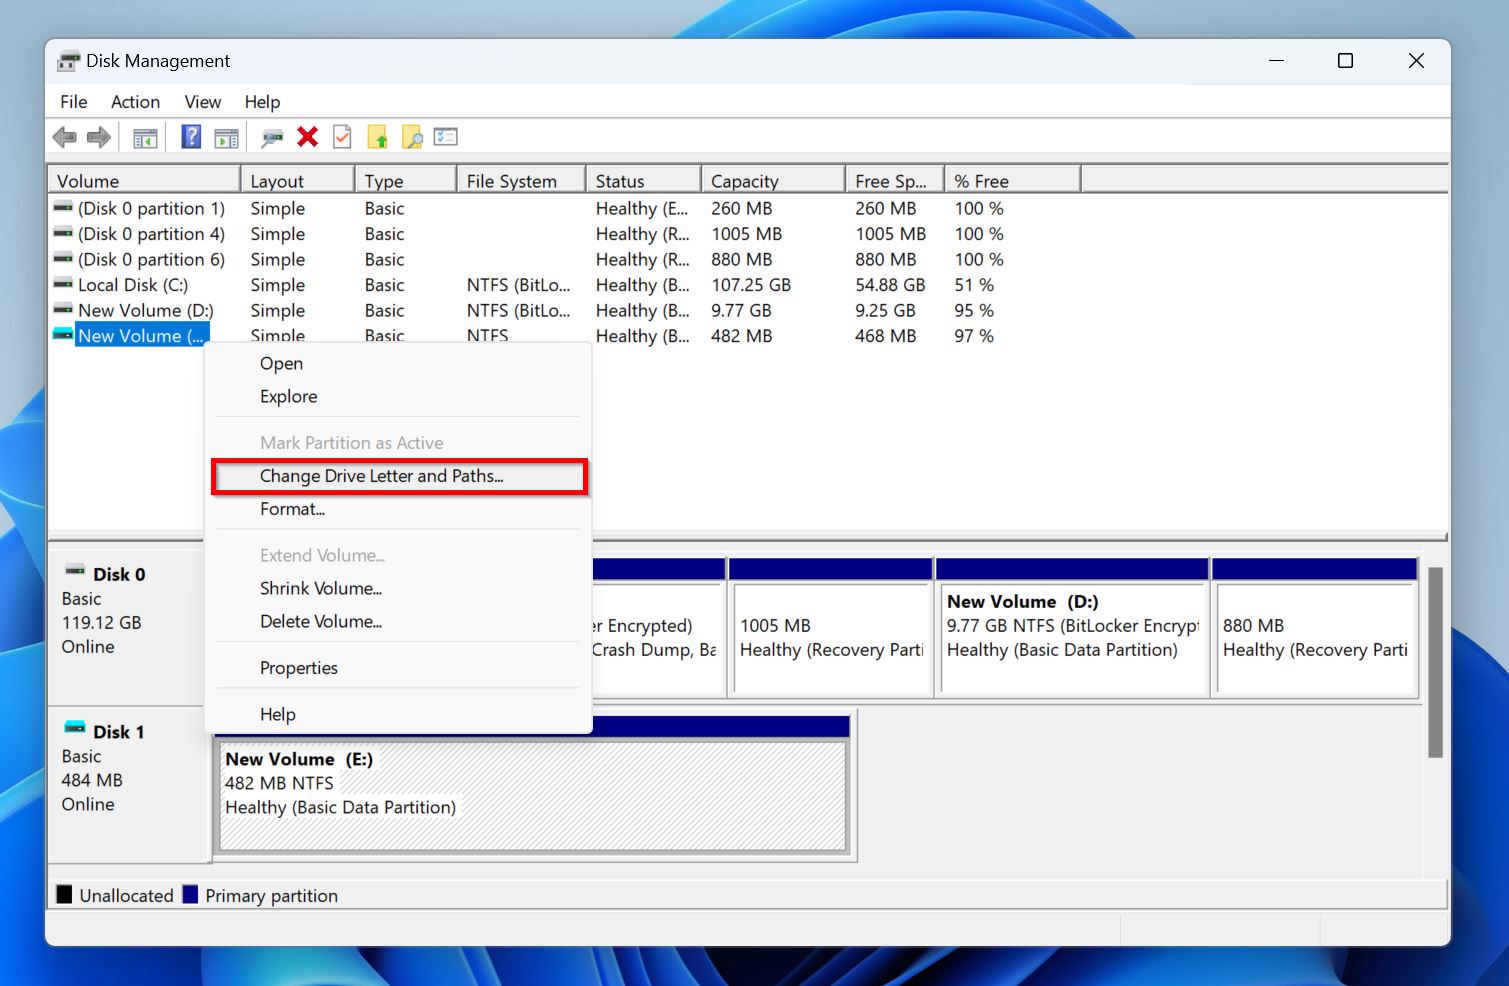
- Click Add if the drive letter is missing, or Change to assign a non-conflicting one, in the next prompt.
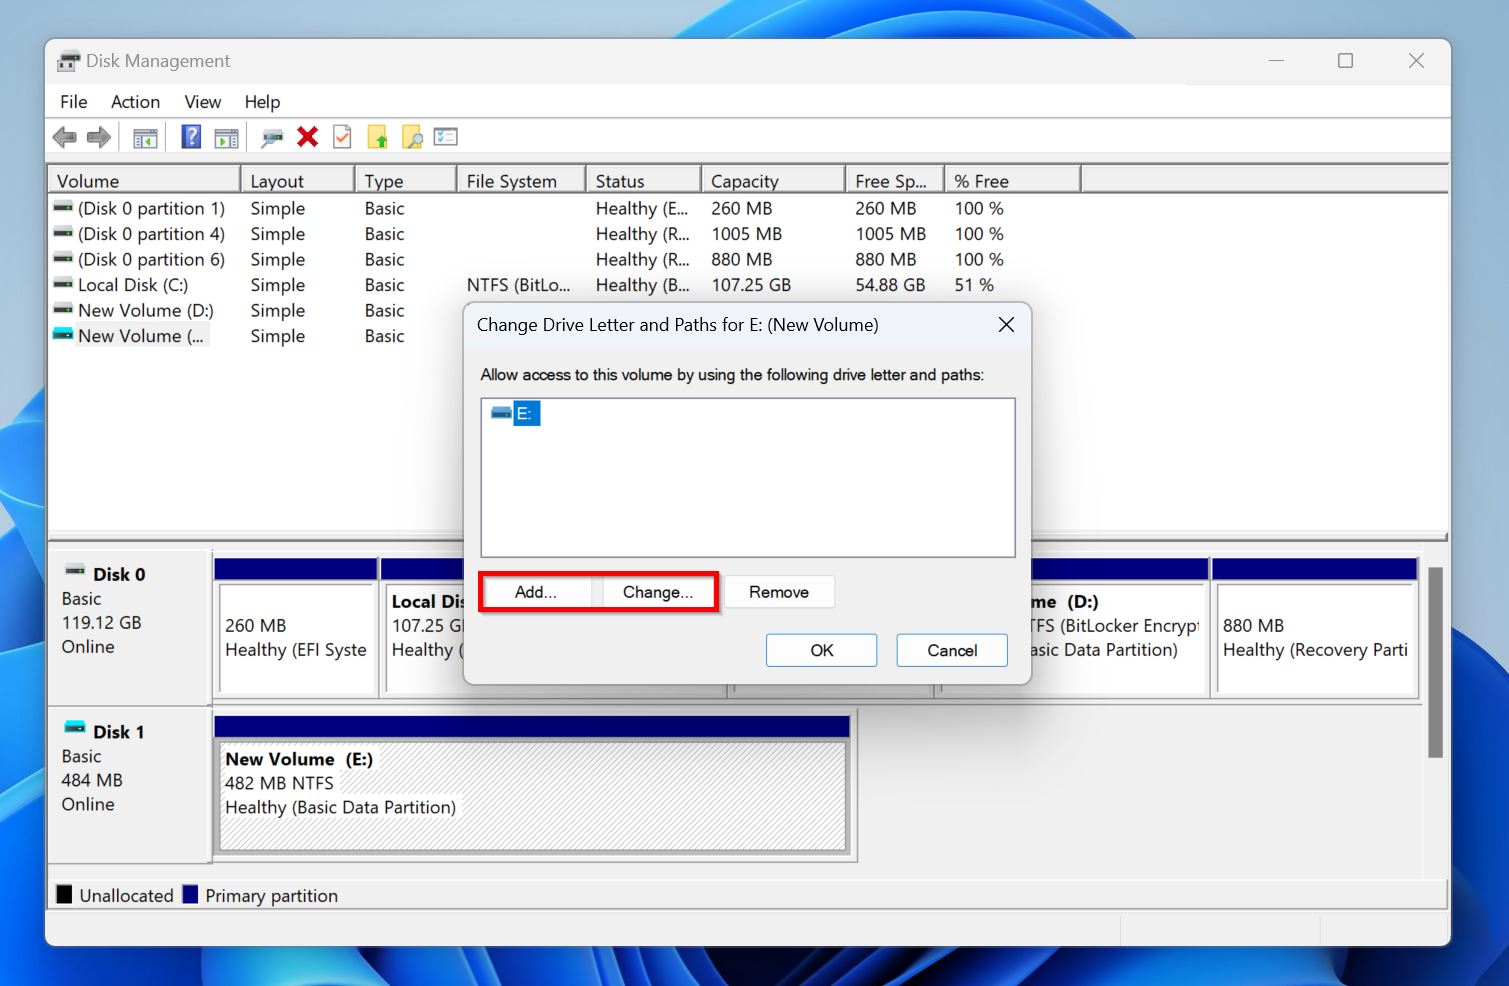
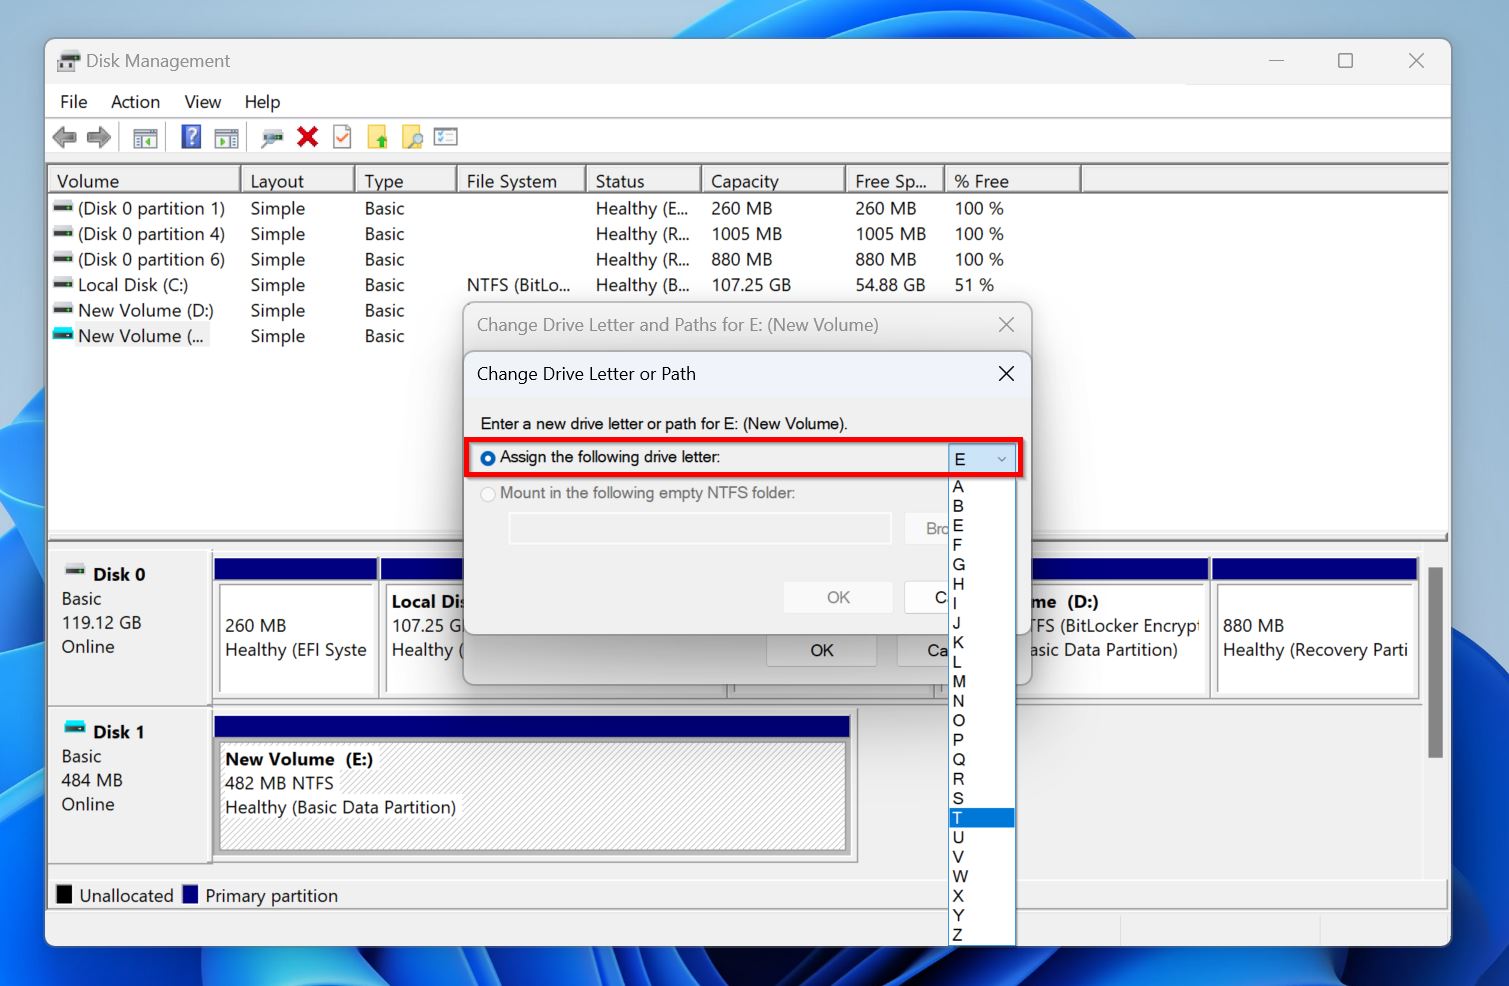
- Choose a drive letter from the drop-down menu next to Assign the following drive letter, and click OK.
If everything goes well, you’ll see the AutoPlay notification on your PC’s screen. If you don’t, open File Explorer and see if the USB drive appears there, before moving on to the next fixes.
Method 2: Disable USB Selective Suspend
The USB Selective Suspend is a power management feature on Windows that puts idle USB devices into a low-power state. However, it can often cause USB devices to become unresponsive or unrecognized. Try disabling this feature and see if Windows begins recognizing your USB drive again.
Here’s how to disable USB Selective Suspend on Windows:
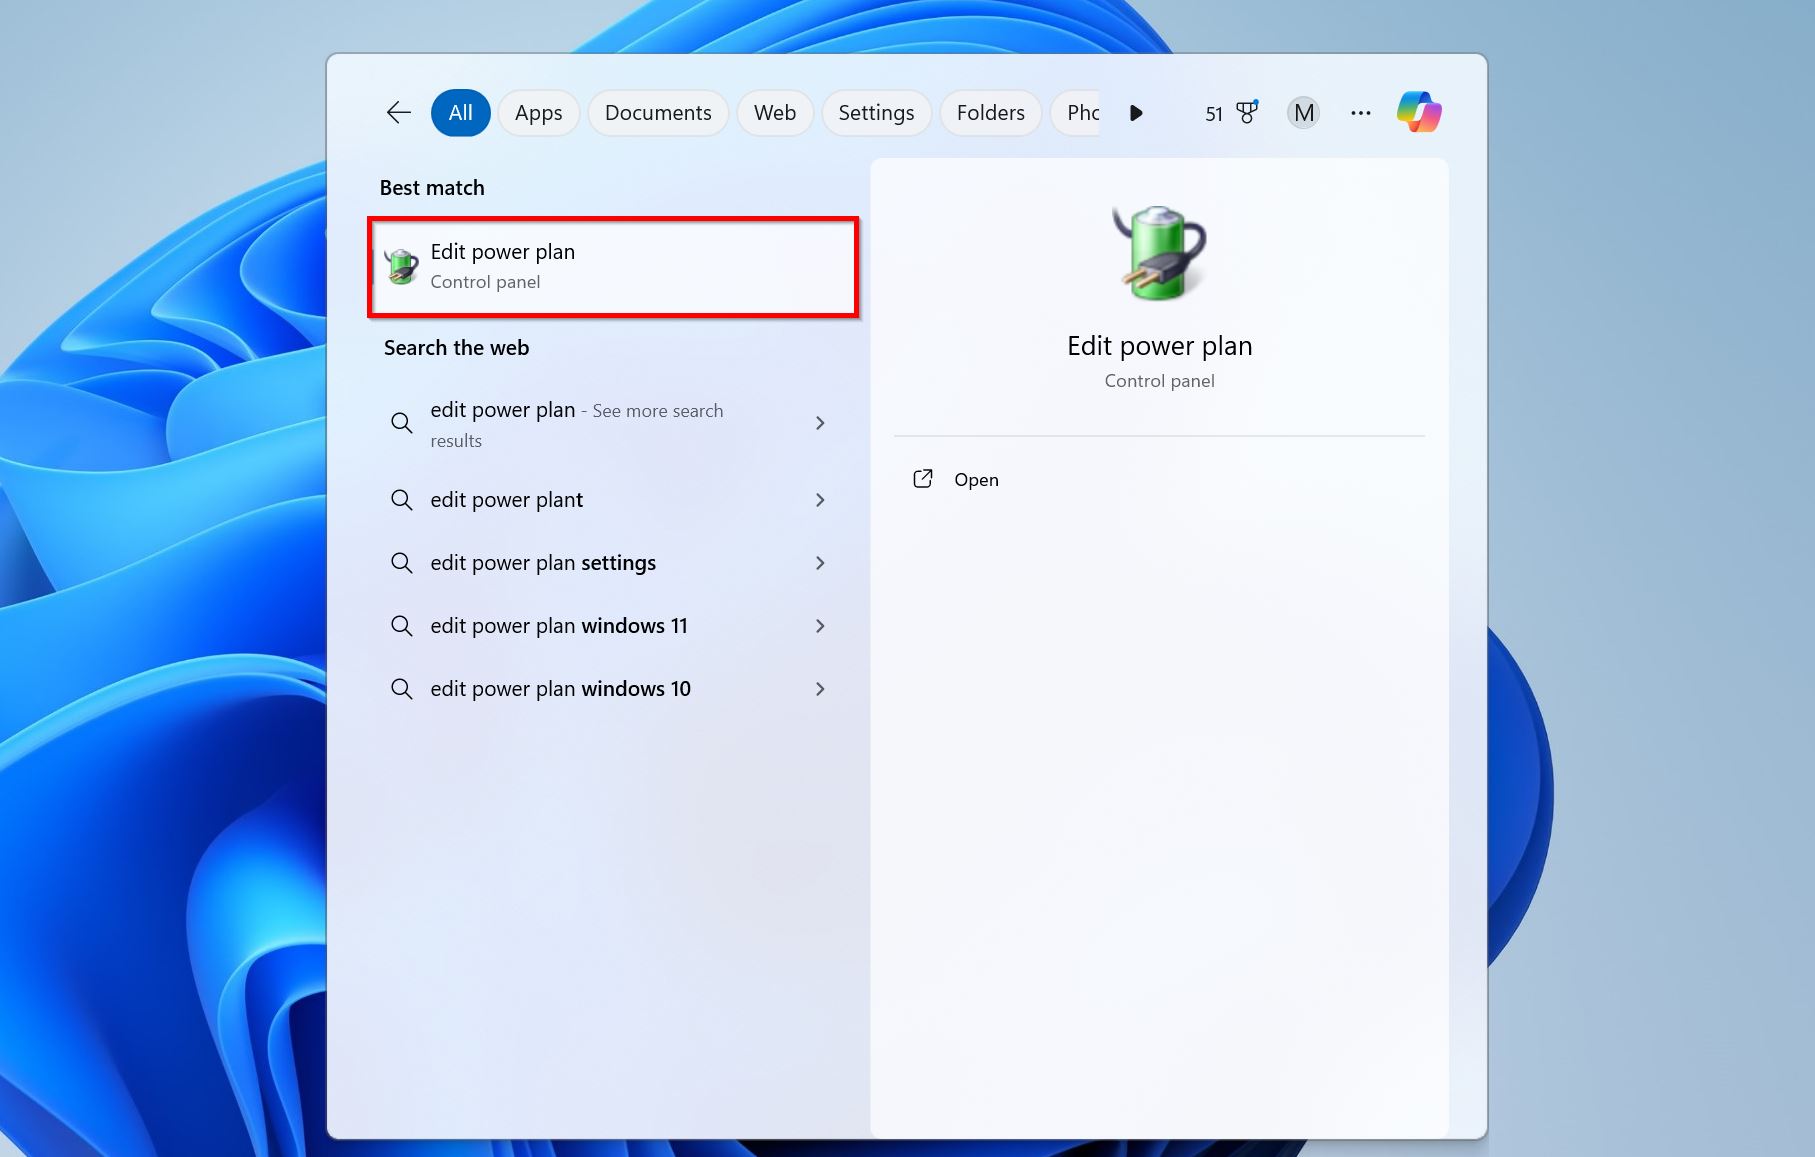
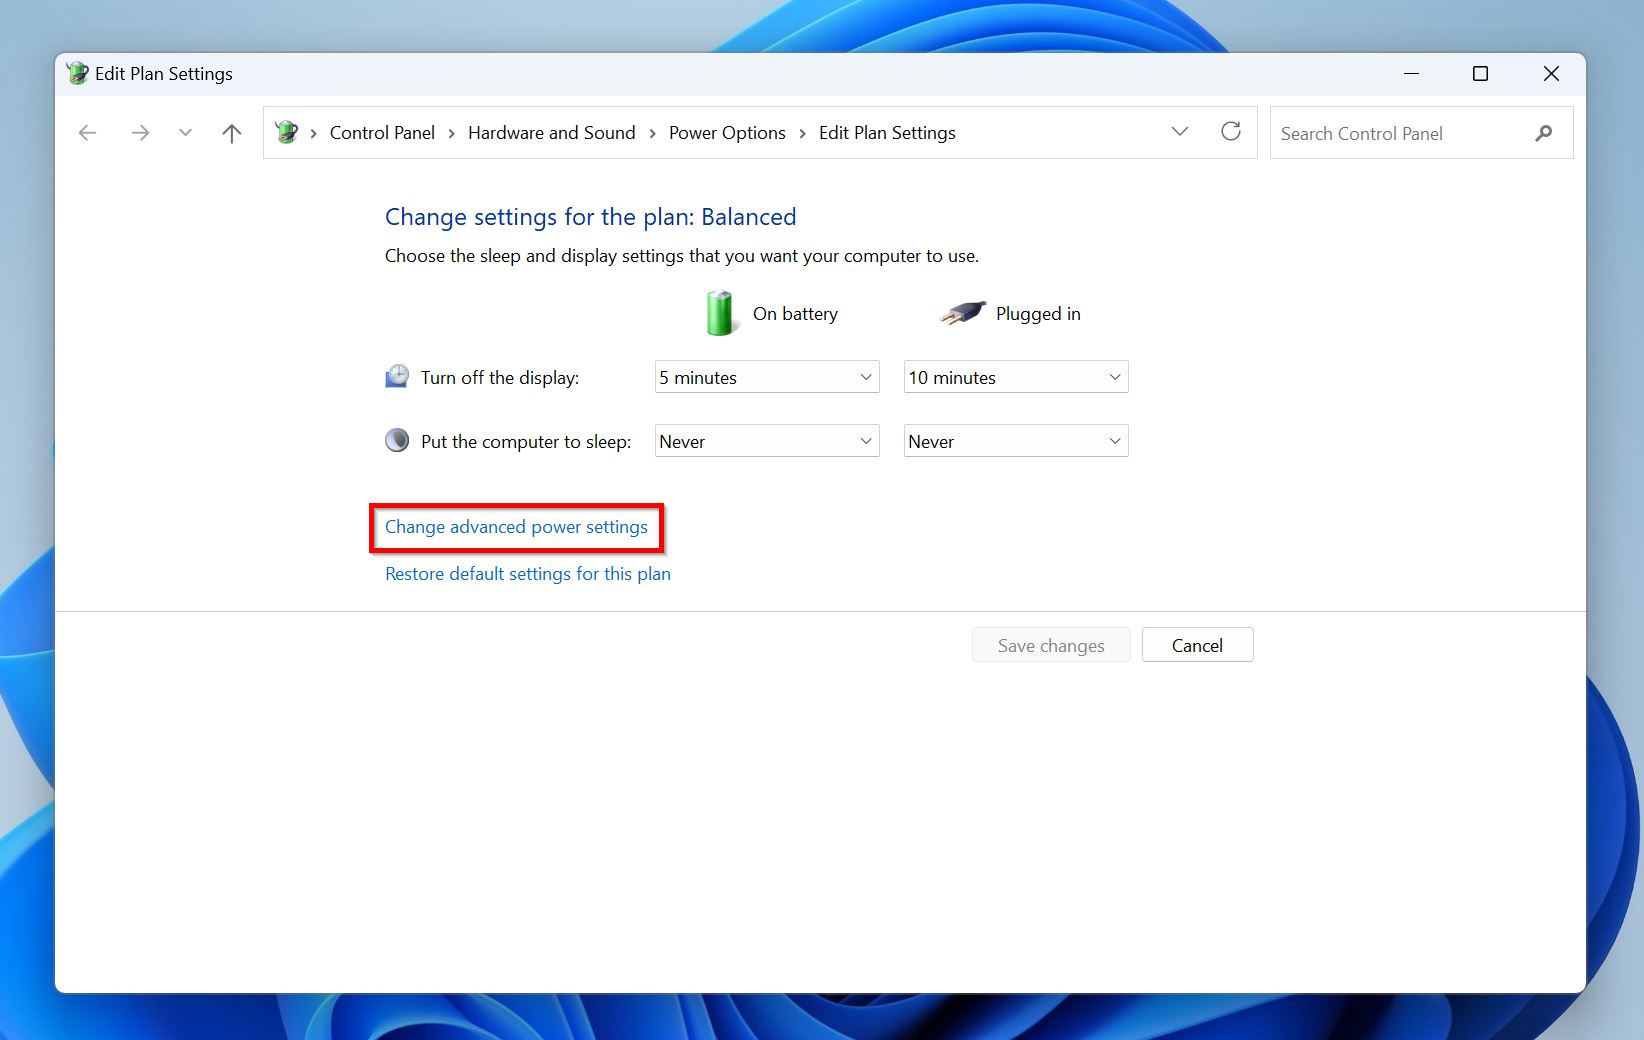
- Search for “Edit power plan” in Windows Search (Windows Key + S), and click on the Edit power plan option in the search results.
- Click on Change advanced power settings.
- Expand USB Settings, and further expand the USB selective suspend setting.
- Click Setting, then choose Disabled from the drop-down menu.
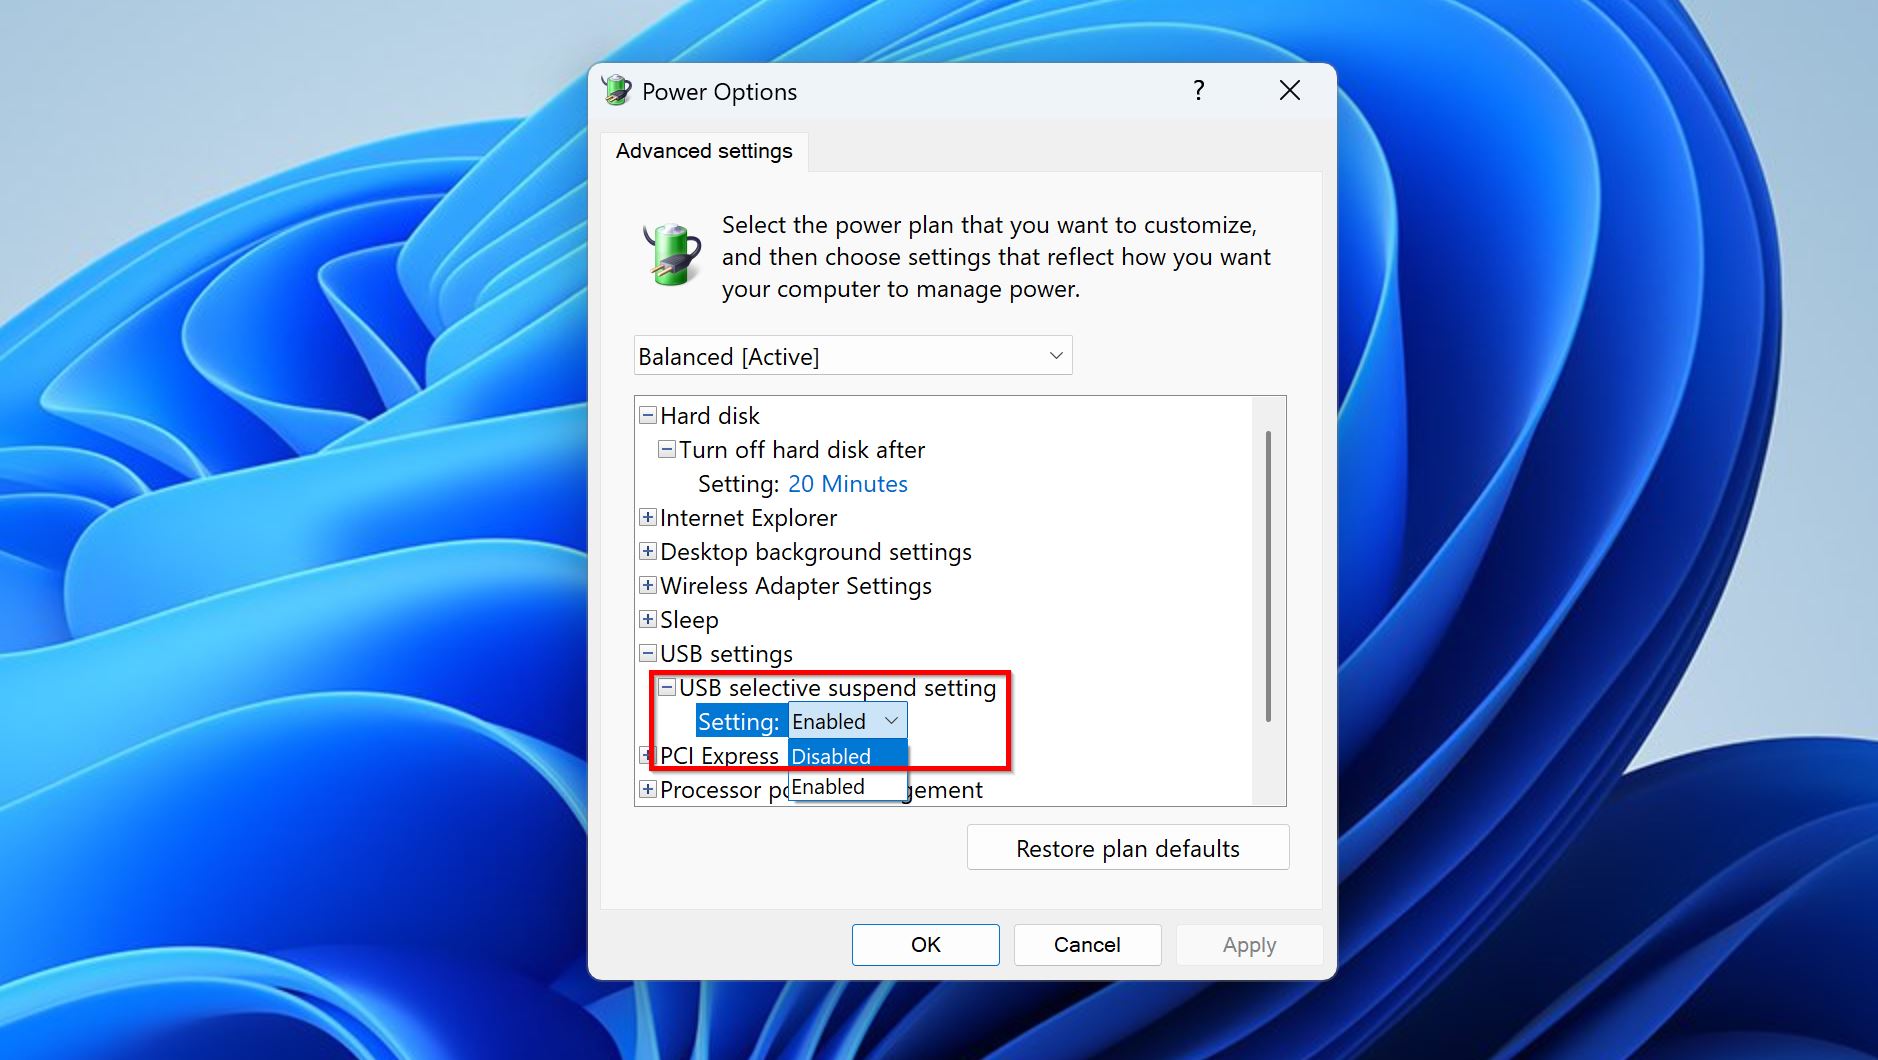
- Click Apply, then OK.

Reinsert the USB drive into your PC, and check if it appears in File Explorer.
Method 3: Use TestDisk to Rebuild a Corrupt Partition Table
A corrupt, or lost partition table is another common reason why Windows isn’t recognizing your USB drive. Since there’s no built-in way to recover deleted partitions in Windows with the previous data intact, you’ll have to rely on third-party programs.
We suggest using TestDisk—one of the best partition recovery tools available on the web. It’s open-source, lightweight, and free to use, but it doesn’t have a GUI. You’ll have to navigate TestDisk’s command-line-based UI using your keyboard, but don’t let that deter you from using the tool. You shouldn’t face any issues as long as you closely follow the steps below:
- Download TestDisk and extract the ZIP file. It’s a portable tool, so you don’t need to install it.
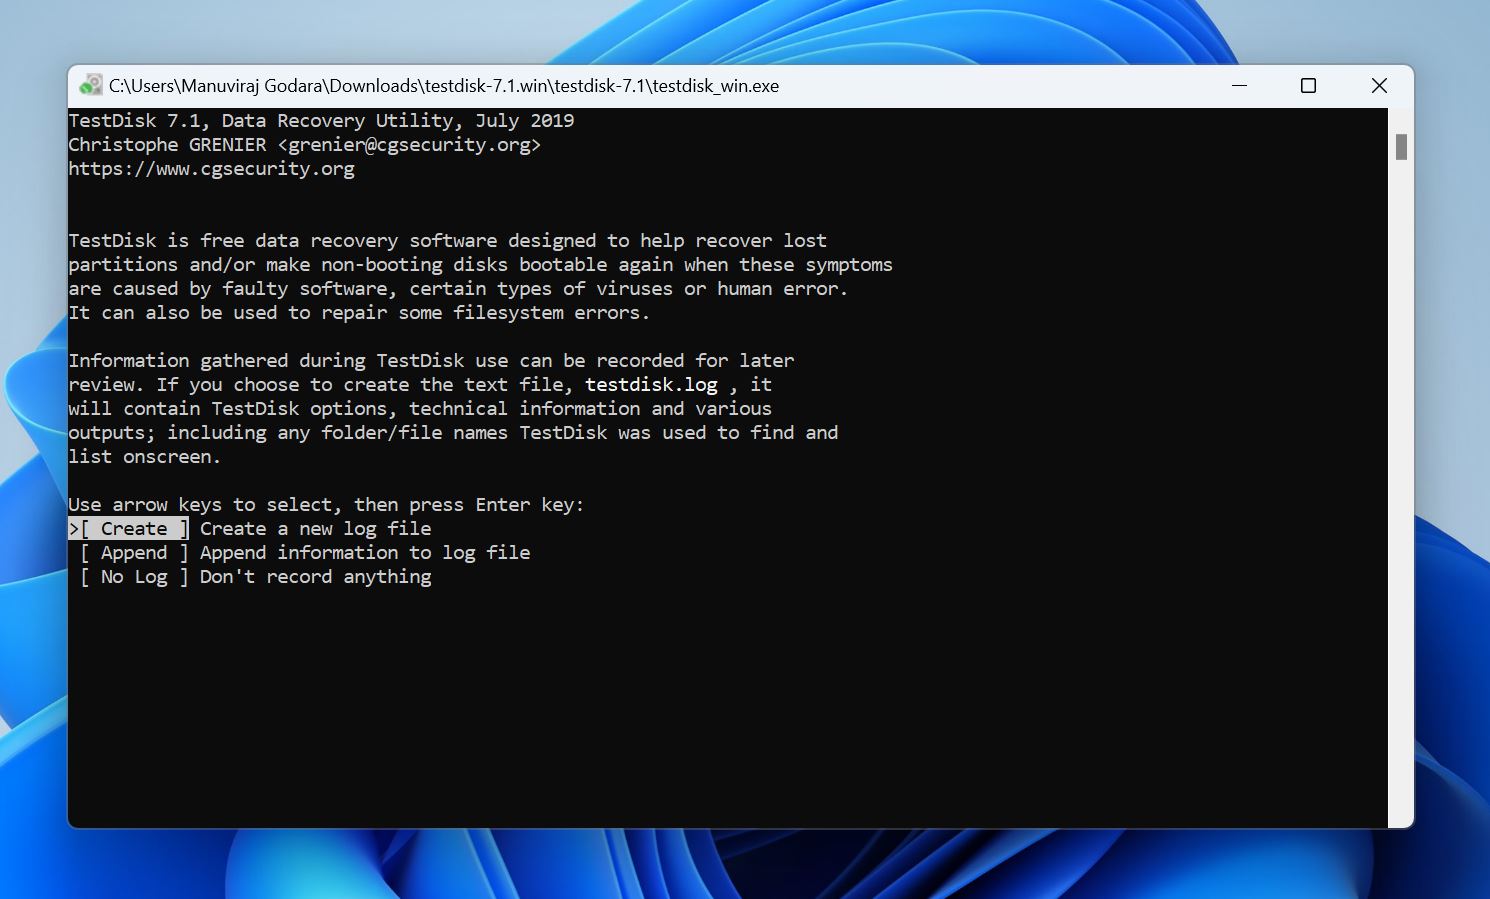
- Open TestDisk by double-clicking the testdisk_win.exe file.
- Choose whether you want to create a log file or not—use the Up and Down arrow keys to highlight an option, and the Enter key to confirm. The log file doesn’t affect the actual partition rebuilding process.
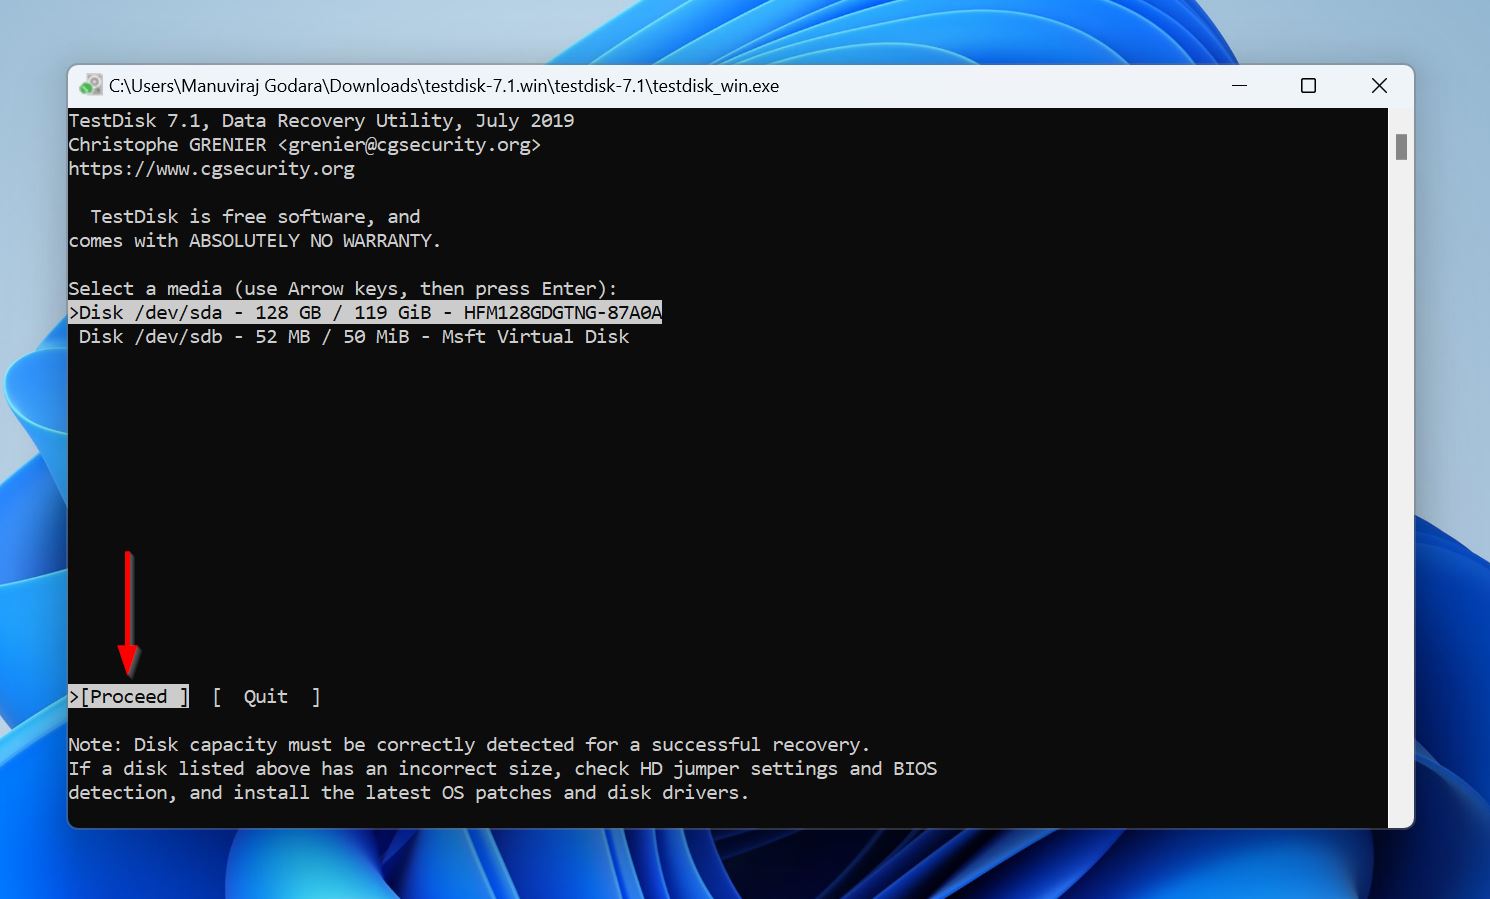
- Select the USB drive from the storage drives list, and press Enter.
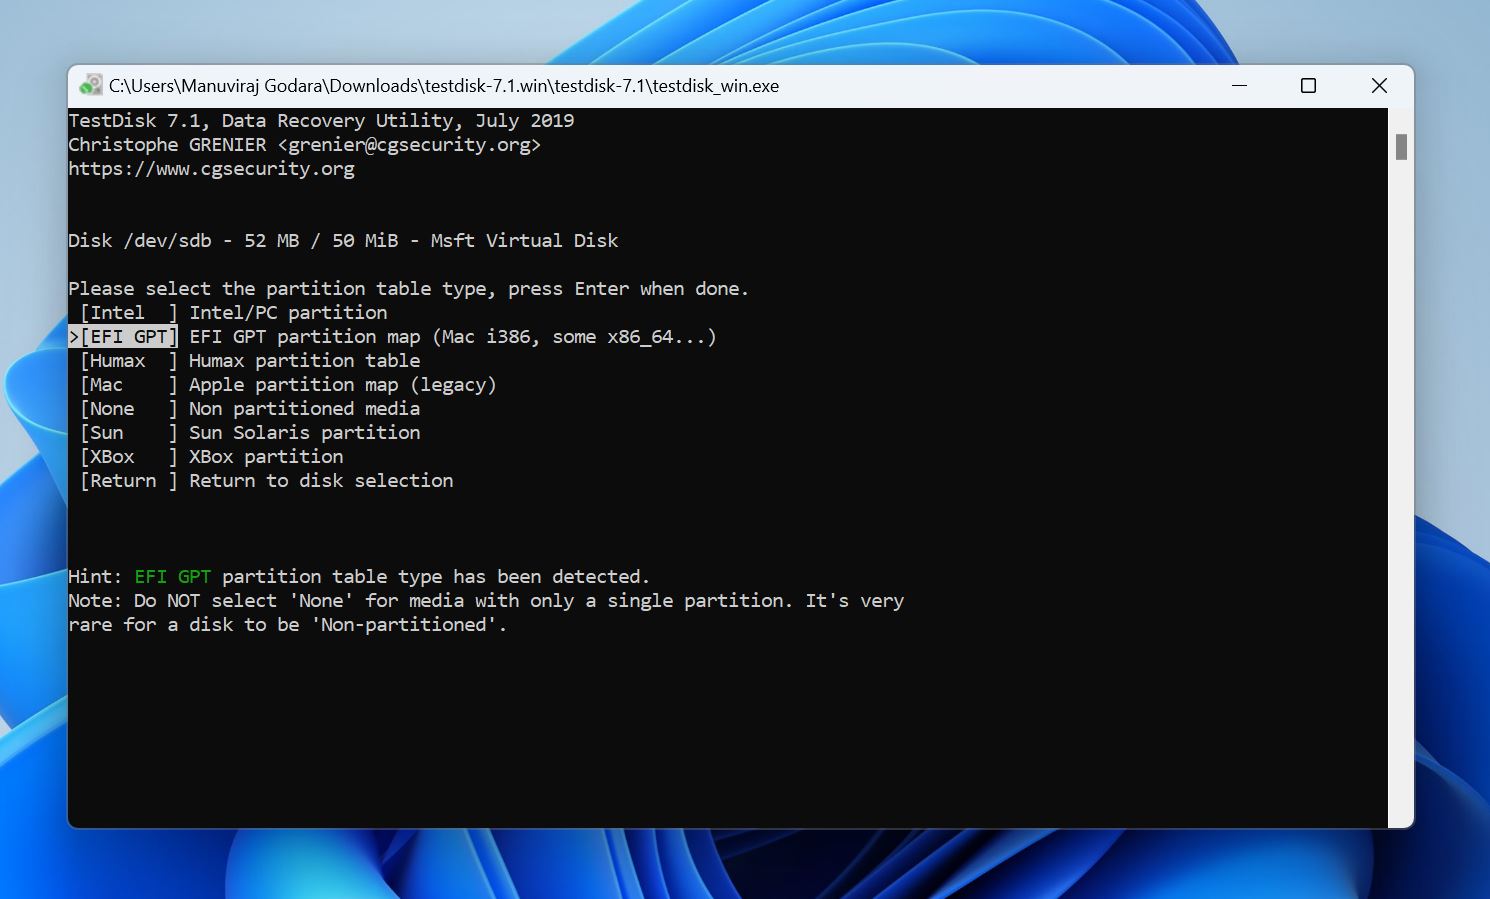
- Select the partition table and press Enter. TestDisk auto-detects this, so it’s best to simply press Enter on the screen unless you’re sure the USB drive uses some other partition table.
- Select Analyse and press Enter.

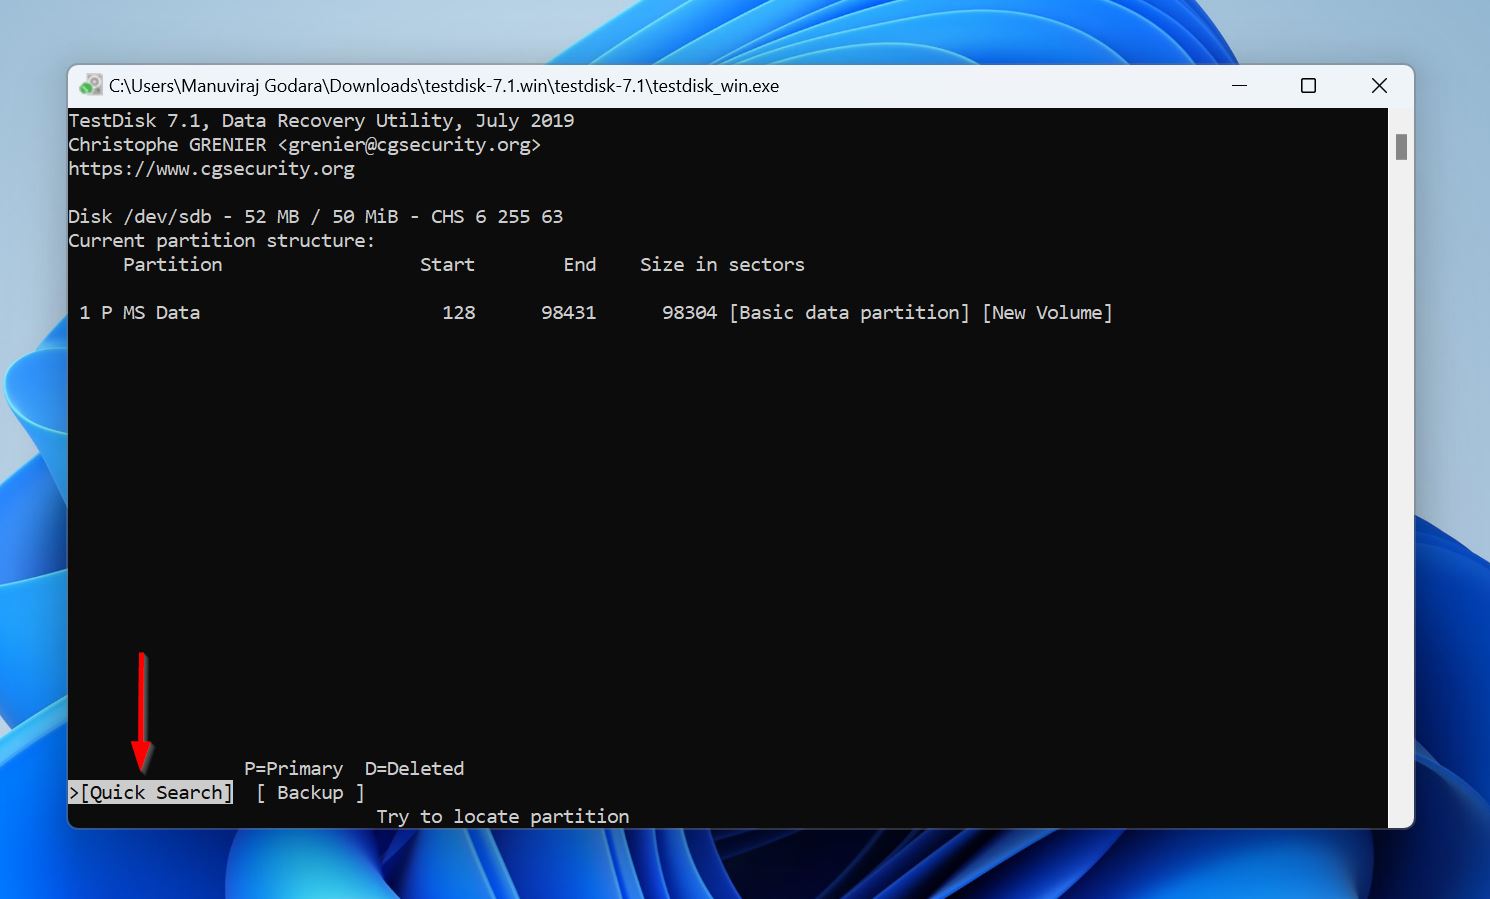
- Select Quick Search and press Enter.
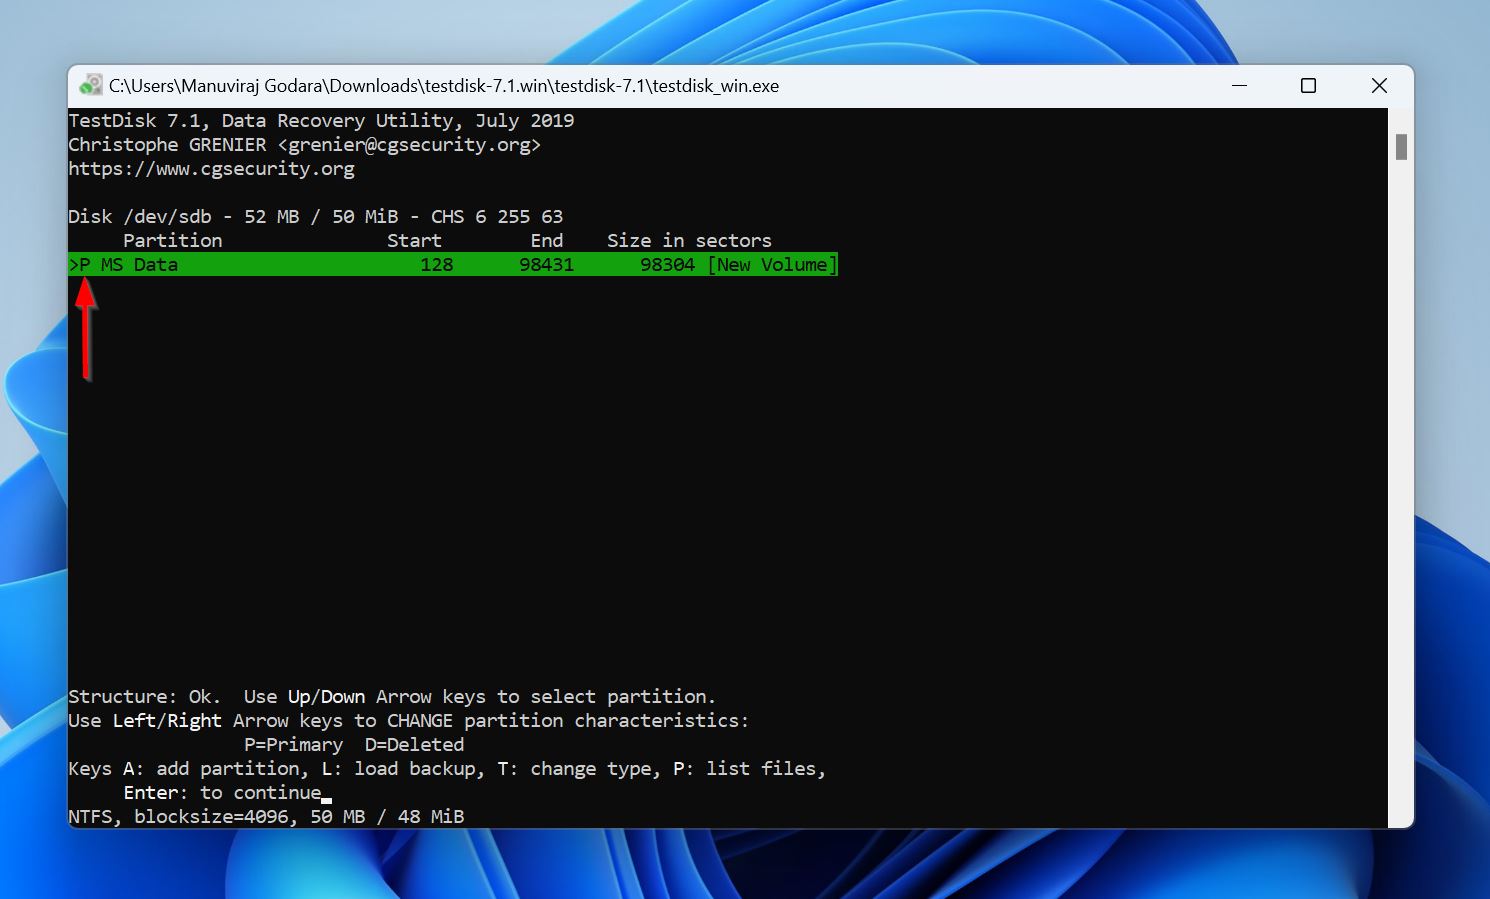
- You’ll see a list of partitions. If TestDisk finds a deleted partition, it’ll have the D prefix before it. Navigate to it, and use the Left and Right arrow keys to cycle between the prefixes—ensure the prefix is set to P. Then, press Enter.
- Now, if TestDisk didn’t find the lost/deleted partition in the previous scan, select the Deeper Scan option, and follow Step 8 again. Else, select Write and press Enter.
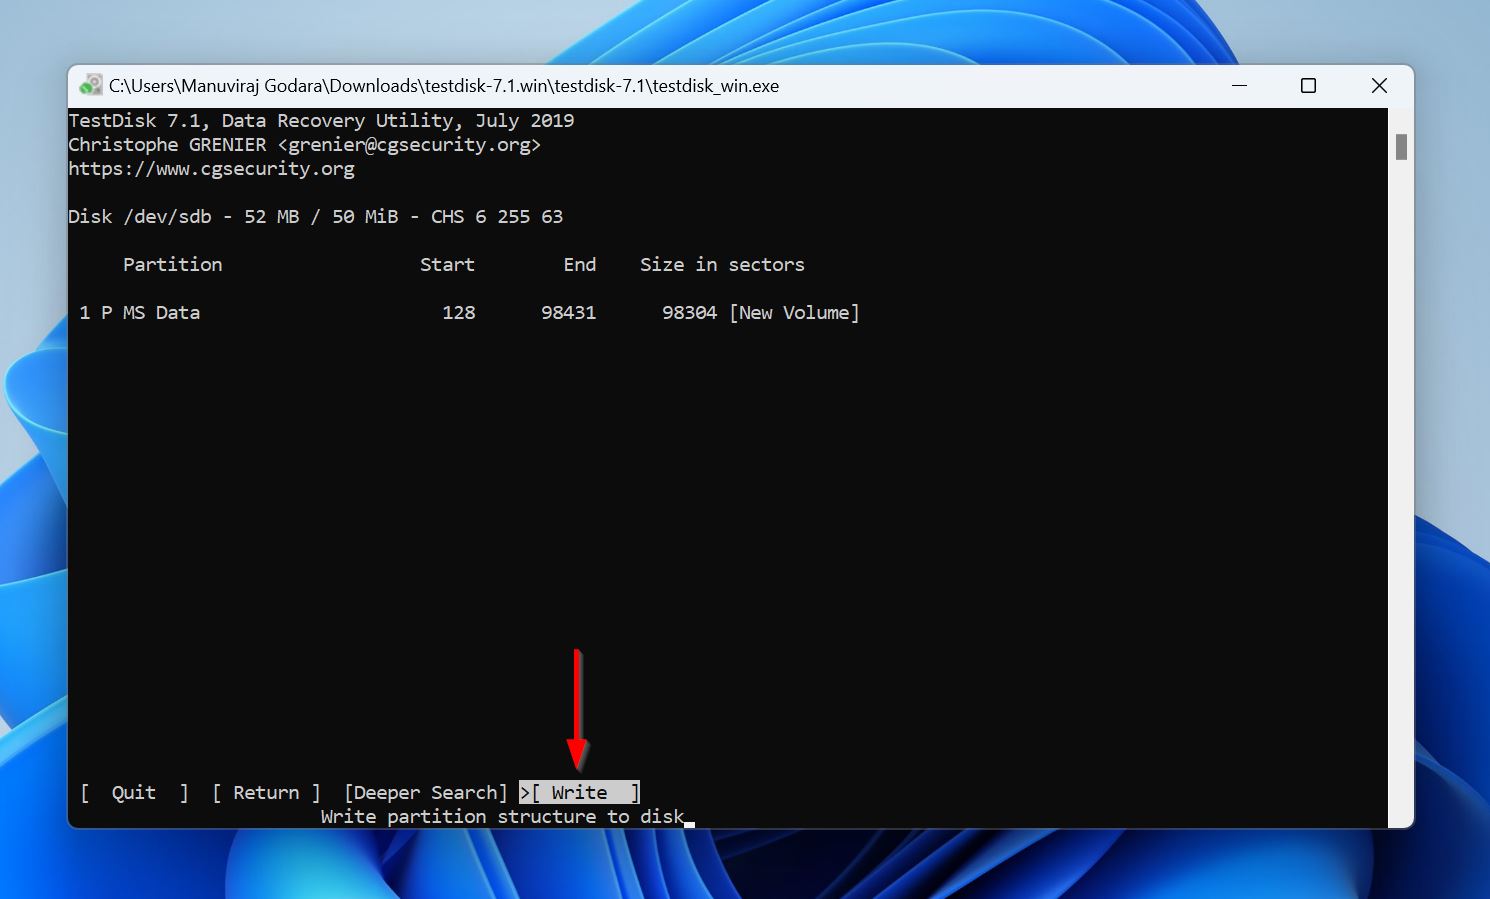
- TestDisk will rebuild the lost partition with the previous data intact. This should make the USB drive reappear in File Explorer.
Method 4: Format USB as a Last Resort
If none of the previous methods worked, the only option is to format the USB drive. It’ll fix any minor logical issues that resulted in the drive becoming unrecognized. Formatting the USB drive erases all its data, so recover your files beforehand.
Since the USB drive is unrecognized, you can’t format it in File Explorer. Instead, you’ll have to use Disk Management:
- Right-click the Start button and choose Disk Management.
- Right-click the unrecognized USB drive and click on Format.
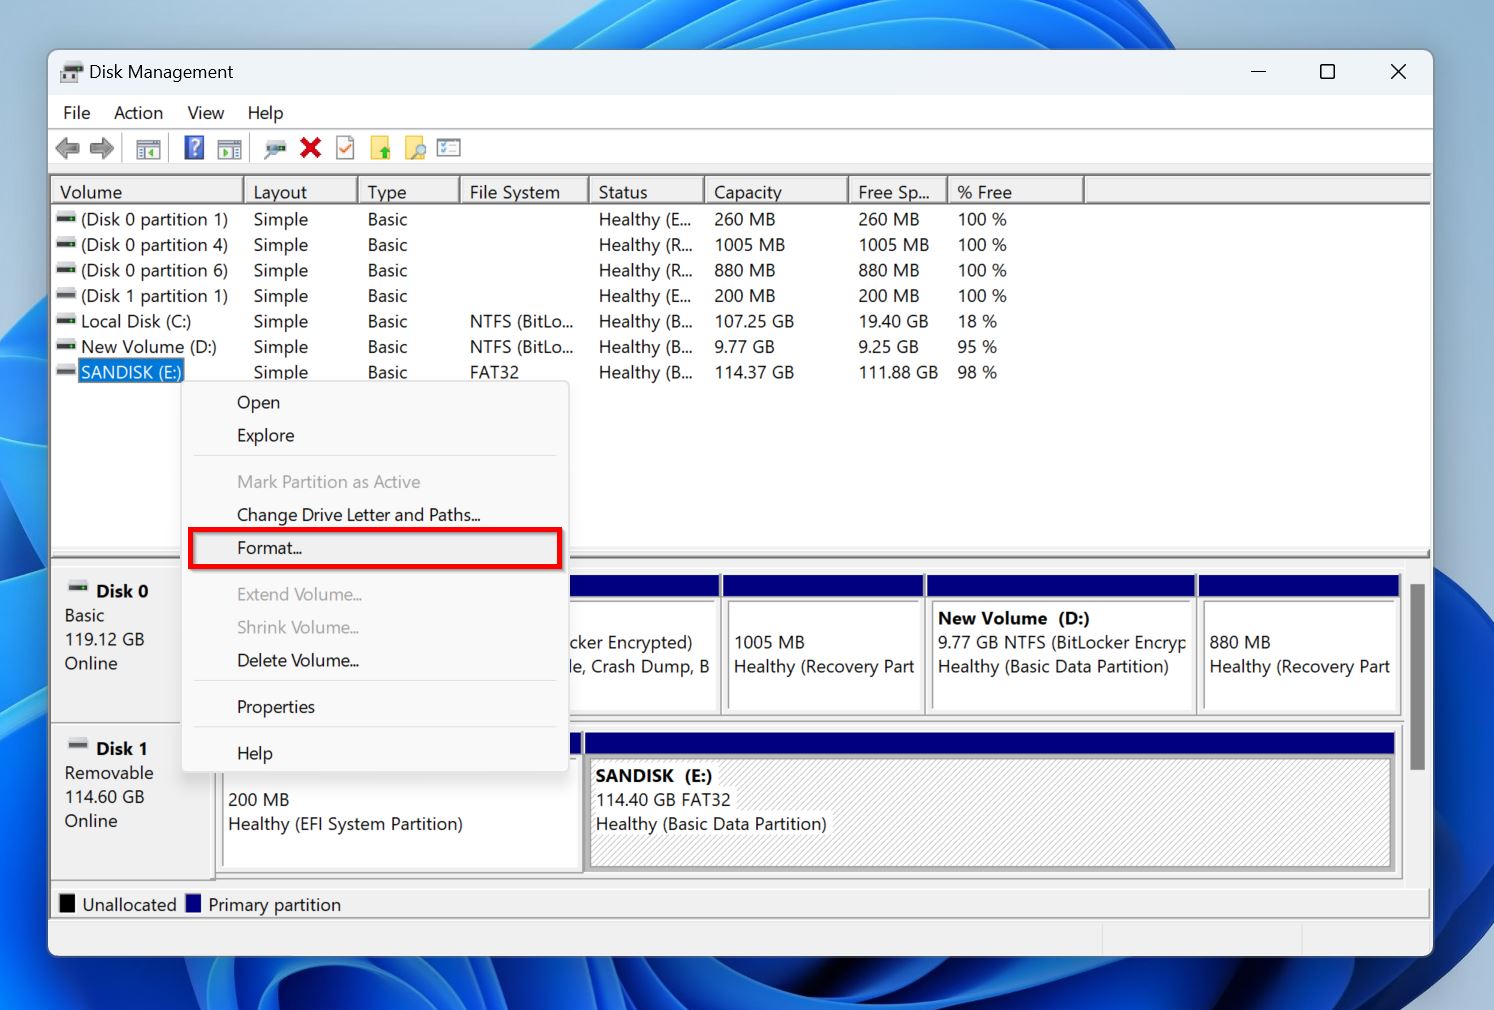
- Choose a file system from the drop-down menu, and click OK.

- Windows will format the USB drive.
Misleading “Fixes” You Should Avoid
The internet is filled with useless, and sometimes downright harmful advice on fixing unrecognized USB drives. Avoid these methods if you want to protect your data and prevent further damage to the USB drive:
- 🛠️ Fixing a physically damaged flash drive by opening the case. The USB drive’s internal components are delicate, and require specialized clean room environments for safe handling. At home, the internal components are exposed to hazards like static electricity, dust, and moisture.
- 🪄 Miracle third-party repair tools. Articles like this wouldn’t exist if there were tools that could magically fix unrecognized USB drives in an instant. These shady tools could wipe out all your data, display fake progress bars, or worse, be malware in disguise.
- 🧹 Using Registry “Cleaners.” Cleaning your PC’s registry isn’t going to magically fix the unrecognized USB drive. In fact, it may create more conflicts, disable USB functionality system-wide, and cause Windows boot issues.
Why USB Flash Drives Become Unrecognized
Several reasons lead to an unrecognized USB drive. Knowing what caused the problem helps save time because you can skip irrelevant fixes and attempt the one most likely to work in your specific case. Here’s a table to help you out:
| Cause | Description | Suggested Fix |
| File System Corruption | The file system determines how data is organized and accessed on a storage drive. If the file system is damaged—due to improper ejection, malware, or wear and tear—Windows won’t recognize the flash drive. | Recover your data, then format the USB drive. |
| Driver Problems | Outdated or corrupted USB drivers can prevent your OS and the USB drive from communicating properly. | Update the USB drivers using Device Manager. |
| Lost Partitions | The USB drive’s partition could get corrupted, or “lost” due to improper usage, or wear and tear. | Recover the corrupt partition using TestDisk. |
| Power Supply Issues | Insufficient power delivery to the USB drive will prevent it from being detected by your PC. This usually happens in USB hubs or malfunctioning ports. | Connect the USB drive directly, or use an actively powered USB hub. |
| Malware | Malware can not only wipe out your USB drive, but also damage its partition table and file system, leaving it unrecognizable by Windows. | Scan the drive using an antivirus program, or quick format the USB drive. Recover your data from the drive after formatting (data can usually be recovered after performing a quick format) |
| Drive Letter Conflicts | A missing or conflicting drive letter will prevent the USB drive from showing up in File Explorer. | Assign a new drive letter to the USB drive using Disk Management. |
| Physical Damage | Hardware level damage due to heat, moisture, power surges, or physical shock. | Contact a professional data recovery service. |
| OS Glitches | Bugs or power-saving settings in Windows can prevent the USB drive from being recognized | Disable the USB selective suspend setting in Windows. |
6 Common Symptoms of an Unrecognized USB Drive
In addition to the USB drive simply being inaccessible, other symptoms, too, indicate that the USB drive is not recognized by Windows. Here are some signs to watch out for:
- ⚠️ Error Notifications. Watch out for error messages like “USB Device not recognized: One of the devices attached to this computer has malfunctioned and Windows does not recognize it” when trying to access the flash drive. You may also see messages prompting you to format the USB drive, or informing you that the drive “does not contain a recognized file system.”
- 📁 The USB drive doesn’t show up in File Explorer. Sometimes there may not be any error message, but the drive simply won’t appear in File Explorer. In this situation, check for the drive in Disk Management—if it’s there, it means Windows detects the USB drive, but is unable to recognize it.
- ❌ The USB drive is visible in Device Manager but isn’t accessible. The Device Manager lets you manage the hardware devices connected to your PC. The USB drive may show up in Device Manager, but you can’t access it using File Explorer. This is another clear sign that Windows detects the USB drive but can’t recognize it.
- ⚙️ Disk Management displays the pen drive as RAW, or 0 Bytes. Open Disk Management, and look for the USB drive. It may show up as RAW, or its storage capacity will be listed as 0 Bytes. This usually indicates a serious issue with the USB drive—probably hardware-related.
- ⛓️💥 Random disconnects and freezes. Notice if the USB drive randomly disconnects and reconnects, or if your OS freezes when you connect it. This could indicate physical issues with the drive or the USB port, or faulty drivers, leading Windows to not recognize the USB drive.
- 🔊 No sounds when plugged in. Windows plays a sound when new devices are plugged in. If you don’t hear the sound, it’s likely Windows hasn’t detected the USB drive at all.
Frequently Asked Questions
How do I know if the drive is physically dead?
A physically dead drive won’t show up anywhere—File Explorer, Device Manager, BIOS. and Disk Management. Try connecting it to other PCs and switching between USB 2.0 and USB 3.0 ports, and see if it’s detected. If not, the USB drive is dead.
Why is Linux better for USB troubleshooting?
Linux is better for USB troubleshooting because it can detect USB drives that Windows can’t, provides low-level system logs, and has more native tools specifically aimed at diagnosing USB drives.
What should I do immediately after my USB drive stops being recognized?
Here’s what you should do immediately after your USB drive stops being recognized:
- Avoid reinserting the drive repeatedly. Instead, reboot your PC and check if the USB drive appears in File Explorer.
- In case it doesn’t, try inserting it into another USB port.
- Check if the drive appears in Disk Management. If yes, attempt data recovery ASAP, then try fixing the drive.
If the drive doesn’t appear in Disk Management, avoid performing DIY data recovery or repairs on it. You’re better off contacting an expert.
Can I fix an unrecognized USB flash drive by formatting it?
Yes, formatting can fix an unrecognized flash drive, but only if the issue was a result of a corrupt/RAW file system, or if Windows prompts you to format the drive when you insert it. It’s best to recover your data beforehand.
Why does my USB work on one computer but not another?
This usually happens when the other computer doesn’t have the relevant drivers, is incompatible with the USB drive’s file system, or the pen drive isn’t assigned a drive letter in that computer.

- 5 publishings
Manuviraj Godara is a professional content writer with over four years of experience, specializing in technology and data recovery topics. His passion for technology began when he got his first computer, sparking a fascination that has never ceased to amaze him. He is also an avid gamer who enjoys spending his free time exploring his favorite music albums and reading. Apart from writing, Manuviraj has a penchant for gaming, motorcycling, and listening to Steely Dan. With his ever-growing expertise in technology, Manuviraj consistently delivers engaging content, helping readers make the most out of their devices and computers.
- Frisco, Texas, United States
Yevgeniy Tolkunov is Hardware Engineer at ACE Data Recovery. Yevgeniy has a Master's Degree in Physics, Information Technology; 15+ years of experience.